
Exploring dbt with Snowflake
In this article, we will see how to use dbt with Snowflake. dbt (data build tool) does the T in ELT (Extract, Load, …

Snowpipe is Snowflake’s continuous data ingestion service. Snowpipe loads data within minutes after files are added to a stage and submitted for ingestion. Currently there is not a consolidated dashboard in snowflake which shows the summary of Snowpipe. Copy history in Snowsight gives a dashboard for table level copy history. Table functions INFORMATION_SCHEMA.PIPE_USAGE_HISTORY and INFORMATION_SCHEMA.COPY_HISTORY has copy history but its available only for 14 days.
In this article, we will try to materialize data from PIPE_USAGE_HISTORY and COPY_HISTORY into a snowflake table and then visualize the Snowpipe copy history and usage history with the help of dbt macro and dbt models.
We will create a dbt model using data from table function PIPE_USAGE_HISTORY and COPY_HISTORY. Since this component is reusable, I have included them in the dbt package dbt-snow-utils.
Package consists of dbt macro get_snowpipe_details and dbt models with +tag:snowpipe
Macro get_snowpipe_details gets all Snowpipe and related target table information at account level
Models with tag +tag:snowpipe will load data into target incremental tables. Models have three layers named staging(views for data transformation), marts(materialize into table) and presentation(view for end users with necessary access controls)
Add the package into packages.yml of you dbt project
   - git: "https://github.com/entechlog/dbt-snow-utils.git"
     revision: 0.1.3
Please refer to the release version of this repo/dbt hub for the latest version. The version number mentioned above may not be the updated version number.
Install the package by running below command
dbt deps
Add the following variables under the vars section of dbt_project.yml. This allows to customize the data retrieval filters, edit them as needed. If you don’t need all pipes in account you can limit the databases in pipe_databases. Valid values are string “ALL” OR list of databases.
vars:
  dbt_snow_utils:
    pipe_databases: "ALL"
    filter_by_date:
    pipe_copy_history_filter_key: "hours"
    pipe_copy_history_filter_value: -168
    pipe_usage_history_filter_key: "day"
    pipe_usage_history_filter_value: -7
Add the following model configuration under the models section of dbt_project.yml. This allows to customize the target database and schema, edit them as needed
models:
  dbt_snow_utils:
    staging:
      database: "DEMO_DB"
      schema: staging
    marts:
      database: "DEMO_DB"
      schema: marts
    presentation:
      database: "DEMO_DB"
      schema: presentation
Make sure the ROLE used by your dbt project has below access in snowflake
-- Required to track the pipe usage
GRANT MONITOR USAGE ON ACCOUNT TO ROLE <dbt-role-name>;

GRANT USAGE ON DATABASE <db-name> TO ROLE <dbt-role-name>;
GRANT CREATE SCHEMA ON DATABASE <db-name> TO ROLE <dbt-role-name>;

-- Required for superset to access presentation layer
GRANT SELECT ON ALL VIEWS IN SCHEMA <db-name>.PRESENTATION TO ROLE <bi-role-name>;
Run the models using command
dbt run --select +tag:snowpipe
OR
dbt run --select +tag:snowpipe --vars '{"filter_by_date": "2022-03-22"}'
This should create two tables presentation.snowpipe__usage_history and presentation.snowpipe__copy_history which can be integrated with BI tools to build Snowpipe monitoring dashboards.
We will use Superset running in docker for this demo purpose. You can use other BI tools also to create similar dashboards. Dashboards shown here might not have all the information you are looking for but gives a good idea on how to use this data to get more insights and operational information about Snowpipes running in your account.
Clone repo superset-examples
cd into superset-snowflake directory and start Superset docker container. This will bring up Superset and initialize it
cd superset-snowflake
docker-compose up -d --build
Validate the status of docker containers by running docker-compose ps
Validate docker logs by running docker logs -f openssh-client. It would take a couple of minutes for Superset to come online.
Run below command if you see issue with initialize-superset.sh being a windows file
sudo find . -type f -exec dos2unix {} \;
The docker startup script will also import database connection and dashboard which was already exported using below commands.
# Export commands
superset export_datasources -f /tmp/databases.yml
superset export-dashboards -f /tmp/dashboards.yml
Navigate to Superset UI and login using admin/admin
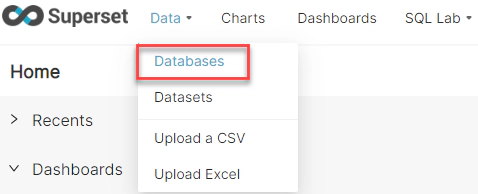
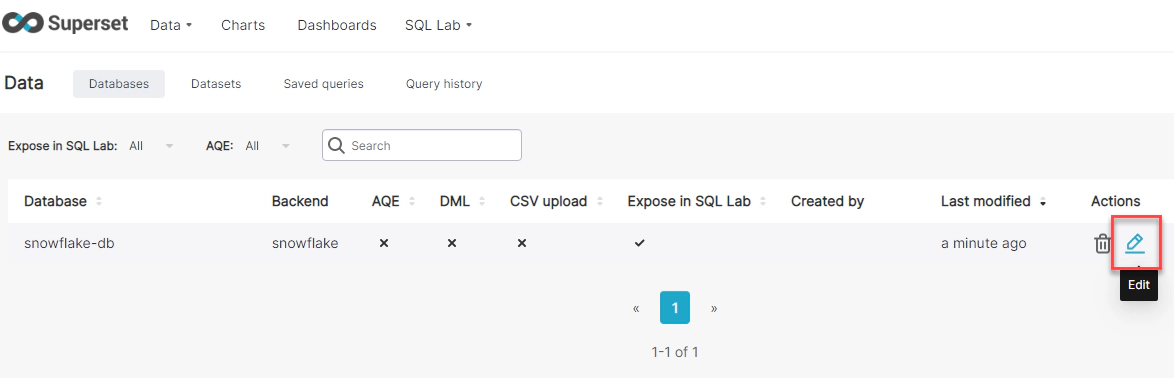
Navigate to Databases and click on database snowflake-db
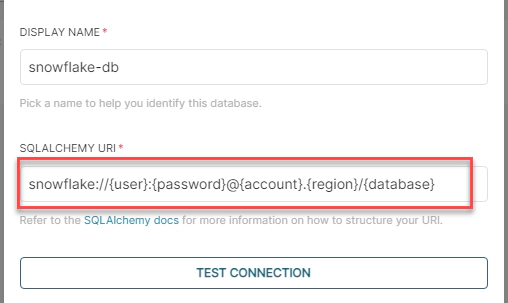
Update the connection string to point to Snowflake instance. The connection can have following variations based on your snowflake setup
snowflake://{user}:{password}@{account}.{region}/{database}

snowflake://{user}:{password}@{account}.{region}/{database}?role={role}&warehouse={warehouse}

snowflake://{user}:{password}@{account}.{region}/?authenticator={authenticator}&database={database}&role={role}&warehouse={warehouse}
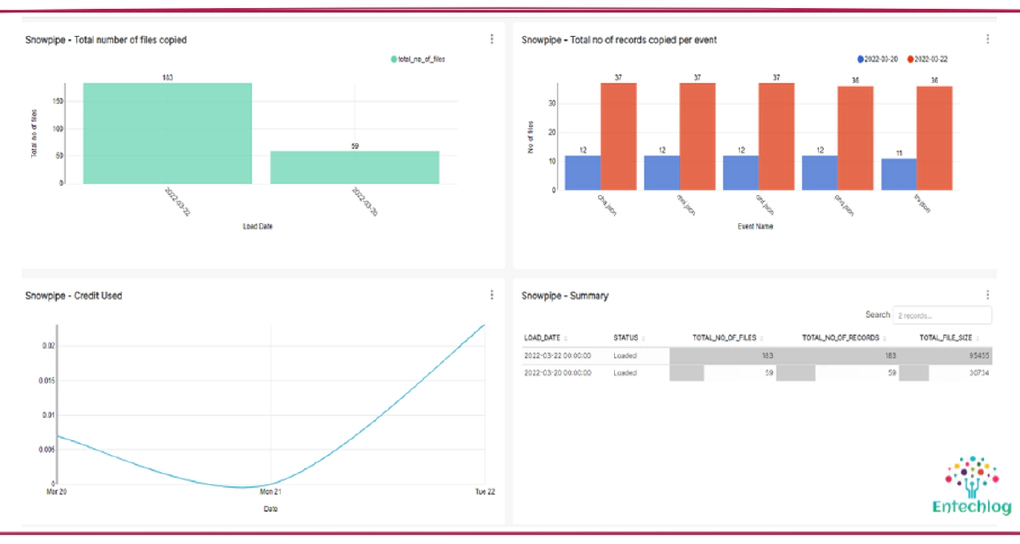
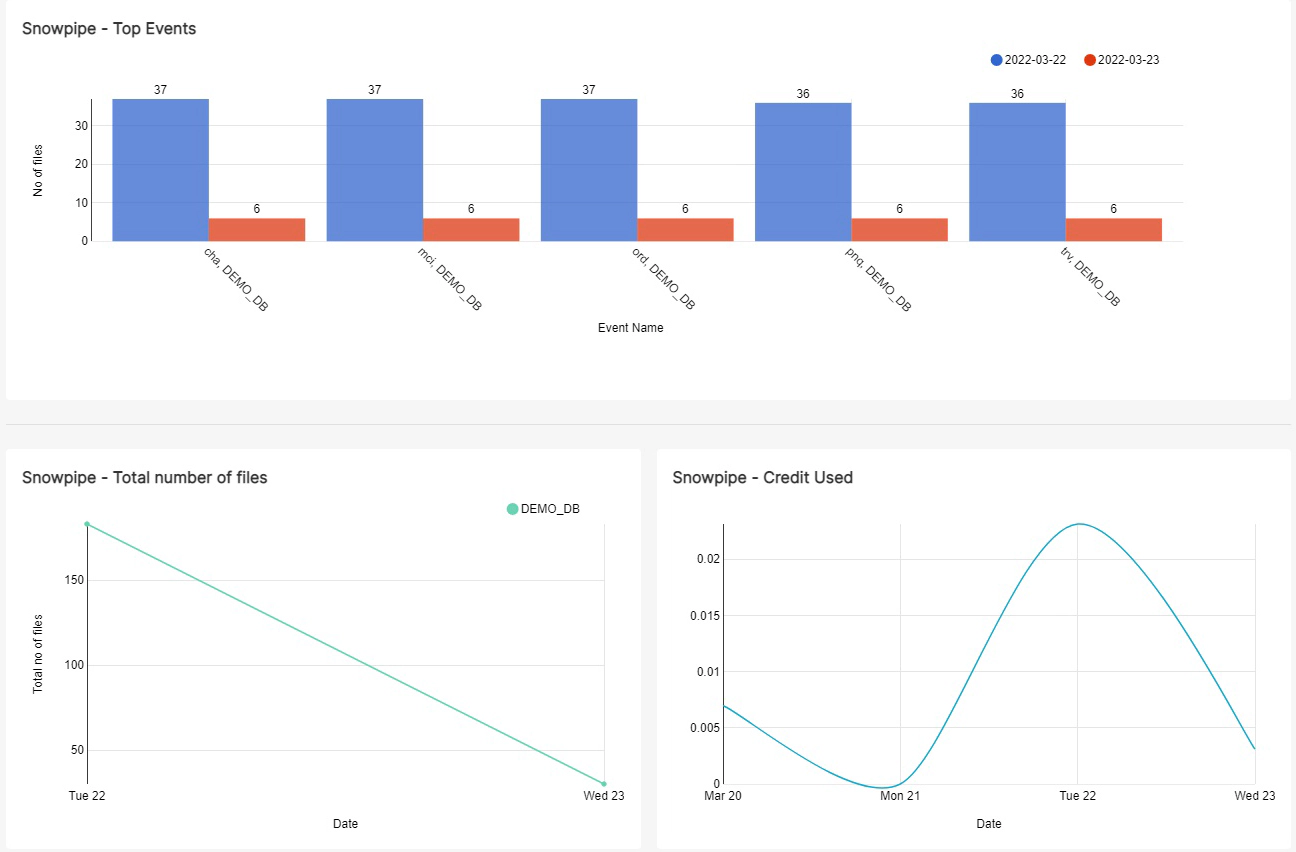
Navigate to Dashboards and click on Snowpipe monitoring dashboard

Here are some common Snowpipe statistics tracked by this Dashboard, you can customize the dashboard based on your needs
Open a new terminal and cd into superset-snowflake directory. Run the below command to delete the docker containers and related volumes
docker-compose down -v --remove-orphans
Hope this was helpful. Did I miss something ? Let me know in the comments.
In this article, we will see how to use dbt with Snowflake. dbt (data build tool) does the T in ELT (Extract, Load, …
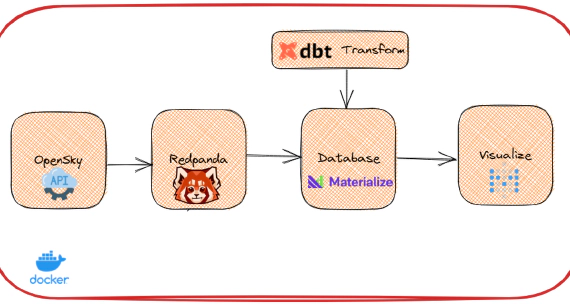
Materialize is a streaming database for real-time applications. Materialize accepts input data from a variety of …