Exploring XML In Snowflake
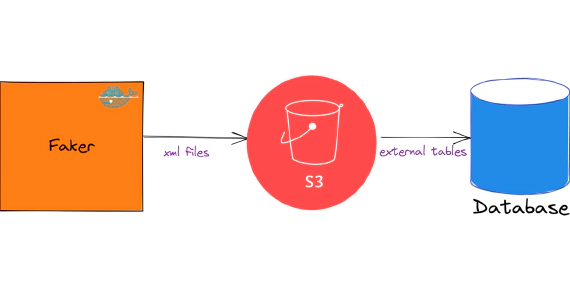
In this article, we will see how to load and use XML files in snowflake. Code used in this article can be found here. …
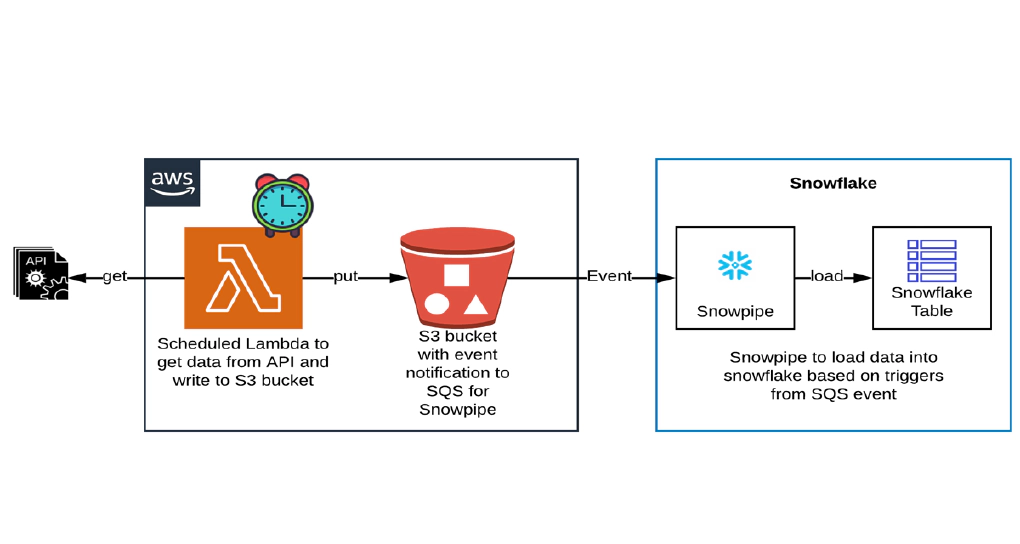

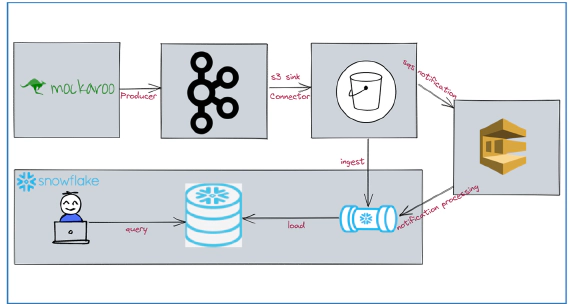
In this article, we will see how to get/pull data from an api, store in S3 and then stream the same data from S3 to Snowflake using Snowpipe. Code used in this article can be found here. Download the git repo to get started. To have stream of data, we will source weather data from wttr.
Snowpipe uses micro batches to load data into Snowflake. This solution works well for use cases to have data available in the target tables within ~5 minutes SLA.
We will see the steps to set up AWS SAM. Please skip next two sections before Create AWS resources if you have a machine with SAM configured and an IAM user with permissions required for SAM.
The access used for demo is pretty open, please adjust them as per your use case.
Security credentials tab of newly created IAM user and create an access key. The access key will be used by SAM to deploy the resources to AWS.Open a new terminal and cd into aws-tools directory. This directory contains Dockerfile and docker-compose.yml to bring up a docker container with AWS SAM.
Create a copy of .env.template as .env
Update the .env with the access key from previous step
Start aws-tools container by running
docker-compose up -d
Validate the container by running
docker ps
SSH into the container by running
docker exec -it aws-tools /bin/bash
Validate AWS CLI by running
aws --version
Validate AWS SAM by running
sam --version
Validate your AWS profile by running
aws configure list
You can also override the profile OR create a new profile at any point by running aws configure OR aws configure --profile <profile-name>
Let’s create following AWS resources required for this demo using AWS SAM.
✅ AWS Lambda to get data from API and write to an S3 bucket
✅ S3 bucket and bucket policy
✅ IAM role and policy for snowflake to read data from snowflake
SAM helps to create server less application that you can package and deploy in AWS Cloud. AWS Lambda function for pulling data from external API and writing files to S3 is written in python. Click the links below to review the code used in this demo
🔗 AWS Lambda(Python Module)
🔗 AWS SAM Template
cd in the SAM project directory sam-lambda-weather-data
cd /C/sam-lambda-weather-data/
cd into the SAM project directory and validate SAM project by running
sam validate
Build the SAM project by running
sam build
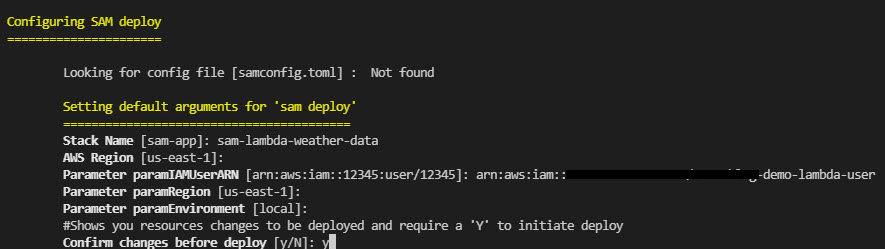
Deploy SAM project by running below command. IAM user for SAM is required for this step
sam deploy --guided --capabilities CAPABILITY_NAMED_IAM
Guided deployment option is best for first deploy. Make sure to keep a note of parameters and the managed S3 bucket name so they can be used in future non guided deployments.
Future deploys can be done using below command
sam deploy --stack-name sam-lambda-weather-data --s3-bucket <sam-bucket-name> --capabilities CAPABILITY_NAMED_IAM --parameter-overrides paramIAMUserARN="arn:aws:iam::<sam-user>"
Successful deployment will create the AWS resources. Navigate to Cloudformation and confirm the status

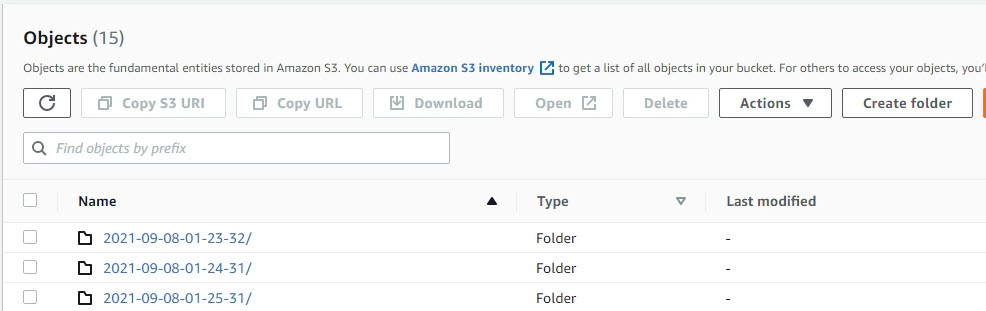
Navigate to S3 bucket and make sure our Lambda is producing weather data in the bucket.
Let’s create snowpipe and connect with S3 events to enable auto load of data every time we have new events in our S3 staging area.
Snowpipe is Snowflake’s continuous data ingestion service. Snowpipe loads data within minutes after files are added to a stage and submitted for ingestion.
Create the demo database
USE ROLE SYSADMIN;
CREATE OR REPLACE DATABASE DEMO_DB;
Create Schema
CREATE OR REPLACE SCHEMA DEMO_DB.SNOWPIPE;
Create storage integration.
Update STORAGE_AWS_ROLE_ARN using the output from cloudformation and STORAGE_ALLOWED_LOCATIONS with your s3 bucket details
USE ROLE ACCOUNTADMIN;
CREATE OR REPLACE STORAGE INTEGRATION WEATHER_S3_INT
TYPE = EXTERNAL_STAGE
STORAGE_PROVIDER = S3
ENABLED = TRUE
STORAGE_AWS_ROLE_ARN = 'iam-role'
STORAGE_ALLOWED_LOCATIONS = ('s3://sam-lambda-weather-data/');
Grant access to integration
GRANT ALL ON INTEGRATION WEATHER_S3_INT TO SYSADMIN;
Verify the Integration
USE ROLE SYSADMIN;
SHOW INTEGRATIONS;
Describe Integration and retrieve the AWS IAM User (STORAGE_AWS_IAM_USER_ARN and STORAGE_AWS_EXTERNAL_ID) for Snowflake Account
DESC INTEGRATION WEATHER_S3_INT;
Grant the IAM user permissions to access S3 Bucket. Navigate to IAM in AWS console, click Roles > click your role name from cloudformation output > click Trust relationships > click Edit trust relationship > Update the Principal with STORAGE_AWS_IAM_USER_ARN and sts:ExternalId with STORAGE_AWS_EXTERNAL_ID > click Update Trust Policy. Now we have replaced the temporary details which we gave when creating the role in cloudformation with the correct snowflake account and external ID.
Create file format for incoming files
CREATE OR REPLACE FILE FORMAT DEMO_DB.SNOWPIPE.WEATHER_FILE_FORMAT
TYPE = JSON COMPRESSION = AUTO TRIM_SPACE = TRUE NULL_IF = ('NULL', 'NULL');
Verify the File Format
SHOW FILE FORMATS;
Create stage for incoming files. Update URL with your S3 bucket details
CREATE OR REPLACE STAGE DEMO_DB.SNOWPIPE.WEATHER_S3_STG
STORAGE_INTEGRATION = WEATHER_S3_INT
URL = 's3://sam-lambda-weather-data/'
FILE_FORMAT = WEATHER_FILE_FORMAT;
Verify Stage
SHOW STAGES;
LIST @DEMO_DB.SNOWPIPE.WEATHER_S3_STG
Create target table for JSON data
CREATE
	OR REPLACE TABLE DEMO_DB.SNOWPIPE.WEATHER_RAW_TBL (
	FILE_PATH_NAME VARCHAR(16777216),
	FILE_NAME VARCHAR(16777216),
	FILE_ROW_NUMBER NUMBER(38, 0),
	FILE_TIMESTAMP TIMESTAMP_NTZ(9),
	FILE_DT DATE,
	FILE_HOUR NUMBER(38, 0),
	ETL_LOAD_DT DATE,
	ETL_LOAD_TIMESTAMP TIMESTAMP_NTZ(9),
	EVENT_NAME VARCHAR(16777216),
	EVENT VARIANT
	);
Create snowpipe to ingest data from STAGE to TABLE
CREATE
	OR REPLACE PIPE DEMO_DB.SNOWPIPE.WEATHER_SNOWPIPE AUTO_INGEST = TRUE AS COPY
INTO DEMO_DB.SNOWPIPE.WEATHER_RAW_TBL
FROM (
	SELECT replace(metadata$filename, split_part(metadata$filename, '/', - 1), '') AS file_path_name,
		split_part(metadata$filename, '/', - 1) AS file_name,
		metadata$file_row_number AS file_row_number,
		try_to_timestamp(left(metadata$filename, 19), 'YYYY-MM-DD-HH24-MI-SS') AS file_timestamp,
		try_to_date(left(metadata$filename, 10)) AS file_dt,
		hour(try_to_timestamp(left(metadata$filename, 19), 'YYYY-MM-DD-HH24-MI-SS')) AS file_hour,
		DATE (sysdate()) AS etl_load_dt,
		sysdate() AS etl_load_timestamp,
		split_part(split_part(split_part(metadata$filename, '/', - 1), '-', 1), '.', 1) AS event_name,
		$1::variant AS event
	FROM @DEMO_DB.SNOWPIPE.WEATHER_S3_STG
	);
Describe snowpipe and copy the ARN for notification_channel
SHOW PIPES LIKE '%WEATHER_SNOWPIPE%';
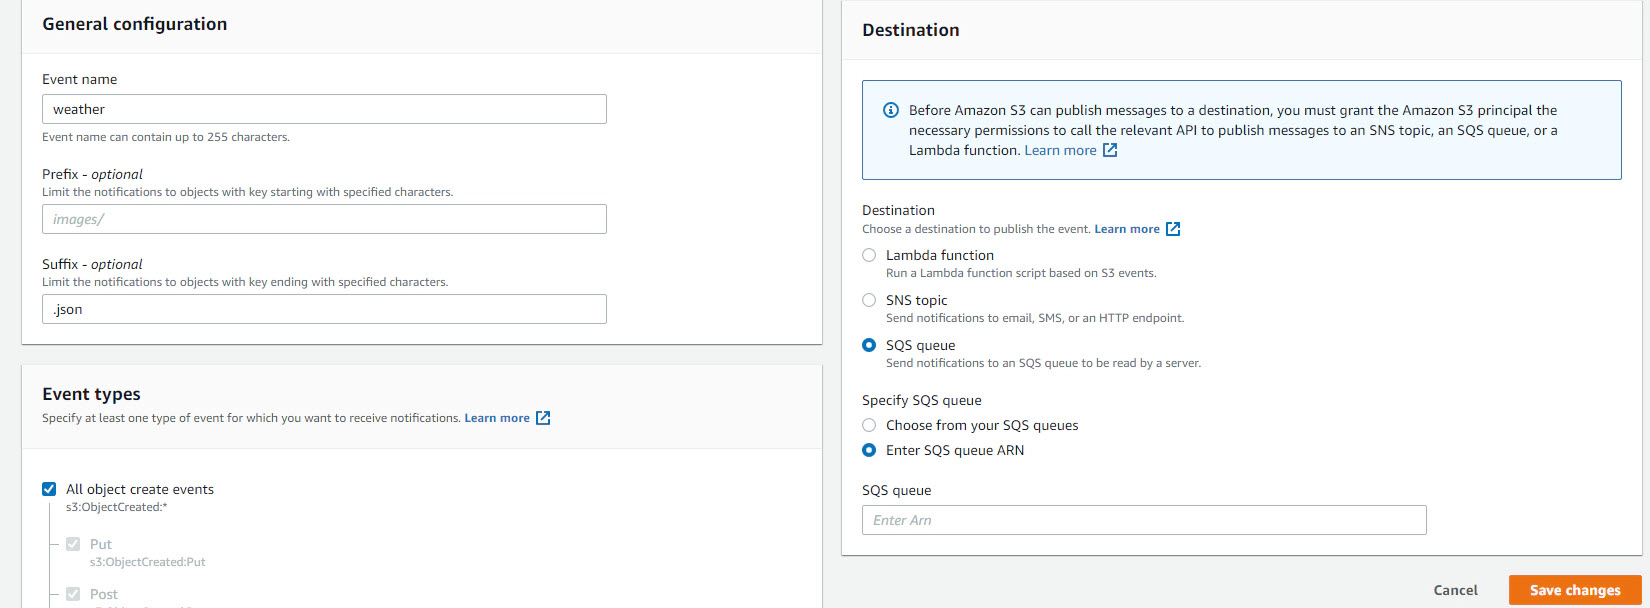
Now is the time to connect S3 and snowpipe. Navigate to Amazon S3 > click your bucket > click Properties > click Create event notification > Update Event name, Prefix and Suffix > Set Event types as All object create events > Update Destination as SQS queue and click Enter SQS queue ARN from the snowpipe
Validate the snowpipe status
SELECT SYSTEM$PIPE_STATUS('DEMO_DB.SNOWPIPE.WEATHER_SNOWPIPE');
Validate data in snowflake
SELECT * FROM DEMO_DB.SNOWPIPE.WEATHER_RAW_TBL;
This data in RAW tables can be further processed by streams and tasks enabling end to end stream processing. We could also create parsed table and load it directly from snowpipe.
Create Parsed table
CREATE
	OR REPLACE TABLE DEMO_DB.SNOWPIPE.WEATHER_PARSED_TBL (
	FILE_PATH_NAME VARCHAR(16777216),
	FILE_NAME VARCHAR(16777216),
	FILE_ROW_NUMBER NUMBER(38, 0),
	FILE_TIMESTAMP TIMESTAMP_NTZ(9),
	FILE_DT DATE,
	FILE_HOUR NUMBER(38, 0),
	ETL_LOAD_DT DATE,
	ETL_LOAD_TIMESTAMP TIMESTAMP_NTZ(9),
	EVENT_NAME VARCHAR(16777216),
	"LOCALOBSDATETIME" STRING,
	"TEMP_C" STRING,
	"TEMP_F" STRING,
	"FEELSLIKEC" STRING,
	"FEELSLIKEF" STRING,
	"WEATHERDESC" STRING
	);
Create snowpipe for Parsed table
CREATE OR REPLACE PIPE DEMO_DB.SNOWPIPE.WEATHER_PARSED_SNOWPIPE AUTO_INGEST = TRUE AS COPY
INTO DEMO_DB.SNOWPIPE.WEATHER_PARSED_TBL
FROM (
	SELECT replace(metadata$filename, split_part(metadata$filename, '/', - 1), '') AS file_path_name,
		split_part(metadata$filename, '/', - 1) AS file_name,
		metadata$file_row_number AS file_row_number,
		try_to_timestamp(left(metadata$filename, 19), 'YYYY-MM-DD-HH24-MI-SS') AS file_timestamp,
		try_to_date(left(metadata$filename, 10)) AS file_dt,
		hour(try_to_timestamp(left(metadata$filename, 19), 'YYYY-MM-DD-HH24-MI-SS')) AS file_hour,
		DATE (sysdate()) AS etl_load_dt,
		sysdate() AS etl_load_timestamp,
		split_part(split_part(split_part(metadata$filename, '/', - 1), '-', 1), '.', 1) AS event_name,
		$1:localObsDateTime AS LOCALOBSDATETIME,
		$1:temp_C AS TEMP_C,
		$1:temp_F AS TEMP_F,
		$1:FeelsLikeC AS FEELSLIKEC,
		$1:FeelsLikeF AS FEELSLIKEF,
		$1:weatherDesc [0] ['value'] AS WEATHERDESC
	FROM @DEMO_DB.SNOWPIPE.WEATHER_S3_STG
	);
Validate the snowpipe status
SELECT SYSTEM$PIPE_STATUS('DEMO_DB.SNOWPIPE.WEATHER_PARSED_SNOWPIPE');
Validate data
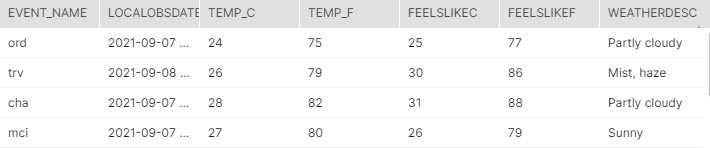
SELECT * FROM DEMO_DB.SNOWPIPE.WEATHER_PARSED_TBL ORDER BY ETL_LOAD_TIMESTAMP DESC;
Delete all AWS resources by running
aws cloudformation delete-stack --stack-name sam-lambda-weather-data
Delete all Snowflake resources by running
USE ROLE SYSADMIN;
DROP DATABASE DEMO_DB;
Pause pipe
ALTER PIPE DEMO_DB.SNOWPIPE.WEATHER_SNOWPIPE
SET PIPE_EXECUTION_PAUSED = TRUE;
Resume pipe
ALTER PIPE DEMO_DB.SNOWPIPE.WEATHER_SNOWPIPE
SET PIPE_EXECUTION_PAUSED = FALSE;
Truncate table and do a full reload
-- Truncate table
TRUNCATE TABLE DEMO_DB.SNOWPIPE.WEATHER_RAW_TBL;
-- Set pipe for refresh
ALTER PIPE DEMO_DB.SNOWPIPE.WEATHER_SNOWPIPE REFRESH;
Reload data for specific prefix
ALTER PIPE DEMO_DB.SNOWPIPE.WEATHER_SNOWPIPE REFRESH PREFIX='2021-09-08/';
Reload data for specific prefix from a specific timestamp
ALTER PIPE DEMO_DB.SNOWPIPE.WEATHER_SNOWPIPE REFRESH PREFIX='2021-09-08/' MODIFIED_AFTER='2021-09-08T15:30:00-00:00';
Check copy history for target table
USE DATABASE DEMO_DB;
USE SCHEMA SNOWPIPE;
SELECT *
FROM TABLE (information_schema.copy_history(table_name => 'WEATHER_RAW_TBL', start_time => dateadd(hours, -5, current_timestamp())));
Hope this was helpful. Did I miss something ? Let me know in the comments.
docker container ls -adocker-compose downdocker-compose down --volumesdocker rm $(docker ps -q -f status=exited)
In this article, we will see how to load and use XML files in snowflake. Code used in this article can be found here. …
In this article, we will see how to stream data from kafka to snowflake using S3 and Snowpipe. Code used in this article …