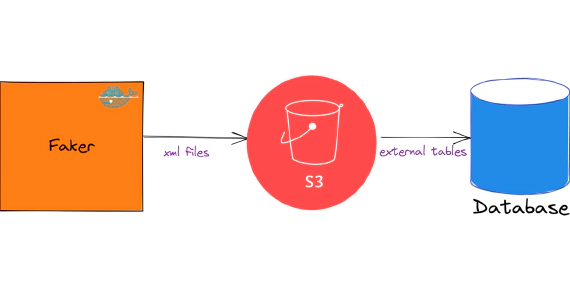
Exploring XML In Snowflake
In this article, we will see how to load and use XML files in snowflake. Code used in this article can be found here. …


Amazon Managed Streaming for Apache Kafka (Amazon MSK) is a managed service for Apache Kafka. In my previous article Integrating Kafka Connect With Amazon Managed Streaming for Apache Kafka (MSK) we looked into a few options to use Kafka connect with MSK. AWS launched MSK connect on Sep 16, 2021, managed service for Kafka connect, giving another option to use Kafka connect with Amazon managed Kafka clusters. In this article, we will see how to integrate MSK connect with Amazon Managed Streaming for Apache Kafka (MSK). Code used in this article can be found here. To have a stream of data for the demo, we will use Confluent Datagen Source Connector and Terraform to deploy all AWS resources.
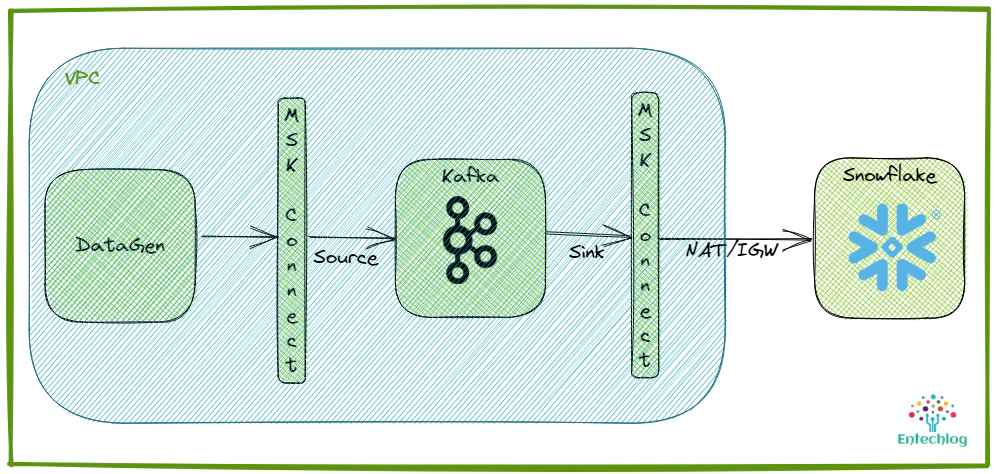
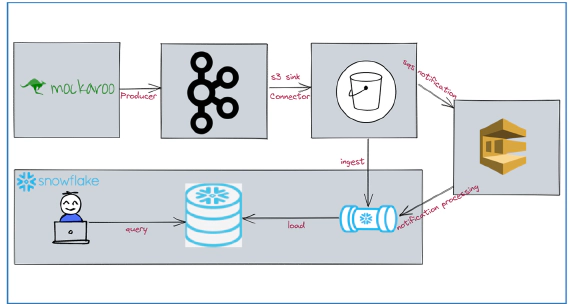
The idea here is to generate sample data using Datagen Source Connector and to sink the sample data into Snowflake using Snowflake Sink Connector. Snowflake lives outside our AWS VPC, hence we will need NAT Gateway and Internet Gateway to allow connection from MSK connect, which resides in our private subnet. This would be the simple setup for this demo, but we can also avoid using Internet Gateway using Private Link provided your source\targets support them. Snowflake requires business critical (or higher) tier for private link support.
Login into your AWS console and create an IAM user and access key required for CLI access. Access key will be used by Terraform to create the AWS resources
This user will need admin access to most of the services, So you could attach the managed policy AdministratorAccess OR attach the managed policy which grants full access to MSK, IAM, Secret manager, KMS
Before the connector can sink data to Snowflake, you need to generate a key pair. Snowflake authentication requires 2048-bit (minimum) RSA. You add the public key to a Snowflake user account. You add the private key to the connector configuration. Generate the key pair in the machine from which we are going to execute the steps.
Generate a private key using OpenSSL
openssl genrsa -out snowflake_key.pem 2048
Generate the public key referencing the private key
openssl rsa -in snowflake_key.pem -pubout -out snowflake_key.pub
Get the required part of public key
grep -v "BEGIN PUBLIC" snowflake_key.pub | grep -v "END PUBLIC"|tr -d '\r\n'`
Get the required part of private key
grep -v "BEGIN RSA PRIVATE KEY" snowflake_key.pem | grep -v "END RSA PRIVATE KEY"|tr -d '\r\n'`
Login into your Snowflake account and execute the following queries to create a user account and add the public key to this account
Switch to the SECURITYADMIN role
USE ROLE SECURITYADMIN;
Create Kafka user in Snowflake
CREATE USER dev_entechlog_kafka_user RSA_PUBLIC_KEY='<your-public-key>';
When using an existing user, you can also set the RSA key by doing an alter
ALTER USER "dev_entechlog_kafka_user" SET RSA_PUBLIC_KEY=''
Assign role for Kafka user
GRANT ROLE SYSADMIN TO USER dev_entechlog_kafka_user;
Using the SYSADMIN role for this demo, ideally you should create a custom role with required permissions only. See here for role naming best practices.
For the purpose of the demo we will use a docker container called developer-tools which has terraform and tools required for the demo.
git clone https://github.com/entechlog/developer-tools.git
cd into developer-tools directory and create a copy of .env.template as .env. Update .env with your access details (AWS_ACCESS_KEY_ID, AWS_SECRET_ACCESS_KEY, AWS_DEFAULT_REGION)
cd developer-tools
Start the container
docker-compose -f docker-compose-reg.yml up -d --build
Validate the containers by running
docker ps
SSH into the container
docker exec -it developer-tools /bin/bash
Validate terraform version and aws access by running below commands
terraform --version
aws kafka list-clusters
We will use terraform to create all AWS resources. Create AWS profile by running below command, this profile uses the same access key and secret as the one used to start the container
aws configure --profile terraform
If you prefer to use a different name for the profile, then update /terraform/providers.tf to reflect the same.
Repository has multiple Terraform modules and will grow overtime. This demo uses only the modules in /terraform/modules/network and /terraform/modules/msk. They are initiated and used by following configuration files, if you don’t need a specific resource just move them to /terraform/skip directory
| Configuration | Module | Description |
|---|---|---|
| terraform/network.tf | network | Configuration file to create required network |
| terraform/variables_required.tf | common | Common variables required for the functioning of the template |
| terraform/variables_network.tf | network | Variables required for creating a new network |
| terraform/variables_network_existing.tf | network | Variables required for using an existing network. Update the templates to use these variables instead of module.*.variable_name when working with an existing network |
| terraform/output_network.tf | network | Output from the network module |
| terraform/msk.tf | msk | Configuration file to create required MSK and MSK connect |
| terraform/variables_msk.tf | msk | Variables required for MSK and MSK connect |
| terraform/output_msk.tf | msk | Output from the MSK module |
We will need the following AWS network resources for this setup
| Resource | Description |
|---|---|
| VPC | Virtual Private Cloud (VPC), logically isolated virtual network for MSK and MSK connect |
| Subnets | Private and Public subnets |
| Security groups | Virtual firewall, controlling the traffic that is allowed to reach and leave the resources that it is associated with |
| NAT Gateway | NAT gateway helps instances in a private subnet to connect to services outside your VPC, MSK connect is launched in private subnet and need NAT gateway so it can connect to resources outside VPC |
| Internet Gateway | Allows communication between VPC and the internet |
| Route table | A route table contains a set of rules, called routes, that determine where network traffic from your subnet or gateway is directed |
Create a file named /terraform/terraform.tfvars and update it to specify values for all variables defined in /terraform/variables_required.tf and /terraform/variables_network.tf like region, availability zone and cidr block for VPC, private network, public subnet. This is required only if you prefer to use a value other than the default values. When using Terraform cloud, these variables can be defined in the UI. Here is an example entry in terraform.tfvars
aws_region = us-east-1
We will need the following AWS MSK resources for this setup
| Resource | Description |
|---|---|
| MSK cluster | Managed Apache Kafka service |
| MSK cluster configurations | Custom configurations which can be used in one OR more MSK clusters |
| MSK connect custom plugins | A plugin contains the code that defines the logic of the connector. Plugins are zip OR jar files, some open source connectors can be found in Confluent Hub, Aiven. Only one plugin can be referenced in a connect configuration, so if you need to use multiple jars then combine them into a single zip file |
| MSK connect worker configurations | Custom configurations which can be used in one OR more MSK connects |
| MSK connect | Managed Apache Kafka connect service |
Update /terraform/terraform.tfvars to specify values for all variables defined in /terraform/variables_msk.tf like the preferred specs for the MSK cluster and the Snowflake credentials
MSK connect will use IAM roles and associated policies to access other AWS resources, see /terraform/modules/msk/iam.tf for the list of required permissions. It requires following permissions
| AWS Resource | Purpose |
|---|---|
| S3 | To read the connect custom plugins |
| Kafka cluster | To read and write into Kafka topics |
| Secrets manager | To securely store connect credentials |
| KMS | To encrypt and decryption the MSK cluster and secrets manager data |
MSK connect worker configurations once created can’t be deleted as of the writing of this article, so choose the worker configuration name wisely
Connectors configuration UI will display any source OR target database credentials which could be a security risk. To mitigate this, credentials can be secured in AWS secret manager by using configuration providers
offset.storage.topic=__consumer_offsets
config.providers.secretManager.class=com.github.jcustenborder.kafka.config.aws.SecretsManagerConfigProvider
config.providers=secretManager
config.providers.secretManager.param.aws.region=${var.aws_region}
"snowflake.private.key"            = "$${secretManager:dev_entechlog_snowflake:private_key}",
"snowflake.private.key.passphrase" = "$${secretManager:dev_entechlog_snowflake:private_key_passphrase}",
Format the terraform templates by running
terraform fmt -recursive
Initialize the terraform templates by running
terraform init
Validate the execution plan for terraform template by running
terraform plan
Create resources by running
terraform apply
Instead of running each of the next commands manually, you can also run the command z_terraform_apply.sh. Before running this command, update the arn for each terraform import statements. We have to do terraform imports on aws_mskconnect_worker_configuration and aws_secretsmanager_secret since these services have certain limitations with delete operation.
The MSK cluster and MSK connect create process is going to take about 30 to 45 minutes to complete. In terms of Kafka resource provisioning, MSK is going to be one of the slowest compared to Confluent and Aiven Kafka cluster creation
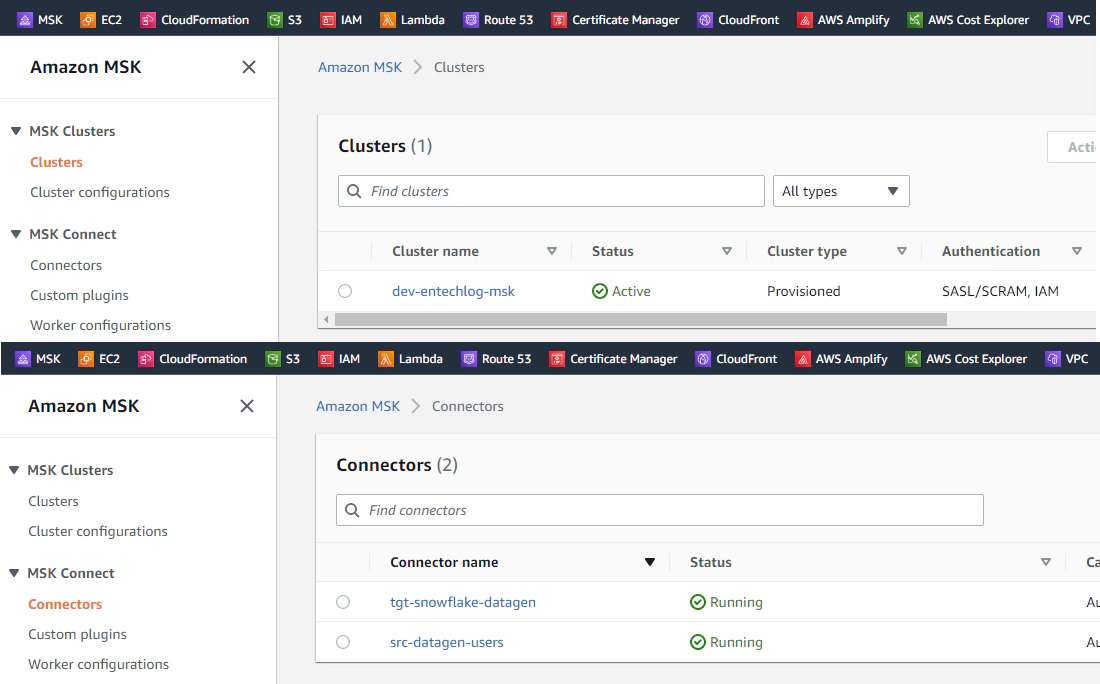
Check the status of cluster and connect by navigating to Amazon MSK > Clusters and Amazon MSK > Connectors
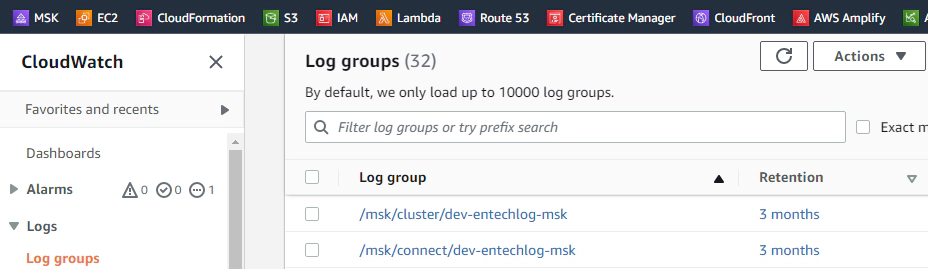
MSK and MSK connect logs are written to CloudWatch groups based on your project name and environment name configuration
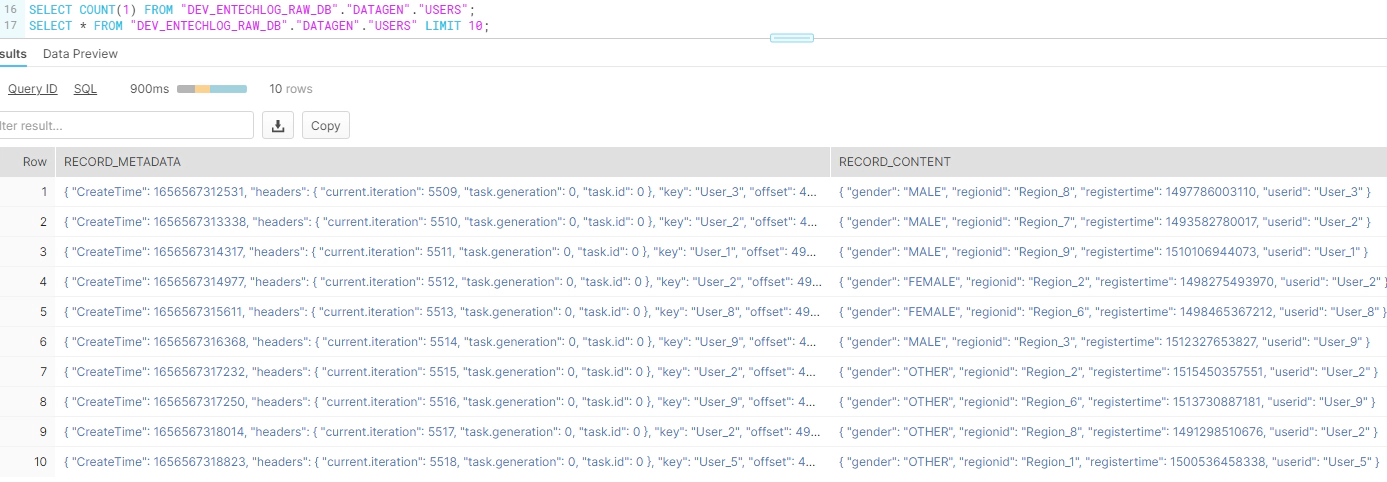
Query the target Snowflake table, as you see we have MSK connect sinking data to the target snowflake table
SELECT COUNT(1) FROM "DEV_ENTECHLOG_RAW_DB"."DATAGEN"."USERS";
SELECT * FROM "DEV_ENTECHLOG_RAW_DB"."DATAGEN"."USERS" LIMIT 10;
Delete MSK cluster and MSK connect by running the script. This script issues terraform state rm for aws_mskconnect_worker_configuration, aws_secretsmanager_secret and aws_kms_key to support recreation of these modules again if needed. You can also issue terraform destroy if you don’t plan to create these resources again with same name in near future
./z_terraform_destroy.sh
Run the below command to delete the docker containers and related volumes
## Developer Tools
docker-compose down -v --remove-orphans --rmi all
Hope this was helpful. Did I miss something ? Let me know in the comments.
docker container ls -adocker-compose downdocker-compose down --volumesdocker rm $(docker ps -q -f status=exited)
In this article, we will see how to load and use XML files in snowflake. Code used in this article can be found here. …
In this article, we will see how to stream data from kafka to snowflake using S3 and Snowpipe. Code used in this article …