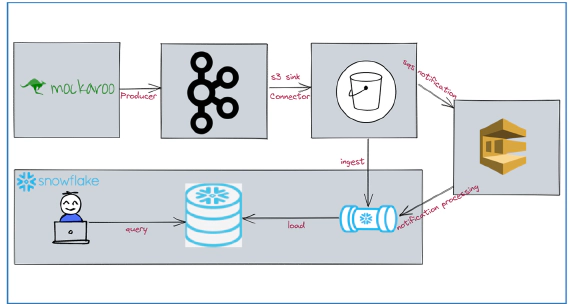
How To Stream Data From Kafka To Snowflake Using S3 and Snowpipe
In this article, we will see how to stream data from kafka to snowflake using S3 and Snowpipe. Code used in this article …
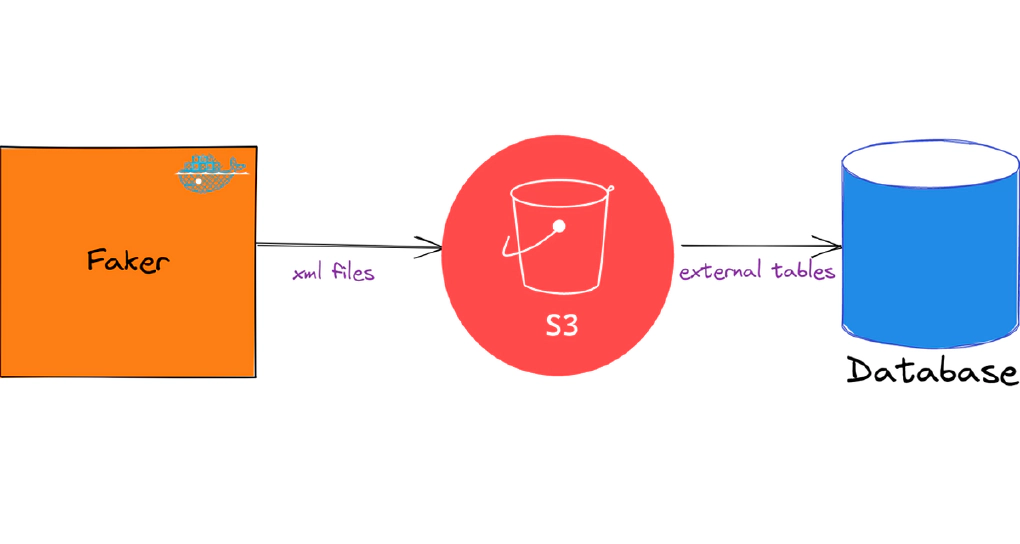

In this article, we will see how to load and use XML files in snowflake. Code used in this article can be found here. Download the folder to get started. We will use Faker to generate mock xml files.
Create s3 bucket which acts as the staging area for incoming files. To automate the bucket creation and IAM provisioning we will use an cloudformation template. This step can be skipped if you already have an s3 bucket with necessary access.
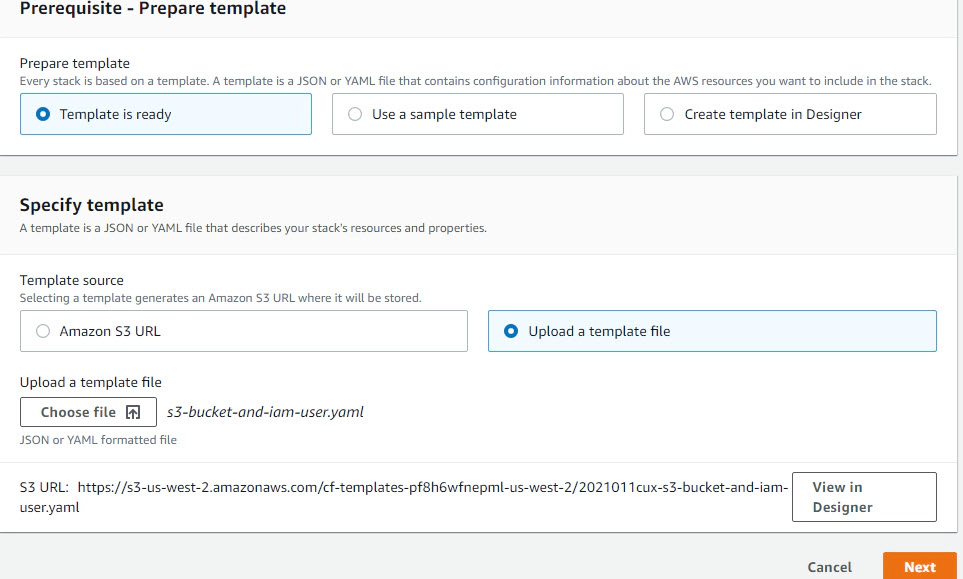
Login into AWS account, Navigate to CloudFormation and click Create stack > click Template is ready > click Choose file to upload the cloudformation template s3-bucket-and-iam-user.yaml
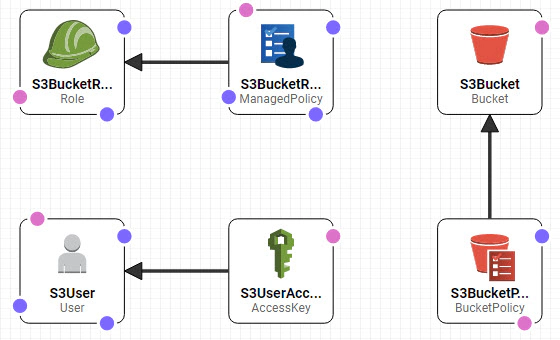
Optionally click View in Designer to verify the components which will be created. Here we are creating
⏩ S3 bucket and bucket policy
⏩ IAM user and policy for kafka to write the data to s3
⏩ IAM role and policy for snowflake to read data from snowflake
Click next > Give a Stack name (Stack name is bucket name as well) and your IAM User ARN (Temporary, we will change it after we create snowpipe) > click Next > click Next > click Create Stack after reviewing the information.
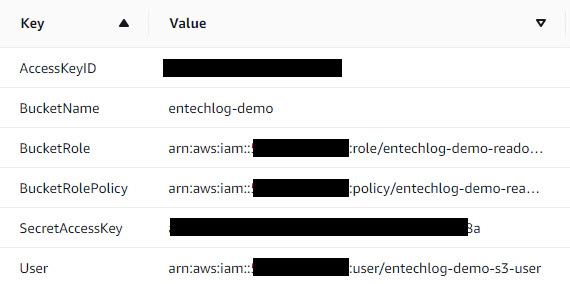
After few minutes you should see CREATE_COMPLETE message. Click output to view the access details for your bucket. Note it down as we would need it for next few steps
The docker-compose.yml will bring up Faker (Custom image with python module to write data to S3)
Create a copy of .env.template as .env and update it with S3 access details from cloudformation output.
Now we have all required artifacts and the next step to start the container to generate some xml files.
Start the application by running docker-compose up --remove-orphans -d --build in the directory with docker-compose.yml
Validate the status of docker containers by running docker-compose ps
Validate docker logs by running docker logs -f faker-datagen-xml
Faker will generate xml files in below format
<?xml version="1.0" ?>
  <all>
  	<username>alvaradopatricia</username>
  	<name>Kimberly Barker</name>
  	<sex>F</sex>
  	<address>677 Harris Plains Lawrenceton, ID 90391</address>
  	<mail>lori47@gmail.com</mail>
  	<birthdate>1947-08-19</birthdate>
  </all>
Validate data in S3 bucket
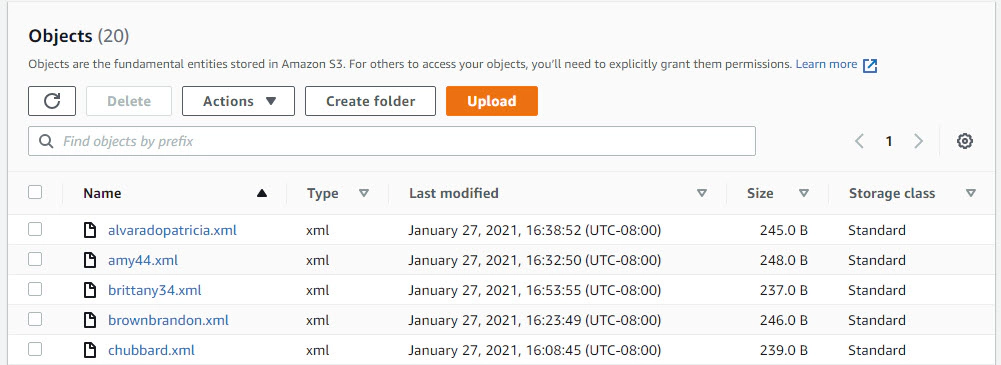
Now we have some xml files ready to be loaded into snowflake.
Create the demo database
USE ROLE SYSADMIN;
CREATE OR REPLACE DATABASE DEMO_DB;
Create Schema
CREATE OR REPLACE SCHEMA DEMO_DB.FAKER;
Create storage integration. Update STORAGE_AWS_ROLE_ARN using the output from cloudformation and STORAGE_ALLOWED_LOCATIONS with s3 bucket details
USE ROLE ACCOUNTADMIN;
CREATE OR REPLACE STORAGE INTEGRATION DATAGEN_XML_INT
TYPE = EXTERNAL_STAGE
STORAGE_PROVIDER = S3
ENABLED = TRUE
STORAGE_AWS_ROLE_ARN = 'iam-role'
STORAGE_ALLOWED_LOCATIONS = ('s3://entechlog-demo/snowflake-xml-demo/');
Describe Integration and retrieve the AWS IAM User (STORAGE_AWS_IAM_USER_ARN and STORAGE_AWS_EXTERNAL_ID) for Snowflake Account
DESC INTEGRATION DATAGEN_XML_INT;
Grant the IAM user permissions to access S3 Bucket. Navigate to IAM in AWS console, click Roles > click your role name from cloudformation output > click Trust relationships > click Edit trust relationship > Update the Principal with STORAGE_AWS_IAM_USER_ARN and sts:ExternalId with STORAGE_AWS_EXTERNAL_ID > click Update Trust Policy. Now we have replaced the temporary details which we gave when creating the role in cloudformation with the correct snowflake account and external ID.
Create file format for incoming files
CREATE OR REPLACE FILE FORMAT DEMO_DB.FAKER.DATAGEN_FILE_FORMAT
TYPE = XML COMPRESSION = AUTO;
Create stage for incoming files. Update URL with s3 bucket details
CREATE OR REPLACE STAGE DEMO_DB.FAKER.DATAGEN_S3_STG
STORAGE_INTEGRATION = DATAGEN_XML_INT
URL = 's3://entechlog-demo/snowflake-xml-demo/'
FILE_FORMAT = DATAGEN_FILE_FORMAT;
Verify STAGE and List files in STAGE
SHOW STAGES;
LIST @DEMO_DB.FAKER.DATAGEN_S3_STG;

Create external table for RAW XML
CREATE
	OR REPLACE EXTERNAL TABLE DEMO_DB.FAKER.DATAGEN_XML_RAW
	WITH LOCATION = @DEMO_DB.FAKER.DATAGEN_S3_STG FILE_FORMAT = DEMO_DB.FAKER.DATAGEN_FILE_FORMAT;
SELECT * FROM DEMO_DB.FAKER.DATAGEN_XML_RAW;
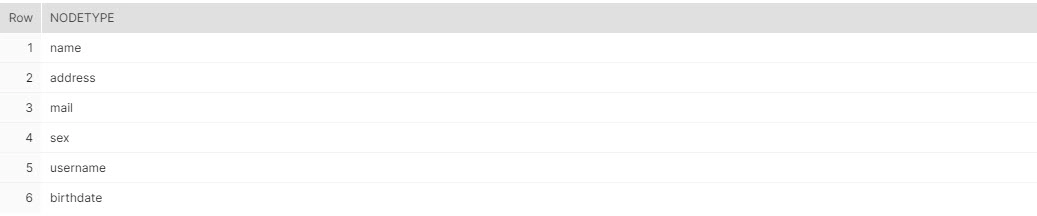
SELECT DISTINCT(GET(Elements.value, '@')::string) nodeType
FROM DEMO_DB.FAKER.DATAGEN_XML_RAW,
	LATERAL FLATTEN(GET(DEMO_DB.FAKER.DATAGEN_XML_RAW.VALUE, '$')) Elements;
Parse individual xml tags. XMLGET is a function to extract XML element object/tags, function requires following arguments
⏩ name of a variant column
⏩ name of xml tag
-- Query staging area
SELECT current_timestamp::TIMESTAMP log_ts
	,left(metadata$filename, 77) path_name
	,regexp_replace(metadata$filename, '.*\/(.*)', '\\1') file_name
	,metadata$file_row_number file_row_number
	,XMLGET($1, 'username'):"$"::string AS username
	,XMLGET($1, 'name'):"$"::string AS name
	,XMLGET($1, 'sex'):"$"::string AS sex
	,XMLGET($1, 'address'):"$"::string AS address
	,XMLGET($1, 'mail'):"$"::string AS mail
	,XMLGET($1, 'birthdate'):"$"::string AS birthdate
FROM @DEMO_DB.FAKER.DATAGEN_S3_STG;

-- Query RAW table
SELECT
   XMLGET( value, 'username' ):"$"::string AS username,
   XMLGET( value, 'name' ):"$"::string AS name,
   XMLGET( value, 'sex' ):"$"::string AS sex,
   XMLGET( value, 'address' ):"$"::string AS address,
   XMLGET( value, 'mail' ):"$"::string AS mail,
   XMLGET( value, 'birthdate' ):"$"::string AS birthdate
FROM DEMO_DB.FAKER.DATAGEN_XML_RAW;
Create parsed external table
CREATE OR REPLACE EXTERNAL TABLE DEMO_DB.FAKER.DATAGEN_XML_PARSED(
     log_ts timestamp as (current_timestamp::TIMESTAMP)
	,path_name varchar as (left(metadata$filename, 77))
	,file_name varchar as (regexp_replace(metadata$filename, '.*\/(.*)', '\\1'))
	,username varchar as (XMLGET($1, 'username'):"$"::string)
	,name varchar as (XMLGET($1, 'name'):"$"::string)
	,sex varchar as (XMLGET($1, 'sex'):"$"::string)
	,address varchar as (XMLGET($1, 'address'):"$"::string)
	,mail varchar as (XMLGET($1, 'mail'):"$"::string)
	,birthdate varchar as (XMLGET($1, 'birthdate'):"$"::string))
WITH LOCATION = @DEMO_DB.FAKER.DATAGEN_S3_STG
FILE_FORMAT = DEMO_DB.FAKER.DATAGEN_FILE_FORMAT
AUTO_REFRESH = TRUE;
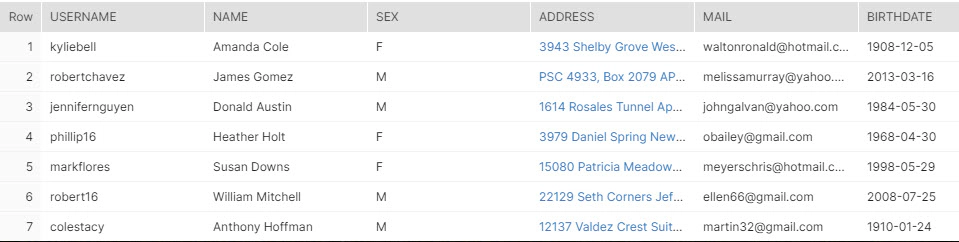
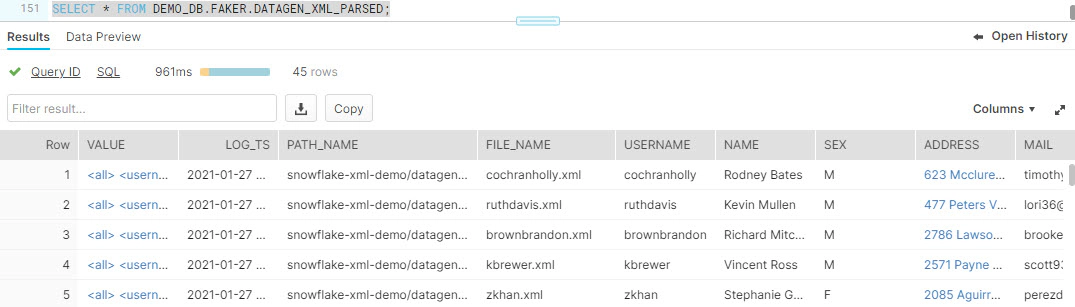
Validate data in parsed table
SELECT * FROM DEMO_DB.FAKER.DATAGEN_XML_PARSED;
Hope this was helpful. Did I miss something ? Let me know in the comments and I’ll add it in !
docker container ls -adocker-compose downdocker-compose down --volumesdocker rm $(docker ps -q -f status=exited)
In this article, we will see how to stream data from kafka to snowflake using S3 and Snowpipe. Code used in this article …
In this article, we will see how to integrate Kafka connect with Amazon Managed Streaming for Apache Kafka (MSK). Code …