
Load and analyze documents in Snowflake
In this article, we will see how to analyze documents in Snowflake database using Amazon Textract. Amazon Textract is a …


CloudWatch logs provide insight into logs from many AWS services, but third-party observability/application performance monitoring(APM) tools like DataDog, New Relic, Splunk, Sumo Logic enables to perform more sophisticated visualization, alerting, and analysis. Most often, the CloudWatch logs are exported to observability/application performance monitoring(APM) tools using a forwarder Lambda function. CloudWatch logs can also be exported to Snowflake for data analysis and audits.
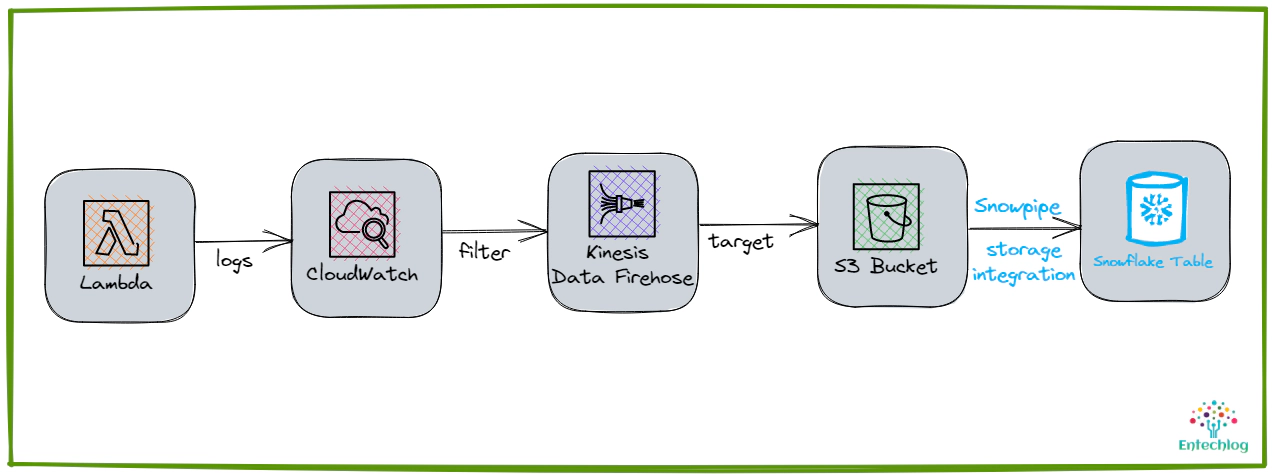
Learn how to stream AWS CloudWatch logs to Snowflake for easy data analysis. This article provides a step-by-step guide on how to set up the resources required to stream logs from CloudWatch to Snowflake using Terraform. Code used in this article can be found here. In this demo we will use an existing CloudWatch log group and setup CloudWatch log filters, AWS kinesis data firehose, S3 bucket, Snowflake storage integration and Snowpipe to ingest data into Snowflake. If you don’t have a need for near real time streaming, then streams and tasks or scheduled copy statements can be used to ingest the logs into Snowflake RAW layer.
All resource creation in AWS and Snowflake is done using Terraform. This blog assumes that you know the basics of Snowflake, AWS and Terraform.
Login into your AWS cloud account and navigate to IAM –> Users and create a new user, say terraform. This new user will be used by Terraform to create the AWS resources
Edit the permissions of the user and attach the policy AdministratorAccess directly to the user.
Attaching AdministratorAccess is for the ease of this demo. In an ideal scenario, you should only attach the required permission/policy to the terraform user.
Navigate to Security credentials of the IAM user and create a new access key with CLI access only
We will need a Snowflake user and role for Terraform to create the rest of the resources
Login into Snowflake and execute below SQL to create the user and role
-- Create role and grant required access for TF to operate
USE ROLE SECURITYADMIN;
CREATE ROLE IF NOT EXISTS ENTECHLOG_TF_ROLE;

CREATE USER IF NOT EXISTS ENTECHLOG_TF_USER DEFAULT_ROLE = ENTECHLOG_TF_ROLE;
GRANT ROLE ENTECHLOG_TF_ROLE TO USER ENTECHLOG_TF_USER;

GRANT CREATE ROLE ON ACCOUNT TO ROLE ENTECHLOG_TF_ROLE;
GRANT CREATE USER ON ACCOUNT TO ROLE ENTECHLOG_TF_ROLE;
GRANT MANAGE GRANTS ON ACCOUNT TO ROLE ENTECHLOG_TF_ROLE;

GRANT ROLE ENTECHLOG_TF_ROLE TO ROLE SECURITYADMIN;
GRANT ROLE ENTECHLOG_TF_ROLE TO ROLE SYSADMIN;

USE ROLE ACCOUNTADMIN;
GRANT CREATE INTEGRATION ON ACCOUNT TO ROLE ENTECHLOG_TF_ROLE;

USE ROLE SYSADMIN;
GRANT CREATE DATABASE ON ACCOUNT TO ROLE ENTECHLOG_TF_ROLE;
GRANT CREATE WAREHOUSE ON ACCOUNT TO ROLE ENTECHLOG_TF_ROLE;
For the purpose of the demo we will use a docker container called developer-tools which has Terraform and tools required for the demo. If you already have a machine with Terraform, AWS CLI then you can skip this step and proceed with Create resources using Terraform
git clone https://github.com/entechlog/developer-tools.git
cd into developer-tools directory and create a copy of .env.template as .env. For the purpose of demo, we don’t have to edit any variables
cd developer-tools
Start the container
docker-compose -f docker-compose-reg.yml up -d --build
Validate the containers by running
docker ps
SSH into the container
docker exec -it developer-tools /bin/bash
Validate terraform version by running below command
terraform --version
Create AWS profile named terraform by running the below command
aws configure
Update the account details with values from AWS account setup
Test the profile by running the command
aws sts get-caller-identity
AWS profile can be also configured by setting the environment variables AWS_DEFAULT_REGION, AWS_SECRET_ACCESS_KEY, AWS_ACCESS_KEY_ID with the value from AWS account setup
To stream the data from CloudWatch to Snowflake, we would need the following resources to be created in AWS
| Resource | Description |
|---|---|
| CloudWatch Logs subscription filters | Subscription filters are used to get real-time feed of log events from CloudWatch Logs to Kinesis Data Firehose. Within a log group, if we need only specific logs to be delivered to Firehose we can limit them using a filter pattern. Each log group can have up to two subscription filters associated with it |
| Kinesis Data Firehose | Amazon Kinesis Data Firehose is a fully managed service for delivering real-time streaming data to destinations such as Amazon S3 or to HTTP endpoints owned by third-party service providers, including Datadog, Dynatrace, LogicMonitor, New Relic, and Sumo Logic. Kinesis Data Firehose can also transform the data before delivering it to the destination |
| S3 bucket | S3 Bucket to store the CloudWatch Logs delivered by Kinesis Data Firehose |
| S3 bucket notification | Notify creation of new s3 objects to sqs queue used by Snowpipe for auto ingestion |
| IAM roles and policies | We would need multiple IAM roles and policies to make this integration work securely. 1) Role to deliver the logs from CloudWatch to Firehose 2) Role to deliver the logs from Firehose to S3 3) Role for Snowflake to read data from S3 |
Clone the snowflake-examples repo to get started
cd into snowflake-examples/snow-cloudwatch-logs/terraform/aws. This directory contains terraform files with the required resource definition to create AWS components
Terraform variables are defined inside a file called variables.tf. The values for variables are specified in terraform.tfvars for local runs. Create terraform.tfvars from terraform.tfvars.template and update with the details about Snowflake storage integration and Snowflake sqs queue for receiving the s3 bucket notification. During the initial run Snowflake integration details won’t be available, so they will be set to the default value
Create the resources by applying the terraform template
# install custom modules
terraform init -upgrade

# format code
terraform fmt -recursive

# plan to review the summary of changes
terraform plan

# apply the changes to target environment
terraform apply
Capture the output from this step, this will be used as input variables for the Snowflake deployment. You could also avoid this two-step deployment and try to get the values by reference
| Variable Name | Description |
|---|---|
| aws_iam_role__s3_to_snowflake_delivery_role__arn | IAM role used by snowflake to access the S3 bucket |
| aws_s3_bucket__cloudwatch_logs__id | S3 bucket name for creating the external stage in Snowflake |
To stream the data from CloudWatch to Snowflake, we would need the following resources to be created in Snowflake
| Resource | Description |
|---|---|
| Database & Schema | Snowflake database and schema for storing the RAW data |
| Storage Integration | Snowflake object to store generated identity and access management (IAM) entity for s3 |
| Stage | Snowflake stage to specify where data files are stored (i.e. “staged”) |
| File format | Snowflake file format to encapsulate information of data files, such as file type (CSV, JSON, etc.) |
| Table | Snowflake table to persist the RAW data from S3 |
| Snowpipe | Snowpipe to trigger the data ingestion copy statements based on file creation event in sqs |
cd into snowflake-examples/snow-cloudwatch-logs/terraform/snowflake. This directory contains terraform files with the required resource definition to create Snowflake components
Create terraform.tfvars from terraform.tfvars.template and update with the Snowflake account and database details. Here are the variables specific to storage integration
| Name | Description |
|---|---|
| snowflake_storage_integration__storage_allowed_locations | S3 location that storage integration will be allowed to access, this the s3 bucket path from the AWS terraform output |
| snowflake__aws_role_arn | IAM role name from AWS terraform output |
Create the resources by applying the terraform template
# install custom modules
terraform init -upgrade

# format code
terraform fmt -recursive

# plan to review the summary of changes
terraform plan

# apply the changes to target environment
terraform apply
Capture the output from this step, this will be used as input variables for the Snowflake deployment. You could also avoid this two-step deployment and try to get the values by reference
| Variable Name | Description |
|---|---|
| snowflake_pipe__notification_channel | This is the sqs queue which will be auto created when creating a snowpipe |
| snowflake_storage_integration__storage_aws_external_id | The external ID that is needed to establish a trust relationship. External ID is required to grant access to your AWS resources (i.e. S3) to a third party (i.e. Snowflake) |
| snowflake_storage_integration__storage_aws_iam_user_arn | The AWS IAM user created for Snowflake account. All S3 storage integrations use that IAM user |
To grant correct permissions to AWS resources, update the aws terraform variables in terraform.tfvars with the output from Snowflake and re-run the AWS terraform template. This should update AWS resources with correct ARN, external id and the notification channel.
After configuring the resources in AWS and Snowflake, to stream CloudWatch logs, generate some logs by triggering the lambda function OR by performing the action which would generate the required logs.
Validate the file format, states and integration by running below sql
USE DATABASE <database-name>;
USE SCHEMA <schema-name>;

-- validate stages
SHOW STAGES;
DESC STAGE <stage-name>;
LIST @<stage-name>;

-- validate data in stage
SELECT src.metadata$filename AS file_name,
  src.metadata$file_row_number AS file_row_number,
  src.metadata$file_content_key AS file_content_key,
  src.metadata$file_last_modified AS file_last_modified,
  src.metadata$start_scan_time,
  src.$1 AS cloudwatch_log
FROM @<stage-name> src;
Validate the snowpipe by running following sql
USE DATABASE <database-name>;
USE SCHEMA <schema-name>;
-- validate pipes
SHOW PIPES;
DESC PIPE <pipe-name>;
SELECT SYSTEM$PIPE_STATUS('<database-name>.<schema-name>.<pipe-name>');
-- validate copy history
SELECT *
FROM TABLE(information_schema.copy_history(TABLE_NAME=>'<database-name>.<schema-name>.<table-name>', START_TIME=> DATEADD(hours, -1, CURRENT_TIMESTAMP())));
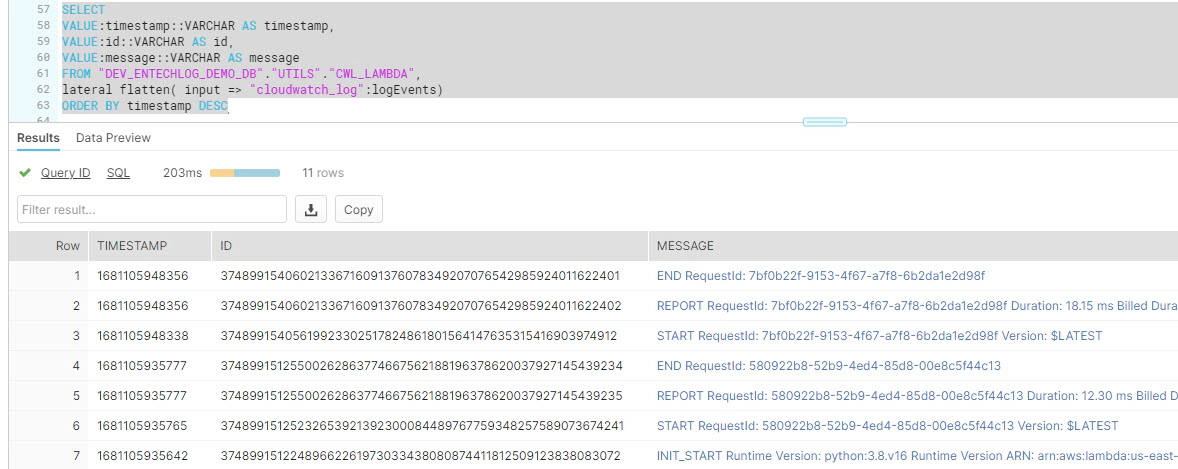
-- validate data in final table
SELECT * FROM <database-name>.<schema-name>.<table-name>;
SELECT
VALUE:timestamp::VARCHAR AS timestamp,
VALUE:id::VARCHAR AS id,
VALUE:message::VARCHAR AS message
FROM <database-name>.<schema-name>.<table-name>,
lateral flatten( input => "cloudwatch_log":logEvents)
ORDER BY timestamp DESC;
Hope this was helpful. Did I miss something ? Let me know in the comments.
This blog represents my own viewpoints and not of my employer, Snowflake. All product names, logos, and brands are the property of their respective owners.
In this article, we will see how to analyze documents in Snowflake database using Amazon Textract. Amazon Textract is a …

In this article, we will see how to get/pull data from an api, store in S3 and then stream the same data from S3 to …