
How to pull data from API using AWS Lambda & stream to Snowflake using Snowpipe
In this article, we will see how to get/pull data from an api, store in S3 and then stream the same data from S3 to …


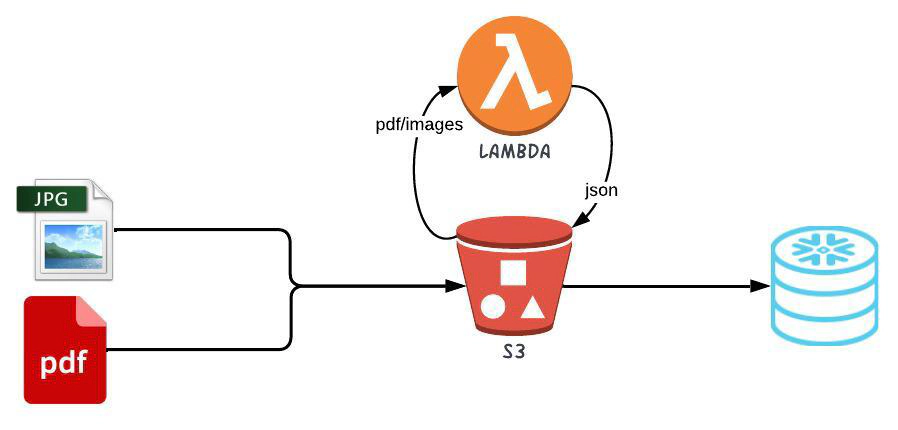
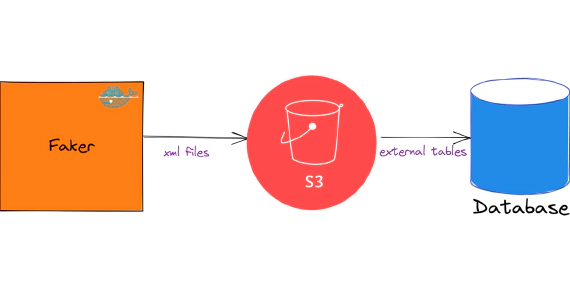
In this article, we will see how to analyze documents in Snowflake database using Amazon Textract. Amazon Textract is a machine learning (ML) service that automatically extracts text, handwriting, and data from scanned documents. Amazon Textract is not a free service and is charged based on number of pages processed. If you are looking for a cost-effective solution, then using python packages like PDFQuery, pdftotext, PyPDF2, tika, fitz could be an option. Code used in this article can be found here. High level design is to send documents to a s3 bucket, this action will trigger lambda functions required to convert the PDF files into json/xml documents. Finally, read the json/xml files in Snowflake using external stages and processing them as needed to extract meaningful data. Using lambda function gives the flexibility to use the language and PDF processing library of your choice, python/textract is used in this example.
All resource creation in AWS and Snowflake is done using Terraform. This blog assumes that you know the basics of Snowflake, AWS and Terraform.
Login into your AWS cloud account and navigate to IAM –> Users and create a new user, say ’terraform`. This new user will be used by Terraform to create the AWS resources
Edit the permissions of the user and attach the policy AdministratorAccess directly to the user.
Attaching AdministratorAccess is for the ease of this demo. In an ideal scenario, you should only attach the required permission/policy to the terraform user.
Navigate to Security credentials of the IAM user and create a new access key with CLI access only
We will need a Snowflake user and role for Terraform to create the rest of the resources
Login into Snowflake and execute below SQL to create the user and role
-- Create role and grant required access for TF to operate
USE ROLE SECURITYADMIN;
CREATE ROLE IF NOT EXISTS ENTECHLOG_TF_ROLE;

CREATE USER IF NOT EXISTS ENTECHLOG_TF_USER DEFAULT_ROLE = ENTECHLOG_TF_ROLE;
GRANT ROLE ENTECHLOG_TF_ROLE TO USER ENTECHLOG_TF_USER;

GRANT CREATE ROLE ON ACCOUNT TO ROLE ENTECHLOG_TF_ROLE;
GRANT CREATE USER ON ACCOUNT TO ROLE ENTECHLOG_TF_ROLE;
GRANT MANAGE GRANTS ON ACCOUNT TO ROLE ENTECHLOG_TF_ROLE;

GRANT ROLE ENTECHLOG_TF_ROLE TO ROLE SECURITYADMIN;
GRANT ROLE ENTECHLOG_TF_ROLE TO ROLE SYSADMIN;

USE ROLE ACCOUNTADMIN;
GRANT CREATE INTEGRATION ON ACCOUNT TO ROLE ENTECHLOG_TF_ROLE;

USE ROLE SYSADMIN;
GRANT CREATE DATABASE ON ACCOUNT TO ROLE ENTECHLOG_TF_ROLE;
GRANT CREATE WAREHOUSE ON ACCOUNT TO ROLE ENTECHLOG_TF_ROLE;
For the purpose of the demo we will use a docker container called developer-tools which has Terraform and tools required for the demo.
git clone https://github.com/entechlog/developer-tools.git
cd into developer-tools directory and create a copy of .env.template as .env. For the purpose of demo, we don’t have to edit any variables
cd developer-tools
Start the container
docker-compose -f docker-compose-reg.yml up -d --build
Validate the containers by running
docker ps
SSH into the container
docker exec -it developer-tools /bin/bash
Validate terraform version by running below command
terraform --version
Create AWS profile named terraform by running the below command
aws configure
Update the account details with values from AWS account setup
Test the profile by running the command
aws sts get-caller-identity
AWS profile can be also configured by setting the environment variables AWS_DEFAULT_REGION, AWS_SECRET_ACCESS_KEY, AWS_ACCESS_KEY_ID with the value from AWS account setup
Clone the snowflake-examples repo to get started
cd into snowflake-examples/snow-read-docs/terraform/aws. This directory contains terraform files with the required resource definition to create AWS components
Terraform variables are defined inside a file called variables.tf. The values for variables are specified in terraform.tfvars for local runs. Create terraform.tfvars from terraform.tfvars.template and update with the details about Snowflake storage integration. During the initial run Snowflake integration details won’t be available so will be set to the default value
Here is the list of resources that will be created in AWS
| Resource | Description |
|---|---|
| S3 bucket | S3 Bucket to store the documents |
| SNS topic | SNS topic to receive notification for each ObjectCreated in S3. We can trigger Lambda directly from S3, but only one lambda can be triggered. In this example we will fan out and make multiple Lambda calls, one to detect text and to write the response to S3, one to analyze text and to write the response to S3 |
| Lambda function | Lambda function to make Amazon Textract calls to detect and analyze texts in the documents. In this example, we are using two different function, so we can turn off the process as needed. See here for the python code behind this example |
| IAM role | IAM role used by Snowflake to connect to S3 |
Create the resources by applying the terraform template
# install custom modules
terraform init -upgrade

# format code
terraform fmt -recursive

# plan to review the summary of changes
terraform plan

# apply the changes to target environment
terraform apply
Capture the output from this step, this will be used as an input variable for the Snowflake deployment. You could also avoid this two-step deployment and try to get the values by reference
cd into snowflake-examples/snow-read-docs/terraform/snowflake. This directory contains terraform files with the required resource definition to create Snowflake components
Create terraform.tfvars from terraform.tfvars.template and update with the Snowflake account and database details. Here are the variables specific to storage integration
| Name | Description |
|---|---|
| snowflake_storage_integration__name | Name for storage integration to be created |
| snowflake_storage_integration__storage_allowed_locations | S3 location that storage integration will be allowed to access |
| aws_iam_role__arn | IAM role name from AWS terraform output |
Here is the list of resources that will be created in Snowflake
| Resource | Description |
|---|---|
| Database & Schema | Snowflake demo database and schema |
| Storage Integration | Snowflake object that stores generated identity and access management (IAM) entity for s3 |
| Stage | Stage specifies where data files are stored (i.e. “staged”) |
| File format | Snowflake file format encapsulates information of data files, such as file type (CSV, JSON, etc.) |
Create the resources by applying the terraform template
# install custom modules
terraform init -upgrade

# format code
terraform fmt -recursive

# plan to review the summary of changes
terraform plan

# apply the changes to target environment
terraform apply
Capture snowflake_storage_aws_iam_user_arn and snowflake_storage_aws_external_id from output and update them in terraform.tfvars file in AWS directory and re-run the AWS terraform template. This should update AWS resources with correct ARN and external id
After deploying both AWS and Snowflake resources, the next step is to trigger the lambda function. This can be done by copying PDF or images into the S3 bucket. See here for some sample pdf documents
For each s3:ObjectCreated s3 event, there will be an related SNS event which fans out and triggers the lambda functions for detecting and analyzing the documents. Idea here is one can have one or multiple lambda function based on the use case
Validate the file format, states and integration by running below sql
USE SCHEMA <database>.<schema>;

--List and check the file format
SHOW FILE FORMATS;

--List and check the storage integration
SHOW INTEGRATIONS;

-- List and check the stages
SHOW STAGES;

--List the files in s3 bucket/stage
LIST @DEMO_S3_STG;
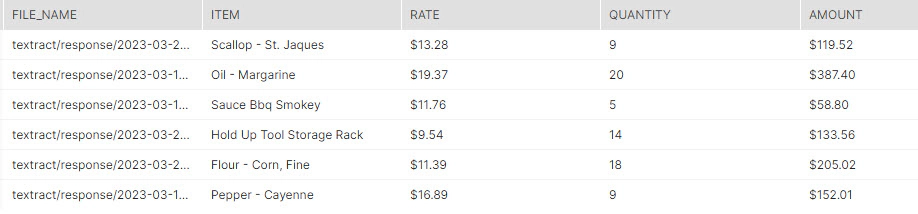
In this example both detect text and analyze text produces two output files. RAW response from textract and a parsed textract response. The reason for generating the parsed response file from lambda is to make the process to read them in Snowflake easier.
Here is an example on how to read the response of detect text in Snowflake
SELECT DISTINCT $1:"Line 0"::VARCHAR as invoice_to,
$1:"Line 1"||$1:"Line 2"::VARCHAR as invoice_number,
$1:"Line 4"::VARCHAR as invoice_date,
$1:"Line 7"::VARCHAR as invoice_balance_due
FROM @DEMO_S3_STG(pattern => '.*_detect_text_parsed_response.json');
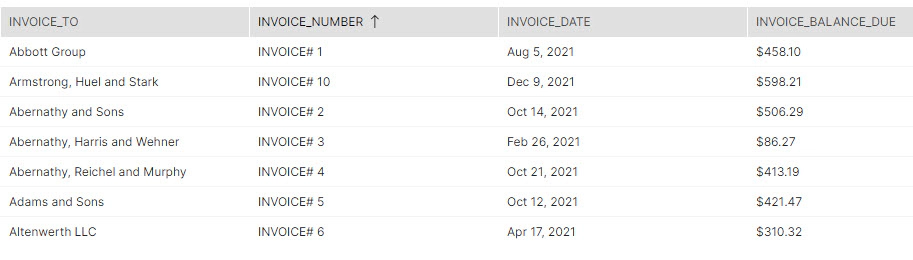
The sql to read the data correctly should be adjusted based on the pdf file format and data
Here is an example on how to read the response of analyze text in Snowflake
WITH col_key
AS (
  SELECT DISTINCT src.metadata$filename AS file_name,
    tbl.KEY AS table_name,
    rw.KEY AS row_name,
    cl.KEY AS column_name,
    cl.value::VARCHAR AS column_value
  FROM @DEMO_S3_STG(pattern => '.*_analyze_text_parsed_response.json') src,
    lateral flatten(input => src.$1 [1] ['tables']::VARIANT, OUTER => true) tbl,
    lateral flatten(input => tbl.value::VARIANT, OUTER => true) rw,
    lateral flatten(input => rw.value::VARIANT, OUTER => true) cl
  WHERE table_name = 'table_1'
    AND row_name = 'row_0'
    AND column_value IS NOT NULL
  ORDER BY table_name,
    row_name,
    column_name ASC
  ),
col_value
AS (
  SELECT DISTINCT src.metadata$filename AS file_name,
    tbl.KEY AS table_name,
    rw.KEY AS row_name,
    cl.KEY AS column_name,
    cl.value::VARCHAR AS column_value
  FROM @DEMO_S3_STG(pattern => '.*_analyze_text_parsed_response.json') src,
    lateral flatten(input => src.$1 [1] ['tables']::VARIANT, OUTER => true) tbl,
    lateral flatten(input => tbl.value::VARIANT, OUTER => true) rw,
    lateral flatten(input => rw.value::VARIANT, OUTER => true) cl
  WHERE table_name = 'table_1'
    AND row_name <> 'row_0'
    AND column_value IS NOT NULL
  ORDER BY table_name,
    row_name,
    column_name ASC
  ),
col_key_and_val
AS (
  SELECT cv.file_name,
    cv.table_name,
    cv.row_name,
    cv.column_name,
    ck.column_value AS column_key,
    cv.column_value
  FROM col_key ck
  INNER JOIN col_value cv ON ck.table_name = cv.table_name
    AND ck.column_name = cv.column_name
  )
SELECT file_name,
  MAX(CASE
      WHEN UPPER(TRIM(COLUMN_KEY)) IN (UPPER('Item'))
        THEN TRIM(COLUMN_VALUE)
      END) AS item,
  MAX(CASE
      WHEN UPPER(TRIM(COLUMN_KEY)) IN (UPPER('Rate'))
        THEN TRIM(COLUMN_VALUE)
      END) AS rate,
  MAX(CASE
      WHEN UPPER(TRIM(COLUMN_KEY)) IN (UPPER('Quantity'))
        THEN TRIM(COLUMN_VALUE)
      END) AS quantity,
  MAX(CASE
      WHEN UPPER(TRIM(COLUMN_KEY)) IN (UPPER('Amount'))
        THEN TRIM(COLUMN_VALUE)
      END) AS amount
FROM col_key_and_val
GROUP BY file_name,
  table_name,
  row_name
HAVING item IS NOT NULL
  AND item <> ''
AWS textract is a good choice for analyzing documents, but there are open source alternatives as well based on the use case. Choose the library to read document which fits your use case. If the document does not have complex objects likes hand written pages, tables, forms, etc., using an open source library like PyPDF2 to detect text could be a cost-effective solution, keeping the same design pattern for data ingestion.
Hope this was helpful. Did I miss something ? Let me know in the comments.
This blog represents my own viewpoints and not of my employer, Snowflake. All product names, logos, and brands are the property of their respective owners.
In this article, we will see how to get/pull data from an api, store in S3 and then stream the same data from S3 to …
In this article, we will see how to load and use XML files in snowflake. Code used in this article can be found here. …