
Cricket Analytics: Integrating Mage AI, dbt, Snowflake, and Superset
In this article, we’re diving into a data engineering demo project that’s all about bringing cricket player …


As data platforms grow, one of the most expensive patterns is duplicating raw data across multiple storage engines. If you have high-volume data landing in S3, you might be copying it into Snowflake’s managed storage, loading it into Redshift, and pointing Athena at it too. Each copy adds storage cost and ingestion overhead.
Apache Iceberg solves this by providing an open table format that sits on top of object storage. The data stays in S3 as Parquet files, and any engine that understands Iceberg can read it directly. Snowflake supports this through external Iceberg tables, which let you query S3 data without loading it into Snowflake’s managed storage.
In this article, we will set up Snowflake external volumes, catalog integration with AWS Glue, and Iceberg tables. We will also look at multiple ingestion methods to write Iceberg tables to S3 and demonstrate how the same data can be queried from both Snowflake and Athena.
All the code and configuration files used in this setup are available here: entechlog/snowflake-examples/snow-iceberg
Before diving into the setup, let’s understand why you would want this architecture.
In an ideal world, you would consolidate on a single query engine and avoid this problem entirely. But anyone who has worked in the data space long enough knows that is rarely the case. Teams adopt different tools for different use cases, acquisitions bring in new stacks, and sometimes a lightweight engine like Athena makes more sense for ad-hoc queries while Snowflake handles the heavy analytics. This approach is for those real-world scenarios where multiple engines are a fact of life.
The problem: In a traditional setup, raw data from sources like APIs, databases, and streaming platforms gets ingested into each analytics engine separately. If you use both Snowflake and Athena, you end up with two copies of the same raw data, each with its own ingestion pipeline, storage cost, and maintenance overhead.
The solution: Keep the raw data in S3 as Iceberg tables and let multiple engines read from the same location. Since Iceberg is an open table format, any engine that supports it (Snowflake, Athena, Spark, Trino, etc.) can read the same physical data files without any duplication.
AUTO_REFRESH = TRUE keeps the metadata in sync, there’s a small delay between when data lands in S3 and when Snowflake sees itThe demo uses three different ingestion methods to write Iceberg tables to S3 via the AWS Glue Catalog. All infrastructure is managed with Terraform.

| Layer | Components |
|---|---|
| Ingestion | Python/Faker, Kafka Connect (Datagen), Sling (PostgreSQL) |
| Storage | S3 bucket with Iceberg tables (Parquet format) organized by Glue database: faker.db/, datagen.db/, slingdata.db/ |
| Catalog | AWS Glue Data Catalog (manages Iceberg metadata, schema, partitions) |
| Query Engines | Snowflake (External Iceberg Tables), Amazon Athena |
| Method | Source | Glue DB | Tables | Snowflake | Details |
|---|---|---|---|---|---|
| Python Generator | Faker library | faker |
customers, orders, products, event_logs | Yes | ingestion/python/ |
| Kafka Connect | Datagen connector | datagen |
customers | Yes | ingestion/kafka-connect/ |
| Slingdata | PostgreSQL | slingdata |
customers, orders | Athena only | ingestion/slingdata/ |
Each ingestion method writes to its own Glue database and Snowflake schema, keeping source systems isolated.
Before getting started, make sure you have the following:
The Terraform in this demo creates the external volume, catalog integration, and Iceberg tables, but it expects the Snowflake database and schemas to already exist. If you are following along without deploying the full snow-infra setup, run the following SQL in Snowflake to create the required objects. Replace <env_code> and <project_code> with your values (e.g., DEV and ENTECHLOG):
-- Create the RAW database
CREATE DATABASE IF NOT EXISTS <env_code>_<project_code>_RAW_DB;

-- Create schemas for each ingestion source
CREATE SCHEMA IF NOT EXISTS <env_code>_<project_code>_RAW_DB.FAKER;
CREATE SCHEMA IF NOT EXISTS <env_code>_<project_code>_RAW_DB.DATAGEN;
CREATE SCHEMA IF NOT EXISTS <env_code>_<project_code>_RAW_DB.SLINGDATA;
The env_code and project_code values here should match what you set in your terraform.tfvars. The Terraform uses these to construct resource names like {ENV_CODE}_{PROJECT_CODE}_RAW_DB, {ENV_CODE}_{PROJECT_CODE}_RAW_EXTERNAL_VOLUME, etc. Throughout this blog, we use DEV and ENTECHLOG as examples, but you should replace these with your own values.
Before setting up the infrastructure, let’s understand the three Snowflake components that make this work.
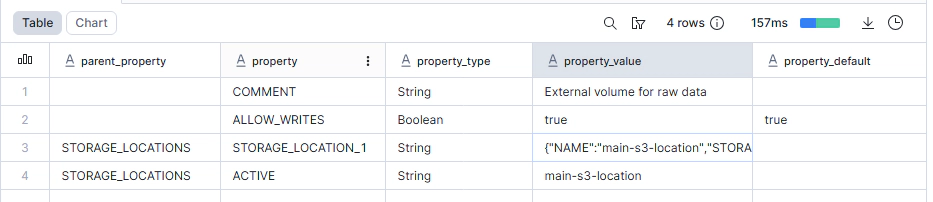
An external volume tells Snowflake where to find data in S3. It defines the S3 bucket location and the IAM role Snowflake assumes to access it:
CREATE EXTERNAL VOLUME <env_code>_<project_code>_RAW_EXTERNAL_VOLUME
  STORAGE_LOCATIONS = ((
    NAME = 'main-s3-location'
    STORAGE_PROVIDER = 'S3'
    STORAGE_BASE_URL = 's3://<your-s3-bucket>/'
    STORAGE_AWS_ROLE_ARN = 'arn:aws:iam::<account_id>:role/<your-iam-role>'
  ))
  ALLOW_WRITES = TRUE;
The catalog integration connects Snowflake to the AWS Glue Data Catalog, which tracks Iceberg table metadata (schema, partitions, file locations):
CREATE CATALOG INTEGRATION <env_code>_<project_code>_ICEBERG_CATALOG_INT
  CATALOG_SOURCE = GLUE
  TABLE_FORMAT = ICEBERG
  CATALOG_NAMESPACE = '<glue_database_name>'
  GLUE_AWS_ROLE_ARN = 'arn:aws:iam::<account_id>:role/<your-iam-role>'
  GLUE_CATALOG_ID = '<aws_account_id>'
  GLUE_REGION = '<aws_region>'
  ENABLED = TRUE;
The Iceberg table ties everything together. It references the external volume for data location, the catalog integration for metadata, and the specific Glue database/table:
CREATE ICEBERG TABLE <env_code>_<project_code>_RAW_DB.FAKER.CUSTOMERS
  EXTERNAL_VOLUME = '<env_code>_<project_code>_RAW_EXTERNAL_VOLUME'
  CATALOG = '<env_code>_<project_code>_ICEBERG_CATALOG_INT'
  CATALOG_TABLE_NAME = 'customers'
  CATALOG_NAMESPACE = 'faker'
  AUTO_REFRESH = TRUE;
With AUTO_REFRESH = TRUE, Snowflake continuously polls the external Iceberg catalog (default every 30 seconds) to synchronize metadata with the latest changes in S3. This means new data files written by the ingestion pipelines are automatically picked up without manual refresh.
In this demo, Terraform handles the creation of all these resources. The SQL above is shown for understanding what gets created under the hood.
The Terraform configuration creates all the AWS and Snowflake resources needed. Due to a chicken-and-egg dependency between Snowflake and AWS IAM, this requires multiple applies.
Clone the repository and configure your variables:
git clone https://github.com/entechlog/snowflake-examples.git
cd snowflake-examples/snow-iceberg/terraform
cp terraform.tfvars.example terraform.tfvars
Edit terraform.tfvars with your Snowflake and AWS settings. Make sure create_iceberg_tables = false for the first apply:
env_code     = "DEV"
project_code = "ENTECHLOG"

snowflake_organization_name = "your-org"
snowflake_account_name      = "your-account"
snowflake_username          = "your-username"
snowflake_password          = "your-password"

create_iceberg_tables = false
Run the first apply:
terraform init
terraform apply
This creates the S3 bucket, IAM roles, Snowflake external volume, catalog integration, and storage integration.
After the first apply, run these commands in Snowflake to get the IAM user ARNs and external IDs:
-- Replace <env_code> and <project_code> with your values (e.g., DEV and ENTECHLOG)
DESC EXTERNAL VOLUME <env_code>_<project_code>_RAW_EXTERNAL_VOLUME;
DESC STORAGE INTEGRATION <env_code>_<project_code>_RAW_STORAGE_INT;
DESC CATALOG INTEGRATION <env_code>_<project_code>_ICEBERG_CATALOG_INT;
Add the Snowflake identifiers to your terraform.tfvars:
external_volume_snowflake_iam_user_arn = "arn:aws:iam::..."
external_volume_aws_external_id       = "..."

storage_integration_snowflake_iam_user_arn = "arn:aws:iam::..."
storage_integration_aws_external_id       = "..."

catalog_integration_snowflake_iam_user_arn = "arn:aws:iam::..."
catalog_integration_aws_external_id       = "..."
Re-apply to update the IAM trust policies:
terraform apply
Run this in Snowflake to confirm the connection is working:
SELECT SYSTEM$VERIFY_EXTERNAL_VOLUME('<env_code>_<project_code>_RAW_EXTERNAL_VOLUME');
You should see SUCCESS in the result.

Lake Formation controls access to Glue Catalog resources. The Terraform already grants DESCRIBE and SELECT permissions to the Snowflake IAM role, but you need to ensure your IAM user is a Lake Formation admin first:
aws lakeformation put-data-lake-settings \
  --data-lake-settings '{"DataLakeAdmins":[{"DataLakePrincipalIdentifier":"arn:aws:iam::YOUR_ACCOUNT_ID:user/YOUR_USERNAME"}]}'
If you plan to query the same tables from Athena, the IAM user or role used by Athena also needs Lake Formation permissions. Without explicit SELECT grants, Athena will show the error COLUMN_NOT_FOUND: Relation contains no accessible columns even though the table is visible.
You can grant Athena access via the Lake Formation console or CLI. Repeat this for each Glue database (faker, datagen, slingdata) that you want to query from Athena:
aws lakeformation grant-permissions \
  --principal '{"DataLakePrincipalIdentifier":"arn:aws:iam::YOUR_ACCOUNT_ID:user/YOUR_ATHENA_USER"}' \
  --resource '{"Table":{"DatabaseName":"faker","TableWildcard":{}}}' \
  --permissions '["SELECT","DESCRIBE"]'
The demo covers multiple ways to create Iceberg tables to reflect real-world use cases: PyIceberg (code-based ingestion), Kafka Connect (streaming), and Slingdata (database replication). For following along with this blog, running just one of these is sufficient.
If you just want to get to the Snowflake Iceberg table setup quickly, the Python generator is the simplest option since it has no external dependencies beyond AWS credentials.
First, configure the shared environment file:
cd snowflake-examples/snow-iceberg/ingestion
cp .env.template .env
Update the .env file with your AWS credentials:
AWS_ACCESS_KEY_ID=your-access-key
AWS_SECRET_ACCESS_KEY=your-secret-key
AWS_REGION=us-east-1
S3_BUCKET_NAME=your-bucket-name
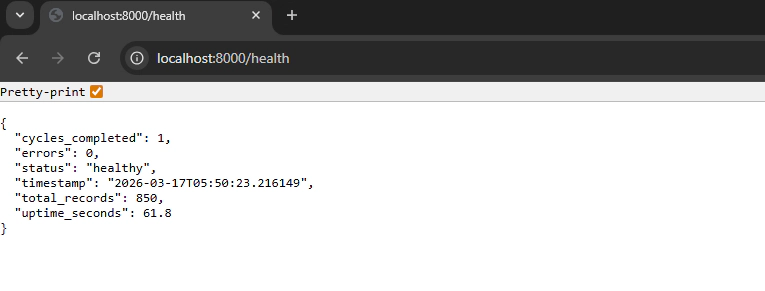
This method uses a Python application with the Faker library to continuously generate realistic data and write it as Iceberg tables to S3:
cd ingestion/python
docker compose up -d
The generator creates four tables (customers, orders, products, event_logs) in the faker Glue database. It uses PyIceberg to handle schema evolution, partitioning by event_date, and writing Parquet files to S3.
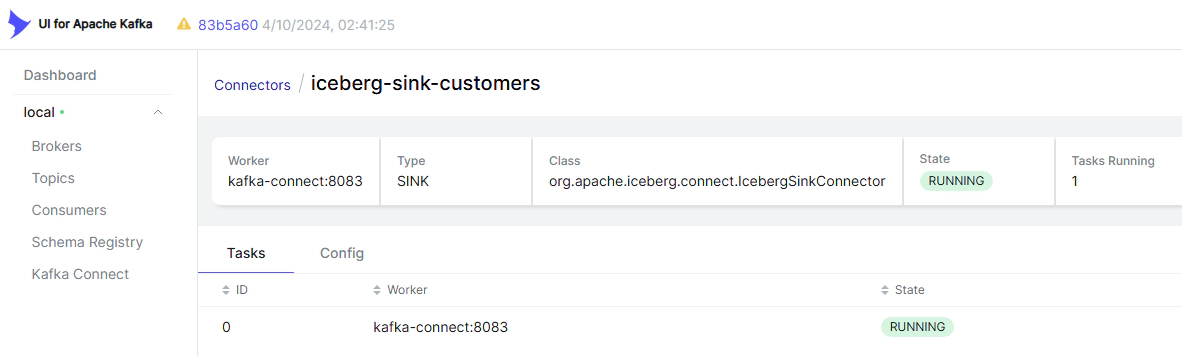
This method uses a Datagen source connector to produce streaming data and an Iceberg sink connector to write it to S3:
cd ingestion/kafka-connect
docker compose up -d
# Wait for services to start, then deploy connectors
./deploy-connectors.sh
This creates a customers table in the datagen Glue database.
This method uses Slingdata to replicate data from PostgreSQL to S3 as Iceberg tables:
cd ingestion/slingdata
docker compose up -d
This creates customers and orders tables in the slingdata Glue database.
The Slingdata tables currently work with Athena but not with Snowflake due to an iceberg-go manifest compatibility issue. This is a known limitation tracked in the demo repository.
Once the ingestion methods have run and data exists in S3, create the Snowflake Iceberg tables:
cd terraform
# Update terraform.tfvars
# create_iceberg_tables = true

terraform apply
This creates the external Iceberg tables in Snowflake for each source system and table defined in the iceberg_tables variable:
iceberg_tables = {
  faker = [
    "customers",
    "orders",
    "products",
    "event_logs"
  ]
  datagen = [
    "customers"
  ]
}
Now you can query the Iceberg tables directly in Snowflake:
-- Replace <env_code>_<project_code> with your values (e.g., DEV_ENTECHLOG)
-- Faker data
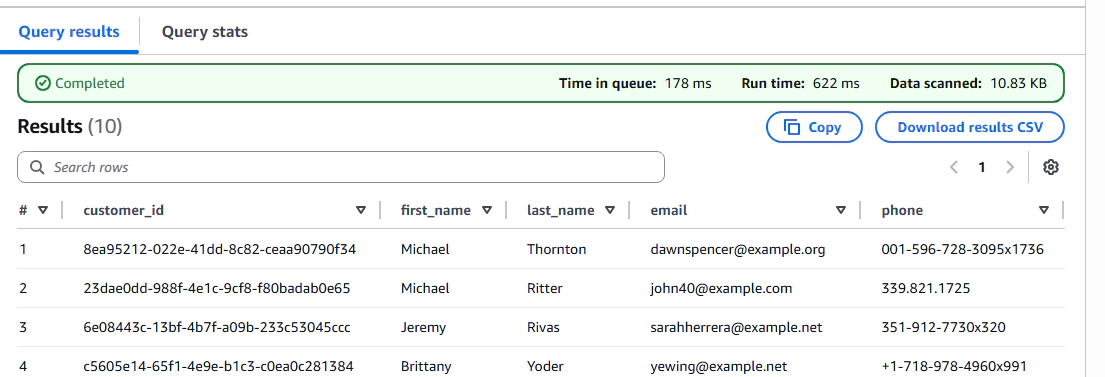
SELECT * FROM <env_code>_<project_code>_RAW_DB.FAKER.CUSTOMERS LIMIT 10;
SELECT * FROM <env_code>_<project_code>_RAW_DB.FAKER.ORDERS LIMIT 10;
-- Kafka Connect data
SELECT * FROM <env_code>_<project_code>_RAW_DB.DATAGEN.CUSTOMERS LIMIT 10;
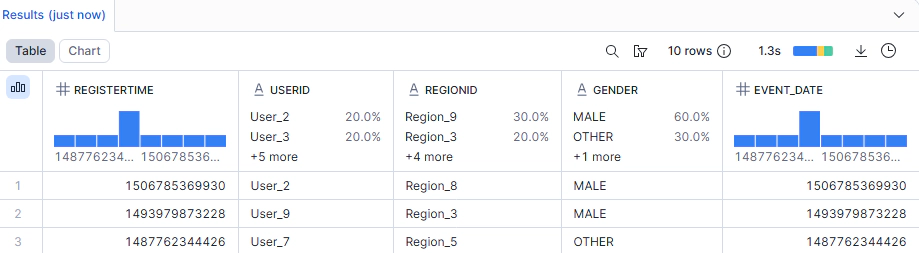
The data is being read directly from S3 Parquet files. There’s no data loaded into Snowflake’s managed storage.
The same data can also be queried from Amazon Athena since it’s stored in the Glue Catalog:
-- Query from Athena (same data, no duplication)
SELECT * FROM faker.customers LIMIT 10;
SELECT * FROM slingdata.customers LIMIT 10;
If you see COLUMN_NOT_FOUND: Relation contains no accessible columns, this is a Lake Formation permissions issue, not a missing table. Your Athena IAM user/role needs explicit SELECT and DESCRIBE grants on the Glue database tables. See the Configure Lake Formation section above for the grant command.
This is the core advantage of the approach. Both Snowflake and Athena are reading from the same S3 data with zero duplication.
You can also verify the data and metadata directly in AWS:
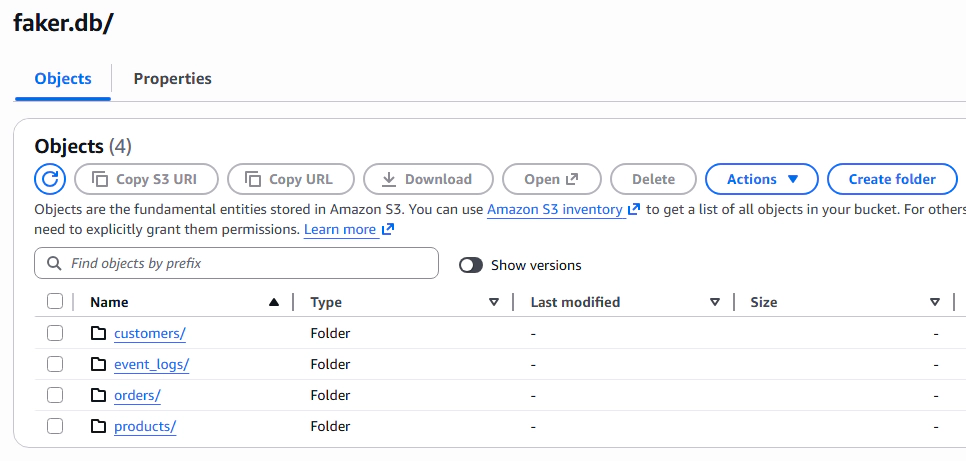
S3: Check the bucket to see the Iceberg data files organized by database and table:
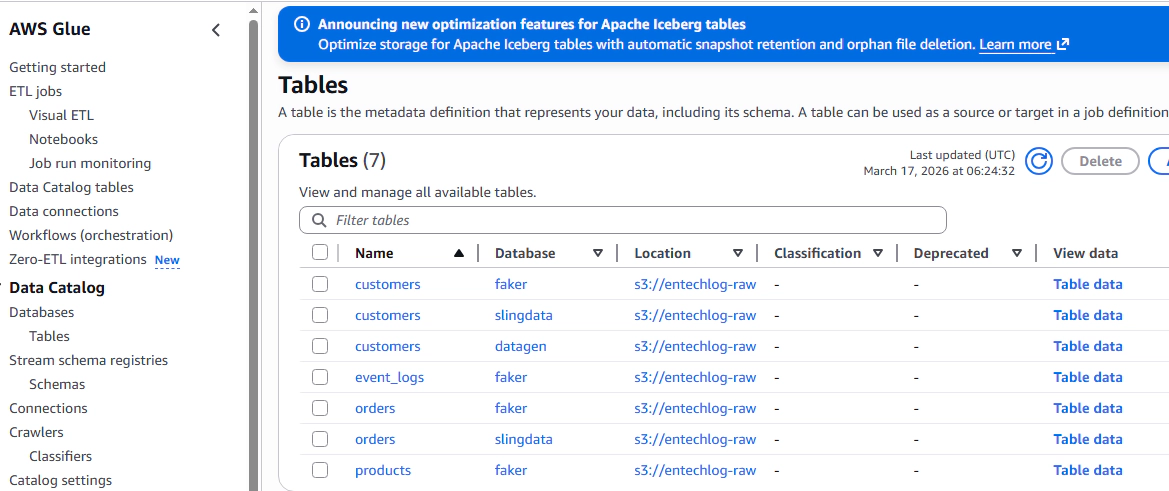
Glue Catalog: Check the Glue databases and tables to see the metadata:
To tear everything down:
# Stop all ingestion
cd ingestion/python && docker compose down -v
cd ingestion/kafka-connect && docker compose down -v
cd ingestion/slingdata && docker compose down -v

# Destroy infrastructure
cd terraform && terraform destroy
This pattern works well when you have high-volume raw data that needs to be accessible from multiple query engines. By keeping the data in S3 as Iceberg tables and using Snowflake external Iceberg tables, you avoid duplicating data across storage layers, reduce ingestion pipelines, and keep the option to query from any Iceberg-compatible engine.
The key considerations are to ensure direct connectivity between your compute engines and S3 (same region, PrivateLink where possible) and to treat this as the RAW layer strategy. For curated or heavily queried datasets, materializing into Snowflake managed tables will likely give better query performance.
Hope this was helpful. Did I miss something ? Let me know in the comments.
This blog represents my own viewpoints and not those of my employer. All product names, logos, and brands are the property of their respective owners.
In this article, we’re diving into a data engineering demo project that’s all about bringing cricket player …

CloudWatch logs provide insight into logs from many AWS services, but third-party observability/application performance …