
Stream AWS CloudWatch logs to Snowflake
CloudWatch logs provide insight into logs from many AWS services, but third-party observability/application performance …


In this article, we’re diving into a data engineering demo project that’s all about bringing cricket player metrics to life, using a combination of Mage AI, dbt, Snowflake, and Superset. My journey began with a search for the perfect dataset to showcase a Mage AI proof of concept. Being a cricket enthusiast, it was a natural choice to center this project around the sport I love. I initially set out to gather all the necessary player and match data from CricSheet. However, I quickly encountered a significant challenge: the dataset was incomplete, missing crucial match data. This was more than a mere gap — it was a pitfall that could lead to inaccurate player metrics, skewing our entire analysis.
To address this, I turned to Cricinfo, integrating its comprehensive data to fill the void left by CricSheet. This integration was pivotal, as it not only completed our dataset but also ensured the accuracy and reliability of our player metrics. This step illustrates a critical aspect of data engineering: the need to continuously seek and integrate comprehensive data sources for accurate analysis.
Even though we did not utilize the match data in this specific instance, it’s important to note that the match data from CricSheet is an extremely valuable resource for conducting match-level analytics, particularly for recent matches and series. The code utilized to extract this match data can be found in the archive directory, underscoring its potential usefulness in future analyses.
In this project, Terraform played a crucial role in orchestrating resource creation across both AWS and Snowflake. To fully appreciate the intricacies of our journey, a certain level of familiarity with these tools — Snowflake, dbt, AWS, and Terraform — is assumed.
Please find the source code used in this demo here: GitHub - entechlog/snowflake-examples.
In this section, we’ll set up the necessary accounts and permissions in AWS and Snowflake. These steps are critical as they lay the foundation for Terraform to effectively manage and create resources in both environments.
In AWS, we will create a dedicated user for Terraform. This user, named terraform, will have the permissions needed to create and manage AWS resources via Terraform scripts.
Log into your AWS cloud account and navigate to IAM –> Users. Create a new user named terraform. This user will be utilized by Terraform for creating AWS resources.
Update the user’s permissions by attaching the AdministratorAccess policy directly.
Attaching AdministratorAccess is only for this demo’s convenience. In a typical scenario, it’s best practice to assign only the necessary permissions/policies to the terraform user.
Under the IAM user’s security credentials, generate a new access key that includes CLI access.
For Snowflake, we require a specific user and role dedicated to Terraform. This setup ensures Terraform has the appropriate permissions to create and manage Snowflake resources.
Log in and execute the following SQL to create a user and role.
-- Create role and grant required access for TF to operate
USE ROLE SECURITYADMIN;
CREATE ROLE IF NOT EXISTS ENTECHLOG_TF_ROLE;

CREATE USER IF NOT EXISTS ENTECHLOG_TF_USER DEFAULT_ROLE = ENTECHLOG_TF_ROLE;
GRANT ROLE ENTECHLOG_TF_ROLE TO USER ENTECHLOG_TF_USER;

GRANT CREATE ROLE ON ACCOUNT TO ROLE ENTECHLOG_TF_ROLE;
GRANT CREATE USER ON ACCOUNT TO ROLE ENTECHLOG_TF_ROLE;
GRANT MANAGE GRANTS ON ACCOUNT TO ROLE ENTECHLOG_TF_ROLE;

GRANT ROLE ENTECHLOG_TF_ROLE TO ROLE SECURITYADMIN;
GRANT ROLE ENTECHLOG_TF_ROLE TO ROLE SYSADMIN;

USE ROLE ACCOUNTADMIN;
GRANT CREATE INTEGRATION ON ACCOUNT TO ROLE ENTECHLOG_TF_ROLE;
GRANT CREATE STAGE ON ACCOUNT TO ROLE ENTECHLOG_TF_ROLE;

USE ROLE SYSADMIN;
GRANT CREATE DATABASE ON ACCOUNT TO ROLE ENTECHLOG_TF_ROLE;
GRANT CREATE WAREHOUSE ON ACCOUNT TO ROLE ENTECHLOG_TF_ROLE;
For this project, we will utilize a Docker container, named developer-tools, which comes pre-equipped with Terraform. This setup ensures a consistent development environment for all users.
If you don’t have Docker installed, please refer to the Prerequisite section for installation instructions. If you already have Terraform installed and configured on your local machine, you may opt to skip this step and use your existing setup.
Start by cloning the developer-tools repo
git clone https://github.com/entechlog/developer-tools.git
After cloning, navigate to the developer-tools`` directory. Create a .envfile using the provided.env.template`.
cd developer-tools
Use the following Docker Compose command to build and start the container.
docker-compose -f docker-compose-reg.yml up -d --build
Check that the container is running correctly.
docker ps
SSH into the container.
docker exec -it developer-tools /bin/bash
Finally, confirm that Terraform is correctly installed in the container.
terraform --version
Create a new AWS profile named terraform. Execute the following command and enter your AWS credentials when prompted
aws configure --profile terraform
Refer to the AWS account setup section for the required values to enter during the configuration process.
Test your new AWS profile to ensure it’s configured correctly
aws sts get-caller-identity
Alternatively, the AWS profile can be configured by setting environment variables: AWS_DEFAULT_REGION, AWS_SECRET_ACCESS_KEY, and AWS_ACCESS_KEY_ID. Use the values obtained from the AWS account setup section.
Begin the process of resource creation by cloning the snowflake-examples repository. This repository contains the necessary Terraform configurations for the project. Clone it by executing the following command in your terminal
git clone https://github.com/entechlog/snowflake-examples.git
This step will download the example configurations to your local machine, setting the stage for the next steps in your resource creation process with Terraform.
Access the snowflake-examples\snow-mage-ai\terraform\aws\ directory within the developer-tools container. This directory contains the Terraform files necessary for creating AWS components.
cd snowflake-examples/snow-mage-ai/terraform/aws/
Terraform uses a file named variables.tf to define variables. Specific values for these variables should be set in a file named terraform.tfvars for local runs. Start by creating terraform.tfvars from the provided template terraform.tfvars.template. Update this file with details about Snowflake storage integration. In the initial run, some Snowflake integration details might not be available and will be set to default values.
cp terraform.tfvars.template terraform.tfvars
# Edit terraform.tfvars to add your specific values
Apply the Terraform template to create the required resources. Follow these steps
  # install custom modules
  terraform init -upgrade

  # format code
  terraform fmt -recursive

  # plan to review the summary of changes
  terraform plan

  # apply the changes to target environment
  terraform apply
Change your current directory to snowflake-examples\snow-mage-ai\terraform\snowflake. This directory includes the Terraform files necessary for creating Snowflake components.
cd snowflake-examples/snow-mage-ai/terraform/snowflake
Create terraform.tfvars from terraform.tfvars.template and update with the Snowflake account details, terraform role and credentials. Additionally update the snowflake_storage_integration__storage_allowed_locations and snowflake__aws_role_arn with the values from AWS_S3_BUCKET_NAME and AWS_IAM_ROLE_ARN_SNOWFLAKE of AWS terraform output.
cp terraform.tfvars.template terraform.tfvars
# Edit terraform.tfvars to add your Snowflake details
Execute the following Terraform commands to set up the required Snowflake resources
  # install custom modules
  terraform init -upgrade

  # format code
  terraform fmt -recursive

  # plan to review the summary of changes
  terraform plan

  # apply the changes to target environment
  terraform apply
If the apply fails for missing permissions, run this sql
GRANT CREATE STAGE ON SCHEMA "YOUR_RAW_DB"."CRICSHEET" TO ROLE YOUR_TF_ROLE;
GRANT CREATE FILE FORMAT ON SCHEMA "YOUR_RAW_DB"."CRICSHEET" TO ROLE YOUR_TF_ROLE;
After setting up your Snowflake components, you’ll need to update the AWS Terraform variables to ensure the correct permissions are granted to AWS resources.
Modify the terraform.tfvars file in the AWS directory with the output values obtained from your Snowflake setup. These values typically include the ARN (storage_integration_aws_iam_user_arn), external ID (storage_integration_aws_external_id).
Navigate back to the AWS Terraform directory and re-run the Terraform commands to update your AWS resources. This step ensures that the AWS environment is correctly aligned with the Snowflake configurations.
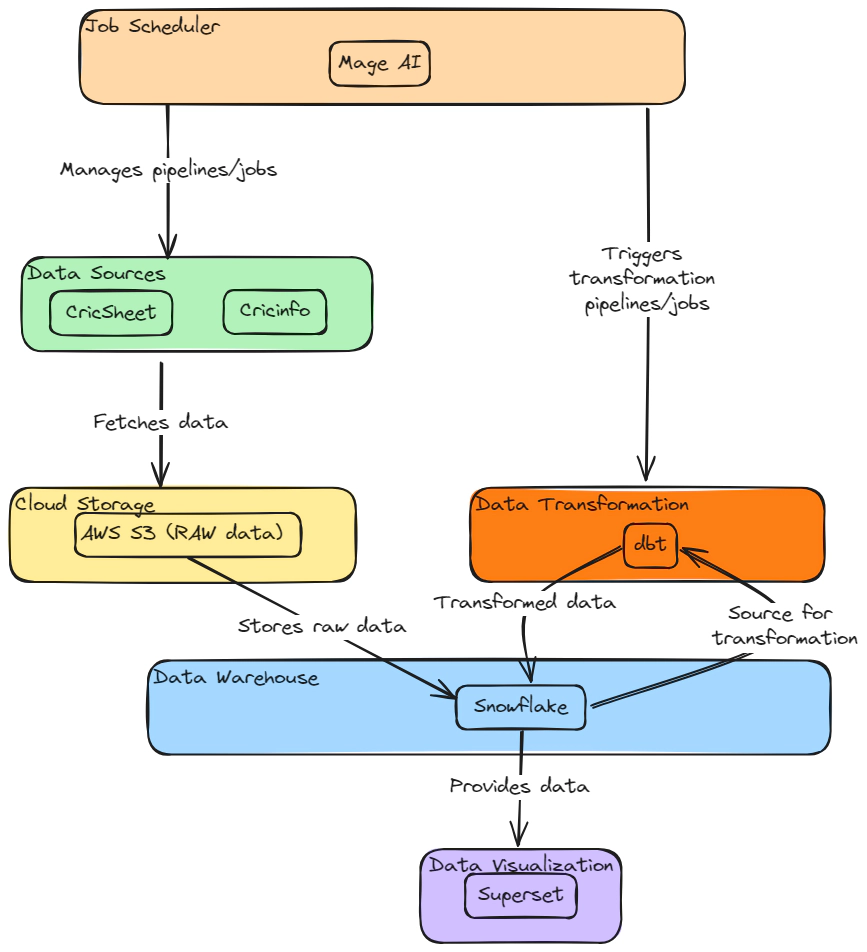
Before diving into the pipeline creation, let’s briefly introduce Mage AI. Mage AI is an advanced data transformation tool designed to automate and streamline the process of preparing and processing data for analytics and machine learning. It offers a user-friendly interface and utilizes machine learning algorithms to assist in data cleaning, transformation, and enrichment. In our project, Mage AI plays a critical role in managing and processing cricket-related data, providing a seamless bridge between raw data collection and the analytical insights we aim to derive.
With the necessary S3 bucket, Snowflake database, and S3-to-Snowflake integration established, you’re ready to start ingesting data using Mage pipelines.
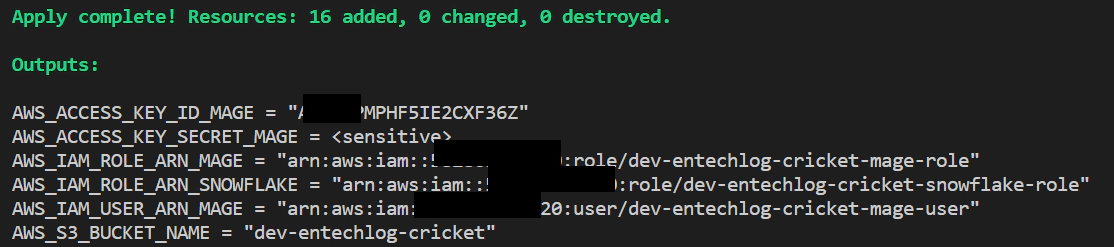
The AWS Terraform run yields essential details
The Snowflake Terraform run yields essential details
To set up the Mage AI container, first copy the snow-mage-ai\.env.template file and rename it to snow-mage-ai\.env.
Update the .env file with the required AWS S3 information (bucket name, access key, and secret key) for Mage AI to write raw data to S3. Also, add your Snowflake credentials (user, password, and account details) for Mage to manage the dbt models
Change your directory to snowflake-examples\snow-mage-ai in your terminal (not from within the developer-tools container).
Use the following command to start the Docker container
docker-compose -f docker-compose.yml up -d --build
Open your web browser and navigate to http://localhost:6789/ to access the Mage interface
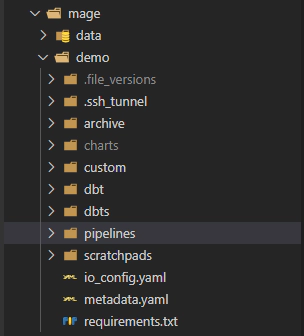
Now we have mage up and running, ready to create data ingestion and data transformation pipelines, Here is the list of pipelines which we will use for this demo
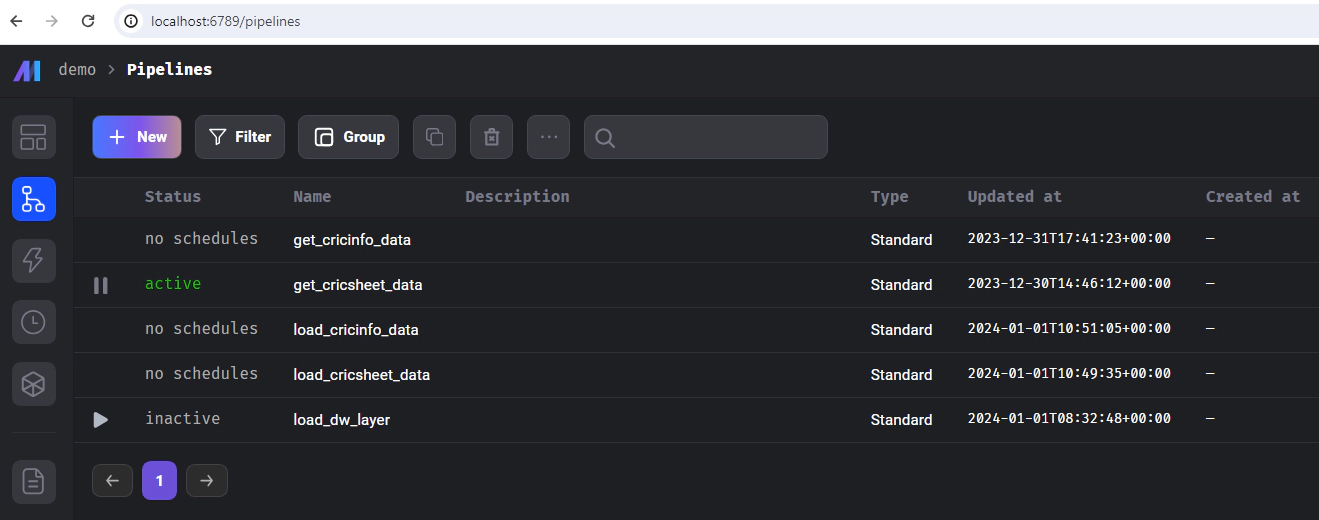
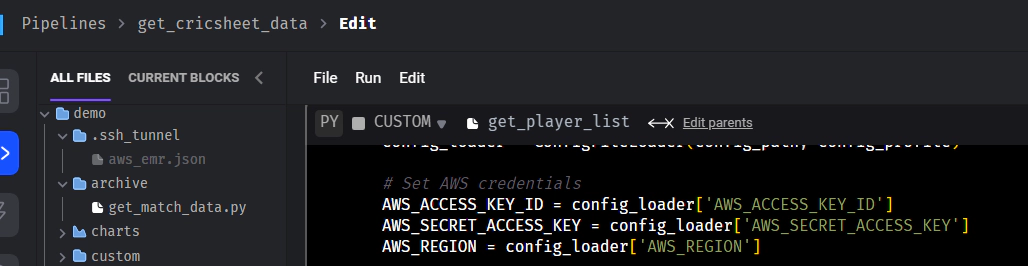
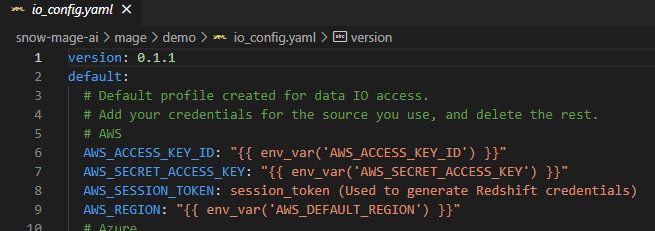
get_cricsheet_data: This pipeline is designed to retrieve a list of cricket players. It employs a custom block/python code for downloading this data and subsequently saving it to an AWS S3 bucket. The pipeline utilizes an io_config.yaml file to access credentials during runtime. This configuration file is set up to use environment variables, which allows for the dynamic fetching of necessary credentials like S3 access keys and Snowflake database details. This approach ensures secure and efficient access to the required services without hardcoding sensitive information into the pipeline’s codebase.
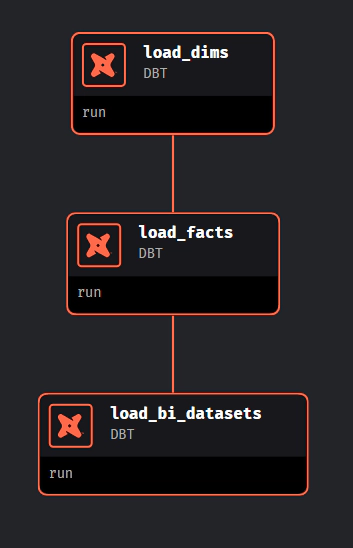
load_cricsheet_data: This pipeline, separate from get_cricsheet_data, loads the player data from S3 into Snowflake. It utilizes a custom dbt materialization called stage2table. The dbt models are located in the dbt directory, and dbt pipelines are defined in the dbts directory.
get_cricinfo_data: This pipeline scrapes player details and metrics from Cricinfo, which are essential for building dashboards. Note that this process, involving web scraping, may take longer to complete.
load_cricinfo_data: Similar to the previous pipeline, this one loads data from Cricinfo into Snowflake using the stage2table materialization.
The final step involves running the load_dw_layer pipeline, which loads the dimensional, factual, and BI dataset models into Snowflake using dbt.
Please note that in this demo, the various pipelines we’ve set up – such as get_cricsheet_data, load_cricsheet_data, get_cricinfo_data, load_cricinfo_data, and load_dw_layer – are designed to operate independently. They are not configured with dependencies or automated triggers.
For demonstration purposes, these pipelines are set to be executed on an ad-hoc basis. This means you have the flexibility to manually trigger each pipeline as needed, depending on your specific requirements or the stage of the demo you are currently exploring. This setup allows for greater control and the ability to closely monitor the output and functionality of each pipeline individually.
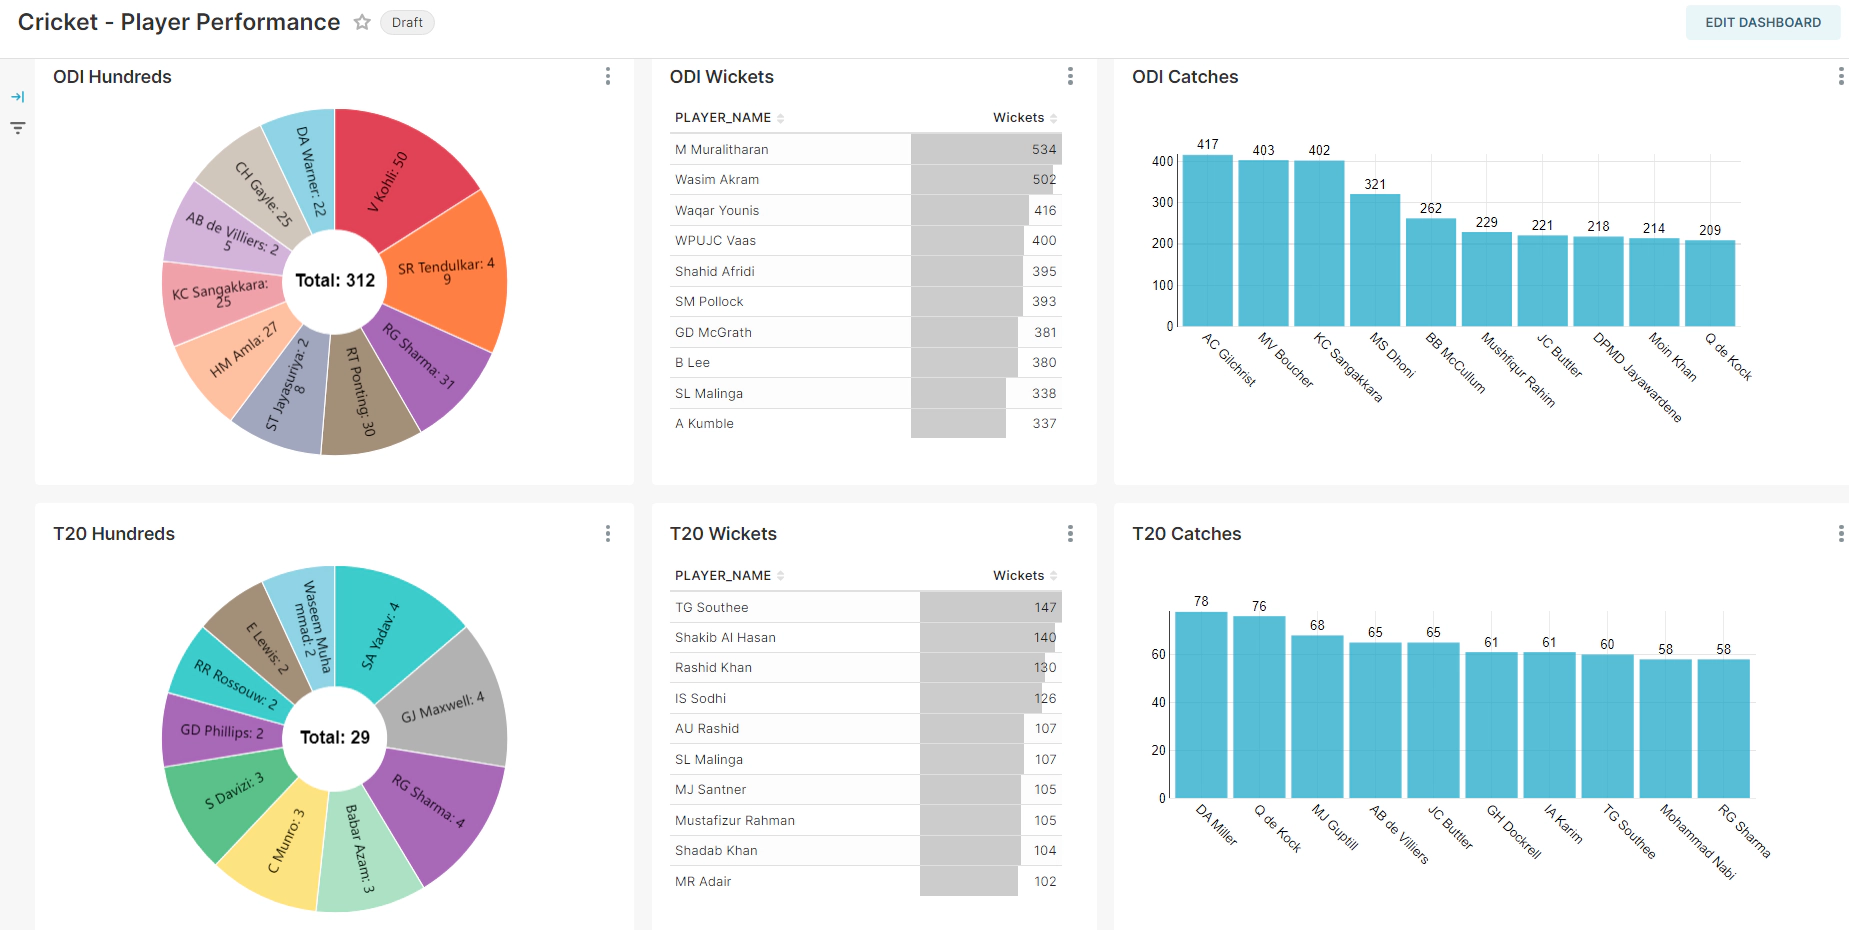
Before we begin with the dashboard creation, let’s introduce Superset. Apache Superset is an open-source business intelligence tool that allows for easy and intuitive exploration of datasets. It enables users to create and share dashboards and visualizations through a simple web-based interface. Superset is designed to handle data at scale, connecting seamlessly with SQL-based databases like Snowflake. Its user-friendly nature makes it a popular choice for data analysts and engineers to quickly transform data insights into actionable visual representations. In our project, Superset serves as the platform for visualizing the cricket data processed and stored in Snowflake, offering an interactive and accessible way to analyze and interpret the data.
The Docker Compose setup for Mage also includes a container for Superset. This allows you to work with Superset in the same environment.
Open your web browser and go to http://localhost:8088/ to access the Superset interface.
In Superset, go to the Dashboards section. Here, import the dashboards.zip file located in snow-mage-ai\superset\configs from the repository. This file contains predefined dashboard configurations.
Navigate to Settings –> Database Connections. Edit the existing connection to match your Snowflake database details.Replace the placeholders in the following connection string with your actual database credentials
snowflake://{user}:{password}@{account}.{region}/?authenticator={authenticator}&database={database}&role={role}&warehouse={warehouse}
OR
snowflake://{user}:{password}@{account}.{region}/?database={database}&role={role}&warehouse={warehouse}
Test the connection to ensure it’s properly configured.
Once the database connection is successfully established, the dashboard should automatically refresh and display data from your Snowflake database.
Once you’ve completed your tasks, it’s a good practice to clean up the resources that you no longer need. This step is important to free up system resources and avoid unnecessary costs.
Navigate to the respective Terraform directories for Snowflake and AWS.
Run terraform destroy in each directory to remove the resources that were created during the demo.
terraform destroy
It’s important to manually delete any access keys related to the mage user ID before proceeding with the removal of the other resources.
To halt the running container, use the down command with Docker Compose.
The –volumes flag will remove any defined volumes, and the –remove-orphans flag will eliminate containers for services not defined in the Compose file.
Execute the following command in your terminal
docker-compose -f docker-compose.yml down --volumes --remove-orphans
In this demo, we explored how to create an end-to-end data engineering pipeline using AWS, Snowflake, Mage AI, dbt, and Superset. While running the setup in Docker is convenient for a quick proof of concept, for real-world applications, it’s advisable to consider cloud hosting options. For more details on deploying to the cloud, visit Mage AI - Deploying to Cloud.
Your participation and feedback are invaluable. If there’s anything you think I missed or could improve, feel free to share your thoughts in the comments or on our forum.
Disclaimer: This blog represents my own viewpoints and not those of my employer, Snowflake. All product names, logos, and brands are property of their respective owners.
CloudWatch logs provide insight into logs from many AWS services, but third-party observability/application performance …

In this article, we will see how to analyze documents in Snowflake database using Amazon Textract. Amazon Textract is a …