
How to chat with data in Snowflake using ChatGPT, dbt, and Streamlit
Unleash the Power of Chatting with Data: A Deep Dive into Snowflake, ChatGPT, dbt, and Streamlit In the era of …


Computers have been doing work for humans for decades. The fundamental loop has always been the same: a person has a business need, and a machine executes the logic to fulfill it. The missing piece was always translation. A non-technical person who knows exactly what they need would share that request with someone who understands the business requirement and can translate it into a language the machine understands, a developer. The developer writes the code, the machine runs it, and the output goes back to the requester.
Over time, this translation layer has evolved through many programming languages, from assembly to COBOL to Python, each making it slightly easier to express intent. But the core pattern remained: humans request, developers translate, machines execute. With the most recent development in Large Language Models (LLMs), the requester can now articulate their request directly to an agent powered by LLMs. The agent interprets the request, converts it into the right code that the machine can understand, and returns the required output. The part of needing a developer to sit in the middle for every request is becoming thinner and increasingly automated. This doesn’t mean developers are less needed, it means the focus is shifting. Instead of writing queries to answer individual business questions, developers are now building the agents, semantic layers, and infrastructure that enable self-service at scale.
This is exactly what Snowflake Cortex Agents enable for analytics. Instead of a business user asking a data analyst to write SQL, the user asks a natural language question, and the agent generates the correct query, runs it against your data warehouse, and returns the answer. But for this to work reliably, the agent needs a clear understanding of your data model, and that is where semantic views and trusted models from your data platform come in.
In this article, we will build Snowflake Cortex Agents powered by semantic views, using two approaches: dbt custom materializations and Cortex Code (CoCo). We will walk through the core concepts, set up the semantic layer, and deploy production-ready agents that can answer business questions from your data platform.
All the code and configuration files used in this setup are available here: entechlog/snowflake-examples/snow-cortex-analyst
Before diving into Snowflake Cortex Agents, let’s revisit some foundational concepts that make this all work.
If you are already familiar with these concepts, feel free to skip ahead to the Semantic Models Landscape section.
| Concept | What It Is | Example |
|---|---|---|
| LLM (Large Language Model) | A neural network trained on massive text datasets that can understand and generate human language. LLMs power the reasoning behind AI agents. | Claude, GPT, Llama, Mistral, Snowflake Arctic |
| Agent | A system that uses an LLM to reason about a request, decide which tools to use, execute those tools, and iterate until the task is complete. Unlike a simple chatbot, an agent can take multi-step actions. | Snowflake Cortex Agent receives “What was revenue last month?”, decides to use Cortex Analyst, generates SQL, runs it, and returns the formatted answer. |
| RAG (Retrieval-Augmented Generation) | A technique where relevant documents are retrieved and provided as context to the LLM before it generates a response. This reduces hallucinations by grounding answers in actual data rather than relying solely on the model’s training knowledge. | A user asks “What is our refund policy?” The system retrieves the relevant policy document from a knowledge base and passes it to the LLM, which then generates an accurate answer based on that document. In Snowflake, Cortex Search provides RAG capabilities. |
| Prompt | The input text given to an LLM. A well-crafted prompt is clear, specific, and provides enough context for the model to generate a useful response. | “What was the total revenue by product category last month?” |
| Context | The background information available to the LLM when processing a prompt. This includes the conversation history, system instructions, and any retrieved documents or data. | The semantic view definitions, column descriptions, verified queries, and orchestration instructions all form the context for a Cortex Agent. |
| Token | The basic unit of text that LLMs process. A token is roughly 3-4 characters or about 0.75 words. Both input (prompt + context) and output (response) consume tokens, which affect cost and response limits. | The sentence “What was total revenue?” is approximately 6 tokens. A Cortex Agent configured with token_limit: 16000 can use up to 16,000 tokens per response. |
With the basics covered, let’s understand the semantic layer, the bridge between how business users think about data and how it is physically stored. A semantic model defines the business meaning of your tables, columns, metrics, and relationships in a way that both humans and AI agents can understand.
There are several approaches available today:
dbt Semantic Layer
The dbt Semantic Layer is powered by MetricFlow (open-sourced under Apache 2.0 at Coalesce 2025) to define metrics, dimensions, and entities as code in YAML files alongside your dbt models. It supports multiple data warehouses (Snowflake, BigQuery, Databricks, Redshift, Trino, Postgres) and provides a unified API for querying metrics. With dbt Fusion, a modernized YAML spec simplifies authoring by embedding semantic metadata directly within model definitions. The semantic definitions live in version control as part of your dbt project, enabling code review and CI/CD for your metric layer.
Snowflake Semantic Views
Snowflake Semantic Views are native database objects that declaratively define business semantics directly in Snowflake. Unlike regular views that contain a query definition, semantic views describe the meaning of your data: which columns are facts (measures), which are dimensions, what synonyms exist, and how tables relate to each other. The Snowflake query engine resolves queries against semantic views dynamically at query time. We will see the full syntax in the demo sections below.
Snowflake Intelligence
Snowflake Intelligence (GA as of November 2025) is the conversational interface built on top of Cortex Agents. It enables non-technical users to ask questions in plain English and get answers from their data. Intelligence uses semantic views and Cortex Agents under the hood, providing a no-code way to interact with your data warehouse. When you build a Cortex Agent, it becomes accessible through Snowflake Intelligence.
Open Semantic Interchange (OSI)
Worth mentioning is the Open Semantic Interchange initiative, a cross-vendor effort by dbt Labs, Snowflake, and Salesforce/Tableau to create a common standard for semantic interoperability. The goal is to allow semantic definitions created in one tool to be understood by others, so a metric defined in dbt could be consumed by Snowflake Intelligence or Tableau without translation. OSI is still in its early stages, with meaningful interoperability expected in the 2026-2027 timeframe, but it signals where the industry is heading: a shared semantic layer that works across platforms.
Where Semantic Views Fit
In this article, we will create Snowflake Semantic Views powered by trusted models from our data platform. The semantic views act as the knowledge layer that tells the Cortex Agent what each column means, how to aggregate it, and what business questions it can answer. The quality of the semantic view directly determines how accurate the agent’s responses will be, which is why grounding them in well-documented, trusted models is critical.
The demo uses a layered architecture where dbt manages the data models and two different approaches create the semantic views and agents on top.
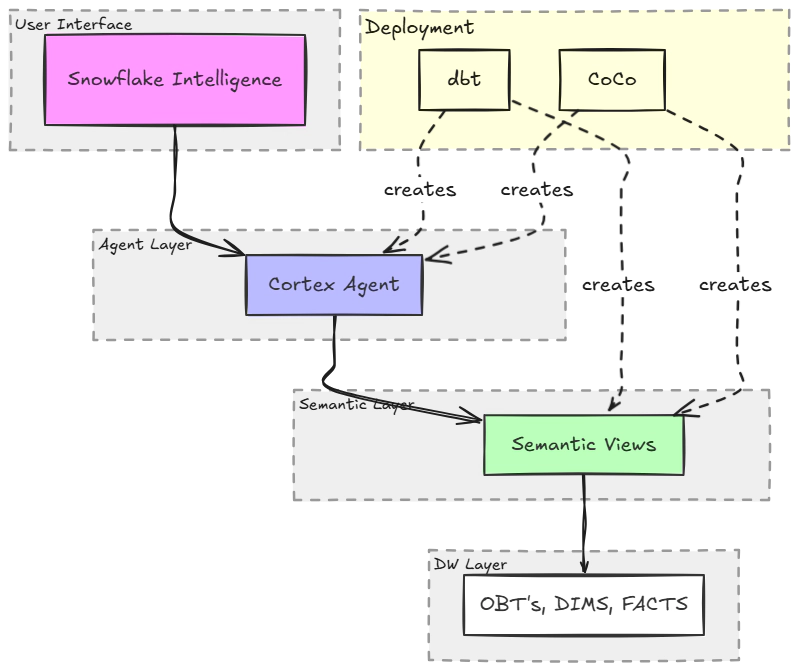
| Layer | Components |
|---|---|
| OBT Layer | Denormalized views built from dimensions and facts, serving as the standard datasets for consumption (e.g., obt__order_stats_1d, obt__customer_stats_1d, obt__marketing_campaign_stats_1d) |
| Semantic Layer | Snowflake Semantic Views with facts, dimensions, synonyms, and verified queries |
| Agent Layer | Snowflake Cortex Agents that use Cortex Analyst to generate and run SQL |
| User Interface | Snowflake Intelligence for conversational access |
For the ease of this demo, we use dbt seed data as our OBT layer. In a production setup, the OBT layer would be built from your dimension and fact tables in the data warehouse.
Two Approaches
| Aspect | dbt Approach | Cortex Code (CoCo) Approach |
|---|---|---|
| Semantic Views | DDL SQL via dbt_semantic_view package |
YAML deployed via deploy.py using SYSTEM$CREATE_SEMANTIC_VIEW_FROM_YAML |
| Agents | Custom cortex_agent materialization |
YAML deployed via deploy.py using CREATE AGENT / ALTER AGENT |
| Verified Queries | meta.verified_queries in schema YAML |
Native verified_queries section in YAML |
| Idempotency | Built into materialization (ALTER if changed, skip if same) | Built into deploy script (same logic) |
| Bidirectional Sync | No (code is truth) | Yes (--pull exports UI edits to YAML) |
| CI/CD | dbt run in GitHub Actions |
python deploy.py in GitHub Actions |
| Datasets | Sales (orders + customers) | Marketing (campaigns) |
| Best For | Teams already using dbt | Teams preferring YAML-first, Snowflake-native tooling |
If you are someone who is already using dbt, the dbt-based approach is the natural choice for creating semantic views and agents. It keeps everything in your existing dbt workflow with version control, testing, and CI/CD. If you are interested in trying out Cortex Agents but don’t have dbt today, using Cortex Code (CoCo) to create semantic views and agents is a great starting point. Either way, both approaches bring software engineering best practices like idempotency, version control, and automated deployment to your AI agent infrastructure.
Before getting started, make sure you have the following:
dbt-snowflake adapter (for dbt approach)snowflake-connector-python (for CoCo approach)Initial Database Setup
The demo expects a database and schemas to exist. Run the initialization scripts to set up the required Snowflake objects:
git clone https://github.com/entechlog/snowflake-examples.git
cd snowflake-examples/snow-cortex-analyst
Review and execute the SQL scripts in sql/init/:
-- 00_init_database.sql: Creates database, schemas, warehouses
-- 01_init_roles_grants.sql: Creates roles and grants permissions
A Cortex Agent is a fully managed, agentic AI service in Snowflake (GA since November 2025). Unlike a simple LLM call, an agent implements a reasoning loop: it receives a question, decides which tool to use, executes the tool, evaluates the result, and iterates until it can provide a complete answer.
The key components of a Cortex Agent are:
Tools: The capabilities available to the agent. In our case, the primary tool is cortex_analyst_text_to_sql, which generates and executes SQL queries against semantic views. Agents can also use Cortex Search (for unstructured data) and custom tools (stored procedures, UDFs).
Semantic Views: The knowledge layer that tells the agent what the data means. Each semantic view maps to a tool resource that the agent can query.
Instructions: Orchestration rules that guide the agent’s reasoning, response formatting, and sample questions that help users discover capabilities.
Verified Queries: Pre-validated SQL patterns that teach the agent how to correctly answer common questions. Think of them as unit tests for the agent, they demonstrate the right way to aggregate, filter, and join your data.
All data access goes through Snowflake’s role-based access control (RBAC). The agent cannot access data that the user’s role cannot access. This means your existing security model extends naturally to AI-powered analytics.
Things to Watch Out For
| Consideration | Details |
|---|---|
| Credit consumption | Cortex Agents consume Snowflake credits for both LLM inference and warehouse compute for SQL execution. Monitor usage with token_limit and timeout_seconds settings in your agent configuration. |
| Region availability | Cortex features are not available in all Snowflake regions. Check the Cortex availability documentation for your region. |
| Semantic view quality | Vague or missing column descriptions lead to inaccurate SQL generation. Invest time in writing precise COMMENT clauses, this is the single biggest factor in agent accuracy. |
| Verified query coverage | Without verified queries, the agent has to guess SQL patterns. Include 3-5 verified queries per semantic view covering your most common question types. |
| Date handling | Agents may default to CURRENT_DATE which returns no results if your data has a fixed range. Use orchestration instructions to tell the agent to query MAX(date_column) instead. |
Both approaches share the same OBT (One Big Table) layer. For the ease of this demo, we use dbt seed data to create the OBT layer. In a production setup, the OBT layer would be built from your dimension and fact tables in the data warehouse.
The OBT layer is optional. Semantic views support referencing multiple tables and defining relationships between them. We use a single denormalized OBT per semantic view here to keep the demo simple and focused on the agent and semantic view concepts rather than multi-table joins.
Seed Data
The demo includes three CSV seed files covering 90 days of data (October-December 2025):
| Seed File | Grain | Key Columns |
|---|---|---|
order_stats_1d.csv |
order_date + product_category + region | revenue, quantity, discount_amount, order_count, refund_amount |
customer_stats_1d.csv |
stats_date + customer_segment + region | total_spend, order_count, new_customers, returning_customers, churn_count |
marketing_campaign_stats_1d.csv |
campaign_date + channel + region | impressions, clicks, spend, conversions, conversion_revenue |
OBT Layer
The OBT models add computed columns on top of the seed data:
-- obt__order_stats_1d.sql
SELECT
    order_date,
    product_category,
    region,
    revenue,
    quantity,
    discount_amount,
    order_count,
    refund_amount,
    revenue - discount_amount - refund_amount AS net_revenue
FROM {{ ref('order_stats_1d') }}
Each OBT view is a pre-aggregated, daily-grain table with cumulative facts. The agent computes derived metrics like average order value at query time, which ensures correct aggregation across any dimension or time range. More on this in the Key Design Principles section.
Load the Data
cd dbt
dbt deps
dbt seed
dbt run --select tag:obt
This loads the CSV seed data into Snowflake and creates the OBT views that both approaches will build semantic views on top of.
The dbt approach uses two custom materializations to create semantic views and agents as native dbt models.
Semantic Views with dbt_semantic_view
The dbt_semantic_view package provides a custom materialization that creates Snowflake semantic views using DDL SQL. Each semantic view is a dbt model with carefully crafted FACTS, DIMENSIONS, and COMMENT clauses:
-- models/semantic/order_stats_1d/semantic__order_stats_1d.sql
{{
    config(
        materialized = 'semantic_view'
    )
}}

CREATE SEMANTIC VIEW {{ this }}
  TABLES (
    order_stats_1d AS {{ ref('obt__order_stats_1d') }}
      COMMENT = 'Daily order statistics at product category and region grain.
                 Each row represents one day + product_category + region combination.'
  )
  FACTS (
    revenue
      SYNONYMS = ('sales', 'gross sales', 'total sales')
      COMMENT = 'Total revenue in USD. CUMULATIVE METRIC: SUM() is valid
                 both across dimensions and time periods.'
    quantity
      SYNONYMS = ('units sold', 'items sold')
      COMMENT = 'Number of units sold. CUMULATIVE METRIC: SUM() is valid.'
    net_revenue
      SYNONYMS = ('net sales', 'net income')
      COMMENT = 'Revenue minus discounts and refunds. CUMULATIVE METRIC: SUM() is valid.
                 Computed as: revenue - discount_amount - refund_amount.'
  )
  DIMENSIONS (
    order_date
      COMMENT = 'Calendar date of the order. Data covers October to December 2025.
                 Query MAX(order_date) to find the latest available data.'
    product_category
      COMMENT = 'Product category. Valid values: Electronics, Clothing, Home & Garden, Sports.'
    region
      COMMENT = 'Geographic region. Valid values: Northeast, Southeast, Midwest, West.'
  )
The quality of COMMENT descriptions directly determines the accuracy of the agent’s SQL. Be explicit about aggregation rules (e.g., “CUMULATIVE: SUM() is valid”), list enum values, and note date ranges. Think of comments as instructions to the agent, not documentation for humans.
Verified Queries
Verified queries are pre-validated SQL patterns that teach the agent how to correctly answer common questions. They are defined in the schema YAML and deployed using a run-operation:
# models/semantic/order_stats_1d/semantic__order_stats_1d.yml
models:
  - name: semantic__order_stats_1d
    meta:
      verified_queries:
        - name: revenue_by_category
          question: "What is the total revenue by product category?"
          sql: |
            SELECT product_category, SUM(revenue) AS total_revenue
            FROM __order_stats_1d
            GROUP BY product_category
            ORDER BY total_revenue DESC
          use_as_onboarding_question: true
        - name: weekly_order_trend
          question: "Show me weekly order count trends"
          sql: |
            SELECT DATE_TRUNC('week', order_date) AS week,
                   SUM(order_count) AS total_orders
            FROM __order_stats_1d
            GROUP BY week
            ORDER BY week
          use_as_onboarding_question: true
Deploy verified queries after building the semantic views:
dbt run-operation deploy_verified_queries
Cortex Agent with Custom Materialization
The custom cortex_agent materialization creates a Snowflake Cortex Agent as a dbt model:
-- models/agents/sales_agent.sql
{{ config(
    materialized = 'cortex_agent',
    alias = 'dev_sales_agent',
    display_name = 'Sales Agent (DEV)',
    description = 'Sales analytics agent with order and customer insights',
    instructions = 'sales_agent',
    semantic_views = ['order_stats_1d', 'customer_stats_1d'],
    warehouse = 'CORTEX_WH_XS',
    grant_to_roles = ['ENTECHLOG_CORTEX_ROLE'],
    timeout_seconds = 60,
    token_limit = 16000,
    query_timeout_seconds = 60
) }}
The materialization handles the full lifecycle:
CREATE AGENTALTER AGENT ... MODIFY LIVE VERSION SET SPECIFICATION (preserving chat history)Agent Instructions
Instructions are defined as Jinja macros and loaded by convention. Three macros control the agent’s behavior:
-- macros/cortex/instructions/sales_agent.sql
{% macro sales_agent_orchestration() %}
You are a sales analytics assistant with access to order and customer data.
CRITICAL RULES:
1. ALL FACTS ARE CUMULATIVE: revenue, quantity, discount_amount, order_count,
refund_amount, net_revenue, total_spend, SUM() is always valid.
2. DERIVED METRICS (compute at query time, never stored):
- Average Order Value: SUM(revenue) / NULLIF(SUM(order_count), 0)
- Refund Rate: SUM(refund_amount) * 100.0 / NULLIF(SUM(revenue), 0)
3. DATES: Data covers October to December 2025.
Always use MAX(order_date) instead of CURRENT_DATE.
4. CROSS-VIEW QUERIES: Both views share the region dimension.
{% endmacro %}
{% macro sales_agent_response() %}
Lead with the key insight. Bold important numbers.
Use tables for multi-row comparisons. Include time period covered.
Keep responses concise, max 200 words.
{% endmacro %}
{% macro sales_agent_sample_questions() %}
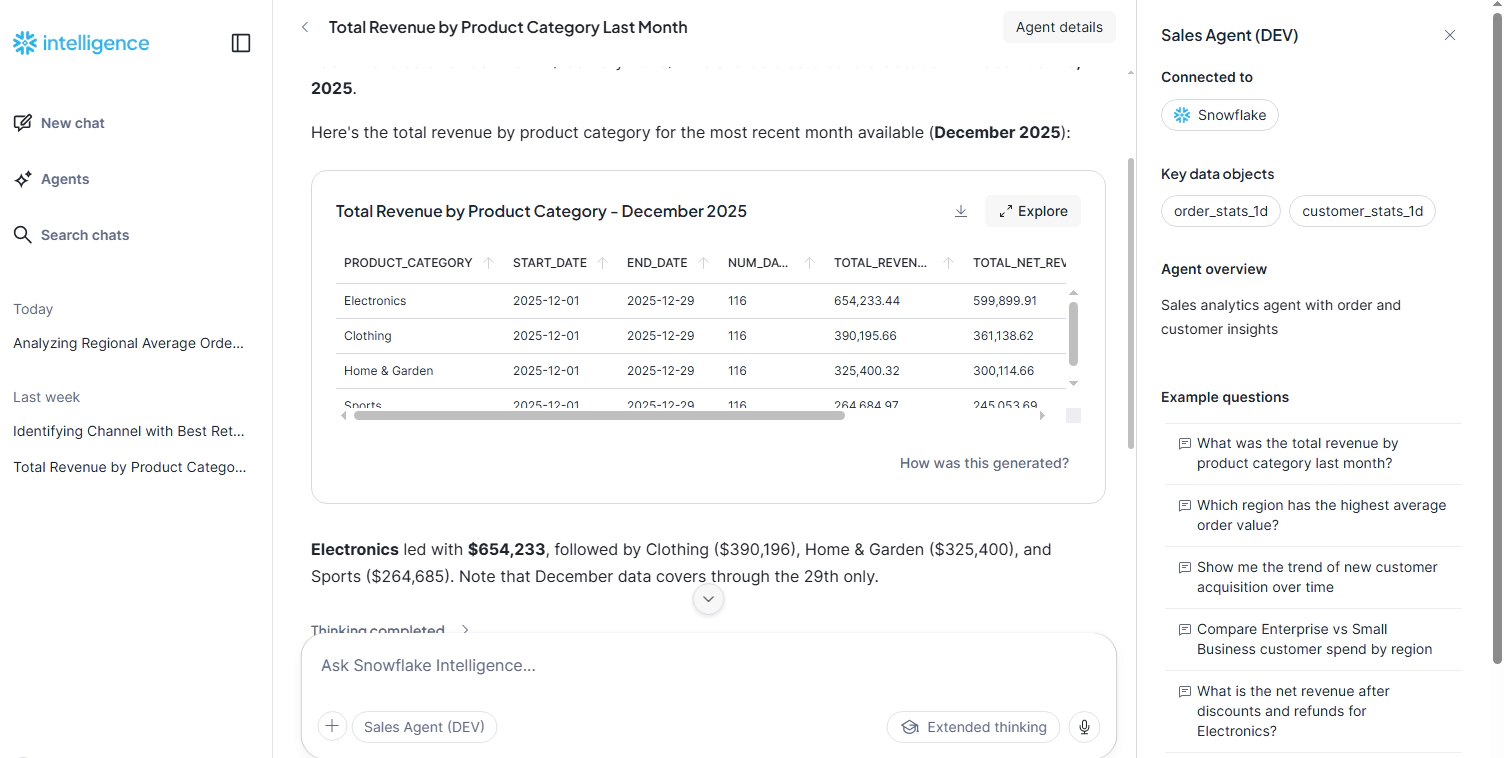
["What was the total revenue by product category last month?",
"Which region has the highest average order value?",
"Show me weekly order count trends",
"Compare customer spend across segments"]
{% endmacro %}
Deploy with dbt
Run the full pipeline:
cd dbt
dbt deps
dbt seed
dbt run
dbt run-operation deploy_verified_queries
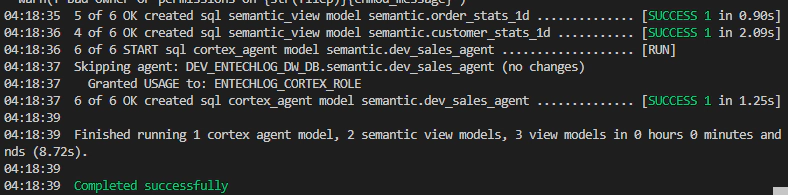
This builds the OBT views, creates the semantic views, deploys verified queries, and creates the Cortex Agent, all in a single dbt run.
The CoCo approach uses YAML definitions and a Python deploy script to create semantic views and agents. This is ideal for teams that want to try Cortex Agents without adopting dbt.
For this demo, the CoCo approach depends on the OBT layer created by dbt in Step 02. If you are only using CoCo, you still need to run dbt seed and dbt run --select tag:obt first to create the source tables.
Semantic View YAML
Semantic views are defined in YAML files that map closely to Snowflake’s semantic view structure:
# coco/semantic_views/marketing_campaign_stats_1d.yaml
name: marketing_campaign_stats_1d
description: "Daily marketing campaign statistics at channel + region grain"

tables:
  - name: marketing_campaign_stats_1d
    base_table:
      database: __DATABASE__
      schema: OBT
      table: MARKETING_CAMPAIGN_STATS_1D

    time_dimensions:
      - name: campaign_date
        synonyms: ["date", "campaign day"]
        description: "Calendar date of campaign activity. Data covers Oct-Dec 2025."
        expr: CAMPAIGN_DATE
        data_type: DATE

    dimensions:
      - name: channel
        synonyms: ["marketing channel", "campaign channel", "medium"]
        description: "Marketing channel. Values: Email, Social Media, Paid Search, Display Ads"
        expr: CHANNEL
        data_type: VARCHAR
        is_enum: true

    facts:
      - name: impressions
        synonyms: ["views", "ad views", "reach"]
        description: "Number of times the ad was shown. CUMULATIVE: SUM() is valid."
        expr: IMPRESSIONS
        data_type: NUMBER

    metrics:
      - name: click_through_rate
        synonyms: ["CTR"]
        description: "Click-through rate. Never SUM this directly."
        expr: SUM(clicks) * 100.0 / NULLIF(SUM(impressions), 0)

verified_queries:
  - name: spend_by_channel
    question: "What is the total spend by marketing channel?"
    sql: |
      SELECT channel, SUM(spend) AS total_spend
      FROM __marketing_campaign_stats_1d
      GROUP BY channel
      ORDER BY total_spend DESC
    use_as_onboarding_question: true
The __DATABASE__ placeholder is replaced at deploy time with the actual database name based on environment variables.
Agent YAML
Agents are defined in a similar YAML structure:
# coco/agents/marketing_agent.yaml
name: marketing_agent
display_name: "Marketing Agent (${ENV_CODE})"
description: "Marketing analytics agent for campaign performance insights"

semantic_views:
  - marketing_campaign_stats_1d

warehouse: "${ENV_CODE}_${PROJ_CODE}_CORTEX_WH_XS"
timeout_seconds: 60
token_limit: 16000
grant_to_roles:
  - "${PROJ_CODE}_CORTEX_ROLE"

instructions:
  orchestration: |
    You are a marketing analytics assistant...
    CRITICAL RULES:
    1. ALL FACTS ARE CUMULATIVE: impressions, clicks, spend, conversions,
       conversion_revenue, net_campaign_value, SUM() is valid.
    2. DERIVED METRICS (compute, never stored):
       - CTR: SUM(clicks) * 100.0 / NULLIF(SUM(impressions), 0)
       - CPC: SUM(spend) / NULLIF(SUM(clicks), 0)
       - ROAS: SUM(conversion_revenue) / NULLIF(SUM(spend), 0)

sample_questions:
  - "What is the total spend by marketing channel?"
  - "Which channel has the best ROAS?"
  - "Show me weekly conversion trends"
Deploy Script
The deploy.py script handles the full lifecycle with four modes:
cd coco/scripts

# Set environment variables
export ENV_CODE=dev
export PROJ_CODE=entechlog
export SNOWFLAKE_ACCOUNT=your-account
export SNOWFLAKE_USER=your-user
export SNOWFLAKE_PASSWORD=your-password

# Deploy everything
python deploy.py

# Dry-run (preview SQL without executing)
python deploy.py --dry-run

# Check deployment status
python deploy.py --status

# Pull deployed objects back to YAML (bidirectional sync)
python deploy.py --pull

Cortex Code CLI Integration
The CoCo approach also includes a Cortex Code CLI skill file (.cortex/skills/semantic-view-guide.md) that teaches the CLI about your data model. When you run Cortex Code from the coco/ directory, you can use natural language prompts to create semantic views interactively:
# Example prompt to Cortex Code CLI
I need to create a Semantic View for the marketing campaign data.
The source table has impressions, clicks, spend, conversions columns.
All facts are cumulative. Add CTR and ROAS as computed metrics.
The skill file encodes the same best practices (cumulative facts, computed metrics, rich descriptions) so that the generated YAML follows the project conventions.
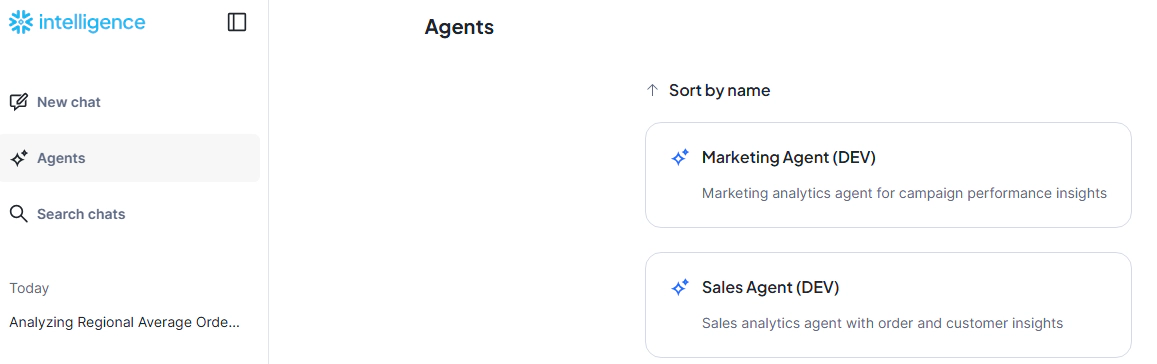
Once deployed, you can interact with the agent through multiple interfaces.
Snowflake Intelligence UI
Navigate to Snowflake Intelligence in the Snowsight UI. Your deployed agents appear as available assistants. Click on the agent and start asking questions:
SQL Interface
You can also query the agent programmatically using SQL:
-- List deployed agents
SHOW AGENTS IN SCHEMA DEV_ENTECHLOG_DW_DB.SEMANTIC;

-- Describe agent specification
DESCRIBE AGENT DEV_ENTECHLOG_DW_DB.SEMANTIC.DEV_SALES_AGENT;

-- Query the agent
SELECT SNOWFLAKE.CORTEX.AGENT(
    'DEV_ENTECHLOG_DW_DB.SEMANTIC.DEV_SALES_AGENT',
    'What was total revenue by product category last month?'
);
A few principles that make the difference between an agent that works in a demo and one that works in production:
Store Cumulative Facts, Never Averages
Store the building blocks (revenue, order_count), not the derived metrics (average_order_value). The agent computes SUM(revenue) / SUM(order_count) at query time, ensuring correct aggregation across any dimension or time range.
Rich Descriptions Drive Accuracy
The COMMENT on each column in a semantic view is effectively an instruction to the agent. Be explicit:
Verified Queries Are Unit Tests
Include 3-5 verified queries per semantic view. These serve as examples that teach the agent correct SQL patterns. Mark them as use_as_onboarding_question: true so they appear as starter suggestions.
Synonyms Bridge the Language Gap
Business users say “sales”, the column is called “revenue”. Add synonyms generously:
revenue SYNONYMS = ('sales', 'gross sales', 'total sales')
Idempotent Deployment
Both approaches use ALTER AGENT ... MODIFY LIVE VERSION SET SPECIFICATION when updating an existing agent. This preserves chat history and avoids disruption for active users.
To remove all deployed objects:
# dbt approach
cd dbt
dbt run-operation drop_cortex_agent --args '{name: dev_sales_agent}'
dbt run-operation drop_semantic_view --args '{name: [order_stats_1d, customer_stats_1d]}'

# CoCo approach
# Use the cleanup SQL script
cd sql/init
# Execute 99_cleanup.sql in Snowflake
The combination of dbt for trusted data models, Snowflake semantic views for business meaning, and Cortex Agents for natural language access creates a powerful self-service analytics pattern. The data models provide the trusted foundation, semantic views add the business context that prevents hallucination, and agents deliver the natural language interface that business users have been waiting for.
What makes this approach production-ready is that it brings software engineering best practices to AI: version control, idempotent deployment, CI/CD pipelines, and environment promotion. Whether you use dbt custom materializations or the CoCo YAML-first approach, the result is the same: agents that are as reliable and manageable as any other piece of your data infrastructure.
Hope this was helpful. Did I miss something ? Let me know in the comments.
This blog represents my own viewpoints and not those of my employer. All product names, logos, and brands are the property of their respective owners.
Unleash the Power of Chatting with Data: A Deep Dive into Snowflake, ChatGPT, dbt, and Streamlit In the era of …
Snowpipe is Snowflake’s continuous data ingestion service. Snowpipe loads data within minutes after files are …