Visualizing Snowpipe usage with dbt and Superset
Snowpipe is Snowflake’s continuous data ingestion service. Snowpipe loads data within minutes after files are …


Unleash the Power of Chatting with Data: A Deep Dive into Snowflake, ChatGPT, dbt, and Streamlit
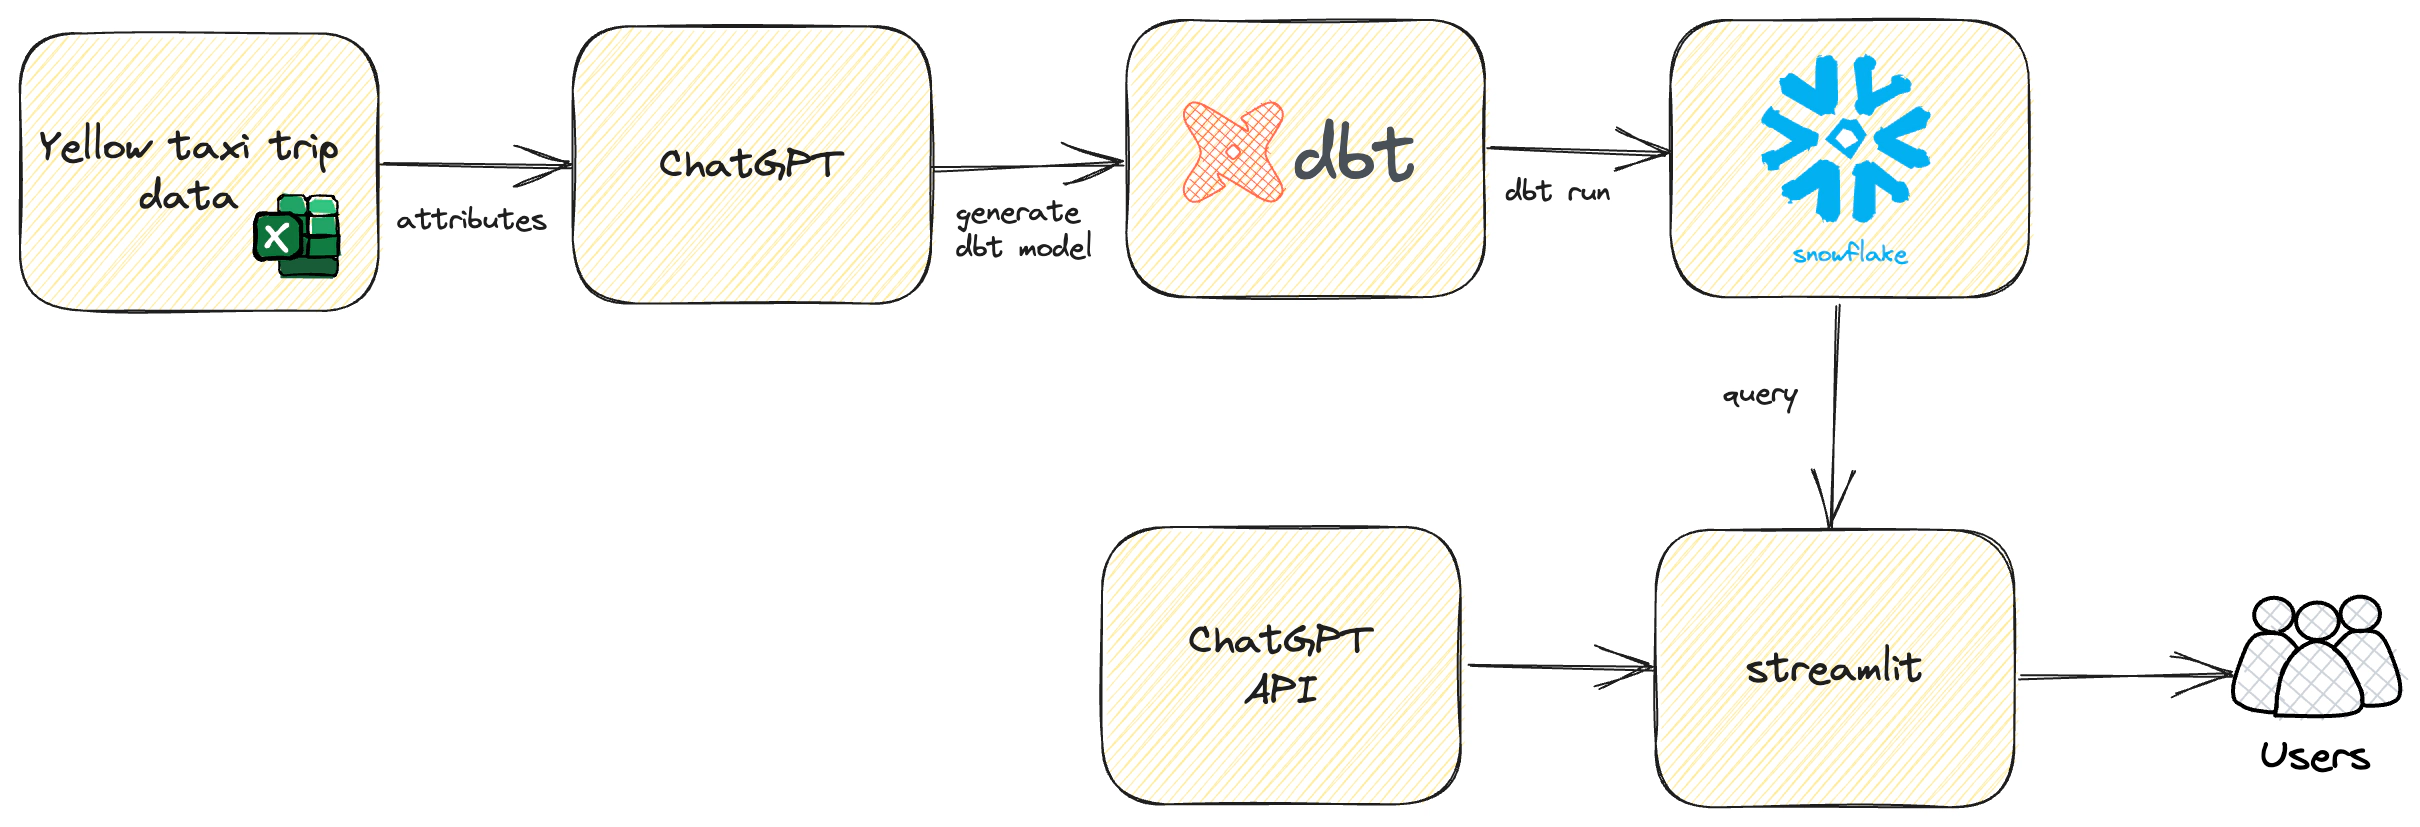
In the era of data-driven decision making, being able to ‘converse’ with your data can unlock new levels of insights and understanding. Imagine posing queries as if you were chatting with an analyst, and receiving responses in natural, human-like language. This is no longer the stuff of science fiction, but a reality made possible by the fusion of Snowflake, OpenAI’s ChatGPT, dbt, and Streamlit.
In this comprehensive guide, I will take you on a fascinating journey where we don’t just analyze data - we chat with it! Together, we will delve into the heart of setting up a Docker environment, initiating interactive queries with Snowflake, and crafting intuitive Streamlit applications to facilitate a seamless dialogue with your data.
Whether you’re a data professional seeking to elevate your skills or a curious enthusiast eager to dabble in the realms of data and AI, this guide has something for you. Not only will you understand the technology underpinning these interactions, but you’ll also gain hands-on experience as you follow along with the code.
By the end of this guide, you’ll be able to transform your approach to data, shifting from traditional querying to engaging, insightful, and intuitive conversations. So, are you ready to chat with your data?
The code used in this article can be found here. Dive in, explore, and let’s bring data to life !
This blog assumes that you have a basic understanding of Docker, dbt, Snowflake, and ChatGPT.
Log in to your OpenAI account, navigate to API keys, and create an API key named streamlit. This API key will enable Streamlit to interact with OpenAI
If you already have an API key, it’s recommended to create a new one instead of reusing keys created for different use cases
A Snowflake user and role will be required for Streamlit to perform queries
Log into Snowflake and execute the SQL provided here to create the user, role, and warehouse
Be sure to update the names and credentials based on your setup.
For this demo, we will utilize a Docker container named developer-tools, which comes pre-equipped with dbt. If you’ve already set up a machine with dbt, feel free to skip this step and proceed directly to setup the container for Streamlit.
Clone the developer-tools repo from here by running the command:
git clone https://github.com/entechlog/developer-tools.git
Navigate into the developer-tools directory and create a copy of .env.template as .env. For this demo, there’s no need to alter any variables:
cd developer-tools
Initiate the container using the following command
docker-compose -f docker-compose-reg.yml up -d --build
Start by cloning the snowflake-examples repository from GitHub. You can do this by running the following command in your terminal:
git clone https://github.com/entechlog/snowflake-examples.git
Navigate into the snowflake-examples\snow-chat\streamlit\src\.streamlit\ directory and here, you will find a file named secrets.toml.template. Create a copy of this file and rename it as secrets.toml. Update the secrets.toml file with your OpenAI and Snowflake credentials. These credentials will allow Streamlit to interact with Snowflake and OpenAI
This container will be utilized later when we start the Streamlit app
Run the following command to verify the status of your containers:
docker ps
To interact with your container via SSH, execute the following command:
docker exec -it developer-tools /bin/bash
Once inside the container, validate the dbt version by running the following command
dbt --version
Download your dataset in preparation for the upcoming steps. If you are using a dataset from an external source, ensure you have the appropriate permissions and rights to use the data. We will be using yellow taxi trip data from Kaggle and data dictionary for this data can be found here
Using a prompt in a ChatGPT chat session, generate the data model for the demo
Here’s the generated model. Keep in mind that the generated model might vary slightly. Always review the output and make any necessary changes to better fit your needs
| Table Name | Fields |
|---|---|
| dim_vendor | vendor_id (PK), vendor_code, vendor_name |
| dim_date | date_id (PK), date, year, month, day, day_name, month_name, day_of_week, day_of_year, is_weekend, is_holiday |
| dim_rate | rate_id (PK), rate_code, rate_name |
| dim_location | location_id (PK), longitude, latitude |
| dim_payment_type | payment_type_id (PK), payment_type_code, payment_type_name |
| fact_trip | trip_id (PK), vendor_id (FK), pickup_date_id (FK), dropoff_date_id (FK), pickup_location_id (FK), dropoff_location_id (FK), rate_id (FK), payment_type_id (FK), passenger_count, trip_distance, pickup_timestamp, dropoff_timestamp, fare_amount, extra, mta_tax, tip_amount, tolls_amount, improvement_surcharge, total_amount |
In this section, we will generate dbt model SQL and schema YAML files, and prepare them for integration with our project:
snow-chat/dbt/models for further detailsNext, we will load our data into Snowflake. Here are the steps for a successful data load:
Open your code editor (e.g., VSCode) and navigate into the dbt directory. Here, create a new dbt profile file named profiles.yml and update it with your database connection details
Modify the dbt_project.yml file to connect to the profile you just created. Ensure that the profile value matches the name in profiles.yml exactly (in this case, snow_chat)
From within the developer-tools container and project directory, run dbt-set-profile to update the DBT_PROFILES_DIR. This step will make it easier for you to switch between multiple dbt projects in the future
Validate your dbt profile and its connection by running the command dbt debug
Execute dbt seed to load your RAW tables
Next, run dbt run to load your DW tables
Log into Snowflake and execute the below SQL commands to validate data in both RAW and DW layers
SELECT 'No of records in RAW table' as desc, COUNT (*) as count FROM "TST_ENTECHLOG_RAW_DB"."YELLOW_TAXI"."TRIP_DATA_NYC"
UNION ALL
SELECT 'No of records in FACT table' as desc, COUNT (*) as count FROM "TST_ENTECHLOG_DW_DB"."FACT"."TRIPS";
Streamlit is an open-source app framework for Machine Learning and Data Science teams. Create beautiful web apps in minutes. In this section, we’ll guide you through the steps to create a Streamlit application:
Streamlit app details: The application is designed to scan all tables within the specified input schemas, gathering details such as table name, table description, column name, and column description. This information is then utilized in conjunction with OpenAI to facilitate the interactive chat functionality. For a more in-depth understanding, please refer to the source code here
get_table_context contains the logic to retrieve metadata from the Snowflake information schemaget_system_prompt incorporates the logic to read the prompt along with the table context for making the OpenAI callStart the container: Use the following command to kickstart your container:
docker-compose -f docker-compose-streamlit.yml up -d --build
Validate the containers: Confirm that your containers are running as expected with the following command:
docker-compose -f docker-compose-streamlit.yml ps
SSH into the container: Gain access to your container’s shell by running:
docker exec -it streamlit /bin/bash
Validate Streamlit version: Ensure you’re running the correct version of Streamlit by checking the version:
streamlit --version
Verify the app’s status: Make sure your Streamlit app is running and listening properly. To do this, check the logs for any potential issues. If all is well, navigate to your Streamlit application at http://localhost:8501/
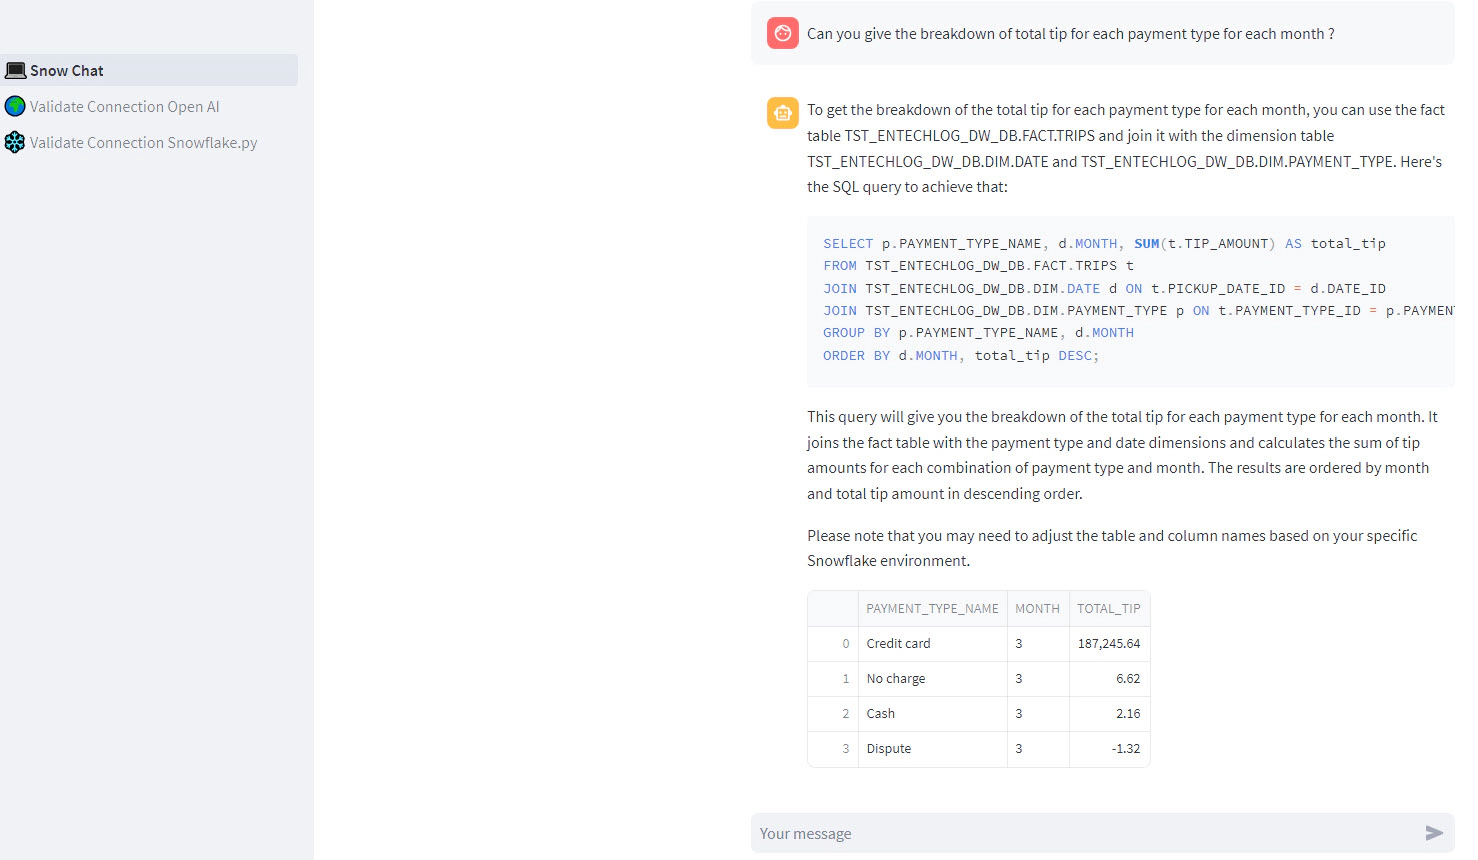
Verify the connections: Navigate to the 🌍 Validate Connection - Open AI and ❄️ Validate connection - Snowflake pages to verify if the connections are working correctly. If they are, then proceed to the main app page, 💻 Snow Chat
Start chatting: Now that your Streamlit app is up and running, you can start interacting with your Snowflake data. Feel free to ask any data-related questions you might have !
Once you’re finished with your tasks, it’s good practice to clean up the resources that are no longer needed. This will free up system resources:
To stop the container, use the down command with Docker Compose. The –volumes flag will also remove any defined volumes in your services. The –remove-orphans flag will remove containers for services not defined in the Compose file. Run the following command in your terminal:
docker-compose -f docker-compose-streamlit.yml down --volumes --remove-orphans
For a hands-on, guided experience, check out below video
Hope this was helpful. Did I miss something ? Let me know in the comments.
This blog represents my own viewpoints and not those of my employer, Snowflake. All product names, logos, and brands are the property of their respective owners.
Snowpipe is Snowflake’s continuous data ingestion service. Snowpipe loads data within minutes after files are …

In this article, we will see how to use dbt with Snowflake. dbt (data build tool) does the T in ELT (Extract, Load, …