
Configure Google Workspace as an identity provider for Snowflake SSO
Federated authentication enables your users to connect to Snowflake using secure SSO (single sign-on). With SSO enabled, …


The Terraform Snowflake Provider allows to provision Snowflake resources using declarative Infrastructure as Code(IaC). In this article, we will see how to provision some common resources in Snowflake. The resources will follow the naming standard described in Snowflake object naming conventions. Code used in this article can be found here.
This blog will not teach basics of Terraform or Snowflake. It assumes that you know the basics and shows how to quickly spin up a working setup to create Snowflake resources using Snowflake.
Login into your Terraform cloud account and navigate to User Settings –> Tokens and create a new token. This new token will be used by Terraform to maintain the state file in cloud
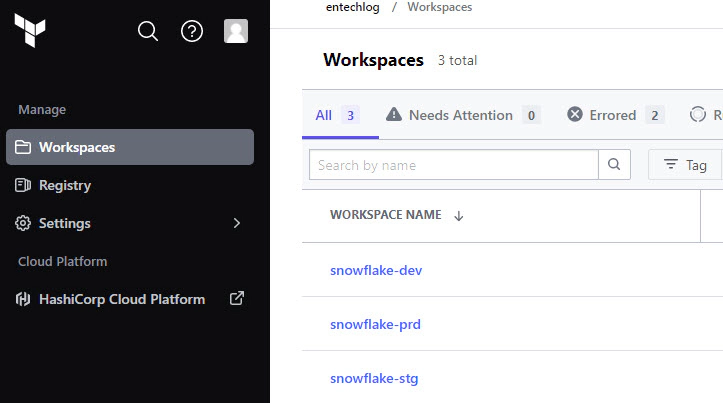
Create workspace in Terraform cloud with proper postfix for required environment names. Here is an example of workspace naming
It’s not mandatory to use Terraform cloud for storing the state, you can use other services like Amazon S3, Azure Blob Storage, Google Cloud Storage, etc. for storing the remote state
We will need a Snowflake user and role to create the rest of the resources
Login into Snowflake and execute below SQL to create the user and role
--// Create role and grant required access for TF to operate
--// Preferred naming standard is <env><service><teamCode><grantorSystemCode><granteeSystemCode>

USE ROLE SECURITYADMIN;
CREATE ROLE IF NOT EXISTS SVC_ENTECHLOG_SNOW_TF_ROLE;

CREATE USER IF NOT EXISTS SVC_ENTECHLOG_SNOW_TF_USER DEFAULT_ROLE = SVC_ENTECHLOG_SNOW_TF_ROLE;
GRANT ROLE SVC_ENTECHLOG_SNOW_TF_ROLE TO USER SVC_ENTECHLOG_SNOW_TF_USER;

GRANT CREATE ROLE ON ACCOUNT TO ROLE SVC_ENTECHLOG_SNOW_TF_ROLE;
GRANT CREATE USER ON ACCOUNT TO ROLE SVC_ENTECHLOG_SNOW_TF_ROLE;
GRANT MANAGE GRANTS ON ACCOUNT TO ROLE SVC_ENTECHLOG_SNOW_TF_ROLE;

GRANT ROLE SVC_ENTECHLOG_SNOW_TF_ROLE TO ROLE SECURITYADMIN;
GRANT ROLE SVC_ENTECHLOG_SNOW_TF_ROLE TO ROLE SYSADMIN;

USE ROLE ACCOUNTADMIN;
GRANT CREATE INTEGRATION ON ACCOUNT TO ROLE SVC_ENTECHLOG_SNOW_TF_ROLE;

USE ROLE SYSADMIN;
GRANT CREATE DATABASE ON ACCOUNT TO ROLE SVC_ENTECHLOG_SNOW_TF_ROLE;
GRANT CREATE WAREHOUSE ON ACCOUNT TO ROLE SVC_ENTECHLOG_SNOW_TF_ROLE;

USE ROLE ACCOUNTADMIN;
ALTER USER "SVC_ENTECHLOG_SNF_TF_USER" SET PASSWORD = "<strong-password>"
For this demo, we’ll use a Docker container named developer-tools. This container comes pre-installed with Terraform and all the necessary tools, ensuring a consistent and streamlined setup for everyone. Using Docker helps avoid any environment-specific issues and makes it easy to get started quickly.
First, clone the developer-tools repository from GitHub to your local machine.
git clone https://github.com/entechlog/developer-tools.git
Change your directory to the developer-tools folder and create a copy of the .env.template file as .env. For this demo, there’s no need to edit any variables
cd developer-tools
cp .env.template .env
Use docker-compose to build and start the container in detached mode
docker-compose -f docker-compose-reg.yml up -d --build
After starting the container, it’s important to verify that everything is set up correctly. Follow these steps to validate the container:
Ensure that the developer-tools container is running by executing below command. This command lists all running containers. You should see developer-tools in the output.
docker ps
SSH into the developer-tools container to interact with it directly
docker exec -it developer-tools /bin/bash
Inside the container, check that Terraform is installed and running properly by executing below command. You should see the Terraform version information, confirming that it is installed correctly.
terraform --version
Terraform resources are the fundamental building blocks used to define infrastructure in a Terraform configuration. Each resource represents a specific component or service, such as a virtual machine, database, or user account. By defining resources in .tf files, you can manage and automate the creation, modification, and deletion of these components in a consistent and repeatable manner.
To get started with setting up Snowflake resources using Terraform, follow these steps:
First, clone the snowflake-examples repository from GitHub to your local machine
Change your directory to snowflake-examples/snow-infra/terraform. This directory contains the Terraform configuration files (.tf) with the necessary resource definitions. While you can specify all configurations in a single file, it’s better to organize them into multiple .tf files for better readability and maintainability in the long run
The first file to examine is providers.tf. This file configures the Snowflake provider, allowing Terraform to interact with Snowflake. Instead of hardcoding the Snowflake credentials, we will use Terraform variables for better security and flexibility
terraform {
  required_providers {
    snowflake = {
      source  = "Snowflake-Labs/snowflake"
      version = "0.94.0"
    }
  }
}

provider "snowflake" {
  account  = var.snowflake_account
  user     = var.snowflake_user
  password = var.snowflake_password
  role     = var.terraform_role
}
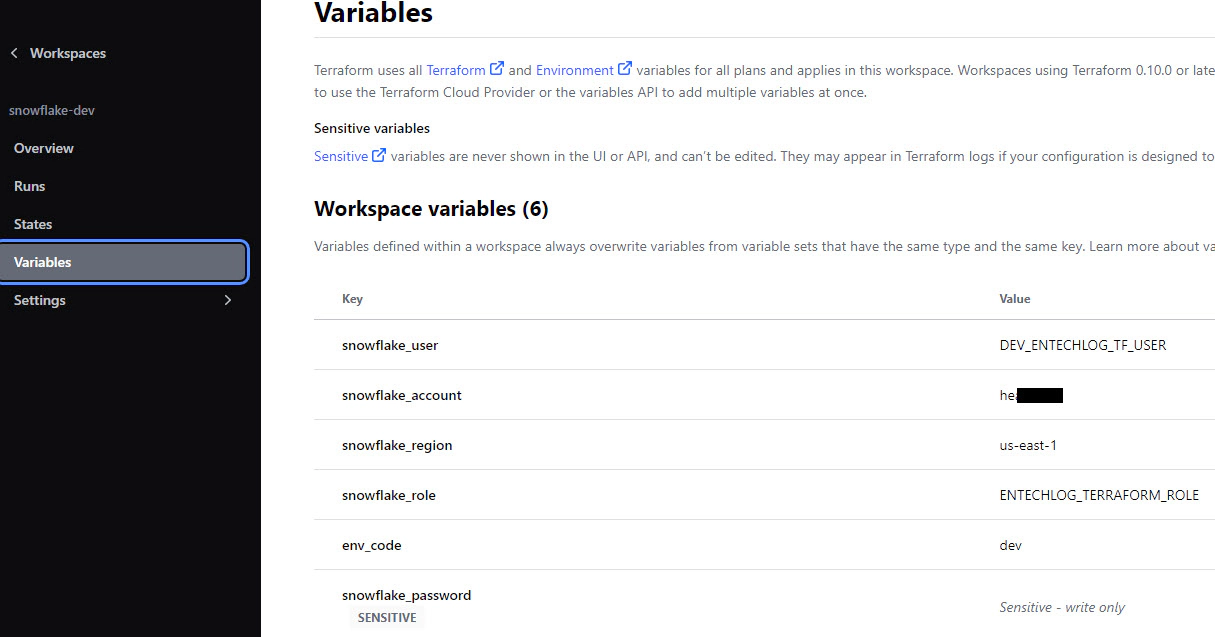
Variables are defined in a file called variables.tf in the same directory. The values for these variables are specified in terraform.tfvars for local runs. Create terraform.tfvars from terraform.tfvars.template and update it with your Snowflake account details. When using Terraform Cloud, values should be specified in workspace variables
The main.tf file contains the resource blocks for declaring Snowflake resources such as users, databases, schemas, and tables. Refer to the Snowflake provider documentation for a list of supported resources. Below is an example of creating a Snowflake user and role using Terraform
// Managing Snowflake users using Terraform will put the password in the terraform state file
// This is not recommended method for creating users
// Rather create users without password and set them latter OR use more secure options like SCIM
// https://docs.snowflake.com/en/user-guide/scim.html

//***************************************************************************//
// Create Snowflake user
//***************************************************************************//

resource "snowflake_user" "demo_user" {
  name         = lower("DEMO_USER")
  login_name   = "DEMO_USER"
  comment      = "Snowflake user account for demo"
  password     = "demouser"
  disabled     = false
  display_name = "Demo User"
  email        = "demo_user@example.com"
  first_name   = "Demo"
  last_name    = "User"

  default_role = snowflake_account_role.demo_role.name

  must_change_password = false
}

//***************************************************************************//
// Create Snowflake role
//***************************************************************************//

resource "snowflake_account_role" "demo_role" {
  name    = "${upper(local.resource_name_prefix)}_DEMO_ROLE"
  comment = "Snowflake role used for demos"
}

//***************************************************************************//
// Create Snowflake role grants
//***************************************************************************//

resource "snowflake_grant_account_role" "demo_role_grant" {

  role_name = snowflake_account_role.demo_role.name
  user_name = snowflake_user.demo_user.name

  depends_on = [snowflake_account_role.demo_role]
}
To create multiple resources using the previous approach, we would need to define multiple resource blocks. This can make the code lengthy and harder to manage. To overcome this, we can use Terraform modules. As per the official documentation, “A module is a container for multiple resources that are used together. You can use modules to create lightweight abstractions, so that you can describe your infrastructure in terms of its architecture, rather than directly in terms of physical objects.”
Here are some general design considerations for using Terraform modules:
These design considerations are configured in providers.tf
Navigate to the module definitions in the subdirectories inside snowflake-examples/snow-infra/terraform/modules. Each module typically has the following files:
providers.tf: Specifies provider details.terraform {
required_providers {
snowflake = {
source = "Snowflake-Labs/snowflake"
version = "0.94.0"
}
}
}
variables.tf: Defines input variables. Here, we use a variable named user_map of type map to accept multiple users as input.variable "user_map" {
type = map(any)
}
main.tf: Contains resource definitions. This example loops over the user_map variable to create users.resource "snowflake_user" "user" {
for_each = var.user_map
name = lower(each.key)
login_name = lower(each.key)
disabled = false
display_name = "${title(each.value.first_name)} ${title(each.value.last_name)}"
email = lookup(each.value, "email", "NONE") == "NONE" ? "" : each.value.email
first_name = title(each.value.first_name)
last_name = title(each.value.last_name)
default_warehouse = lookup(each.value, "default_warehouse", "NONE") == "NONE" ? "" : each.value.default_warehouse
default_role = lookup(each.value, "default_role", "NONE") == "NONE" ? "PUBLIC" : each.value.default_role
must_change_password = false
}
output.tf: Specifies output variables.
  output "user" {
    value = snowflake_user.user
  }
After creating the module, you can invoke it in your Terraform configuration. The module block includes a source that points to the module’s directory. This example shows how to create multiple users with a few lines of code by referencing a reusable resource block.
module "all_service_accounts" {
  source = "./user"
  user_map = {
    "${lower(var.env_code)}_entechlog_demo_user" : { "first_name" = "Demo", "last_name" = "User" },
    "${lower(var.env_code)}_entechlog_dbt_user" : { "first_name" = "dbt", "last_name" = "User" },
    "${lower(var.env_code)}_entechlog_atlan_user" : { "first_name" = "Atlan", "last_name" = "User" },
    "${lower(var.env_code)}_entechlog_kafka_user" : { "first_name" = "Kafka", "last_name" = "User", default_role = "${upper(var.env_code)}_ENTECHLOG_KAFKA_ROLE" }
  }
}
Finally, create the resources by applying the Terraform configuration. Run the following commands in your terminal
# Install custom modules
terraform init -upgrade

# Format code
terraform fmt -recursive

# Plan to review the summary of changes
terraform plan

# Apply the changes to target environment
terraform apply
By using modules, you can create reusable, organized, and scalable Terraform configurations, simplifying the process of managing your infrastructure.
In the previous example, we manually applied Terraform changes. To streamline and automate this process, we can connect our Terraform Cloud workspace to a version control provider like GitHub. Here’s how to do it:
Navigate to the version control properties of your Terraform Cloud workspace to connect it to your version control provider. In this example, we will use GitHub.
Update the Terraform Working Directory to point to the directory containing the module blocks. For this example, it will be snow-infra/terraform/.
Set the Apply Method to Auto apply to ensure changes are automatically applied after they are reviewed and approved.
Set the Run Triggers to Only trigger runs when files in specified paths change. Specify the path as snow-infra/terraform/.
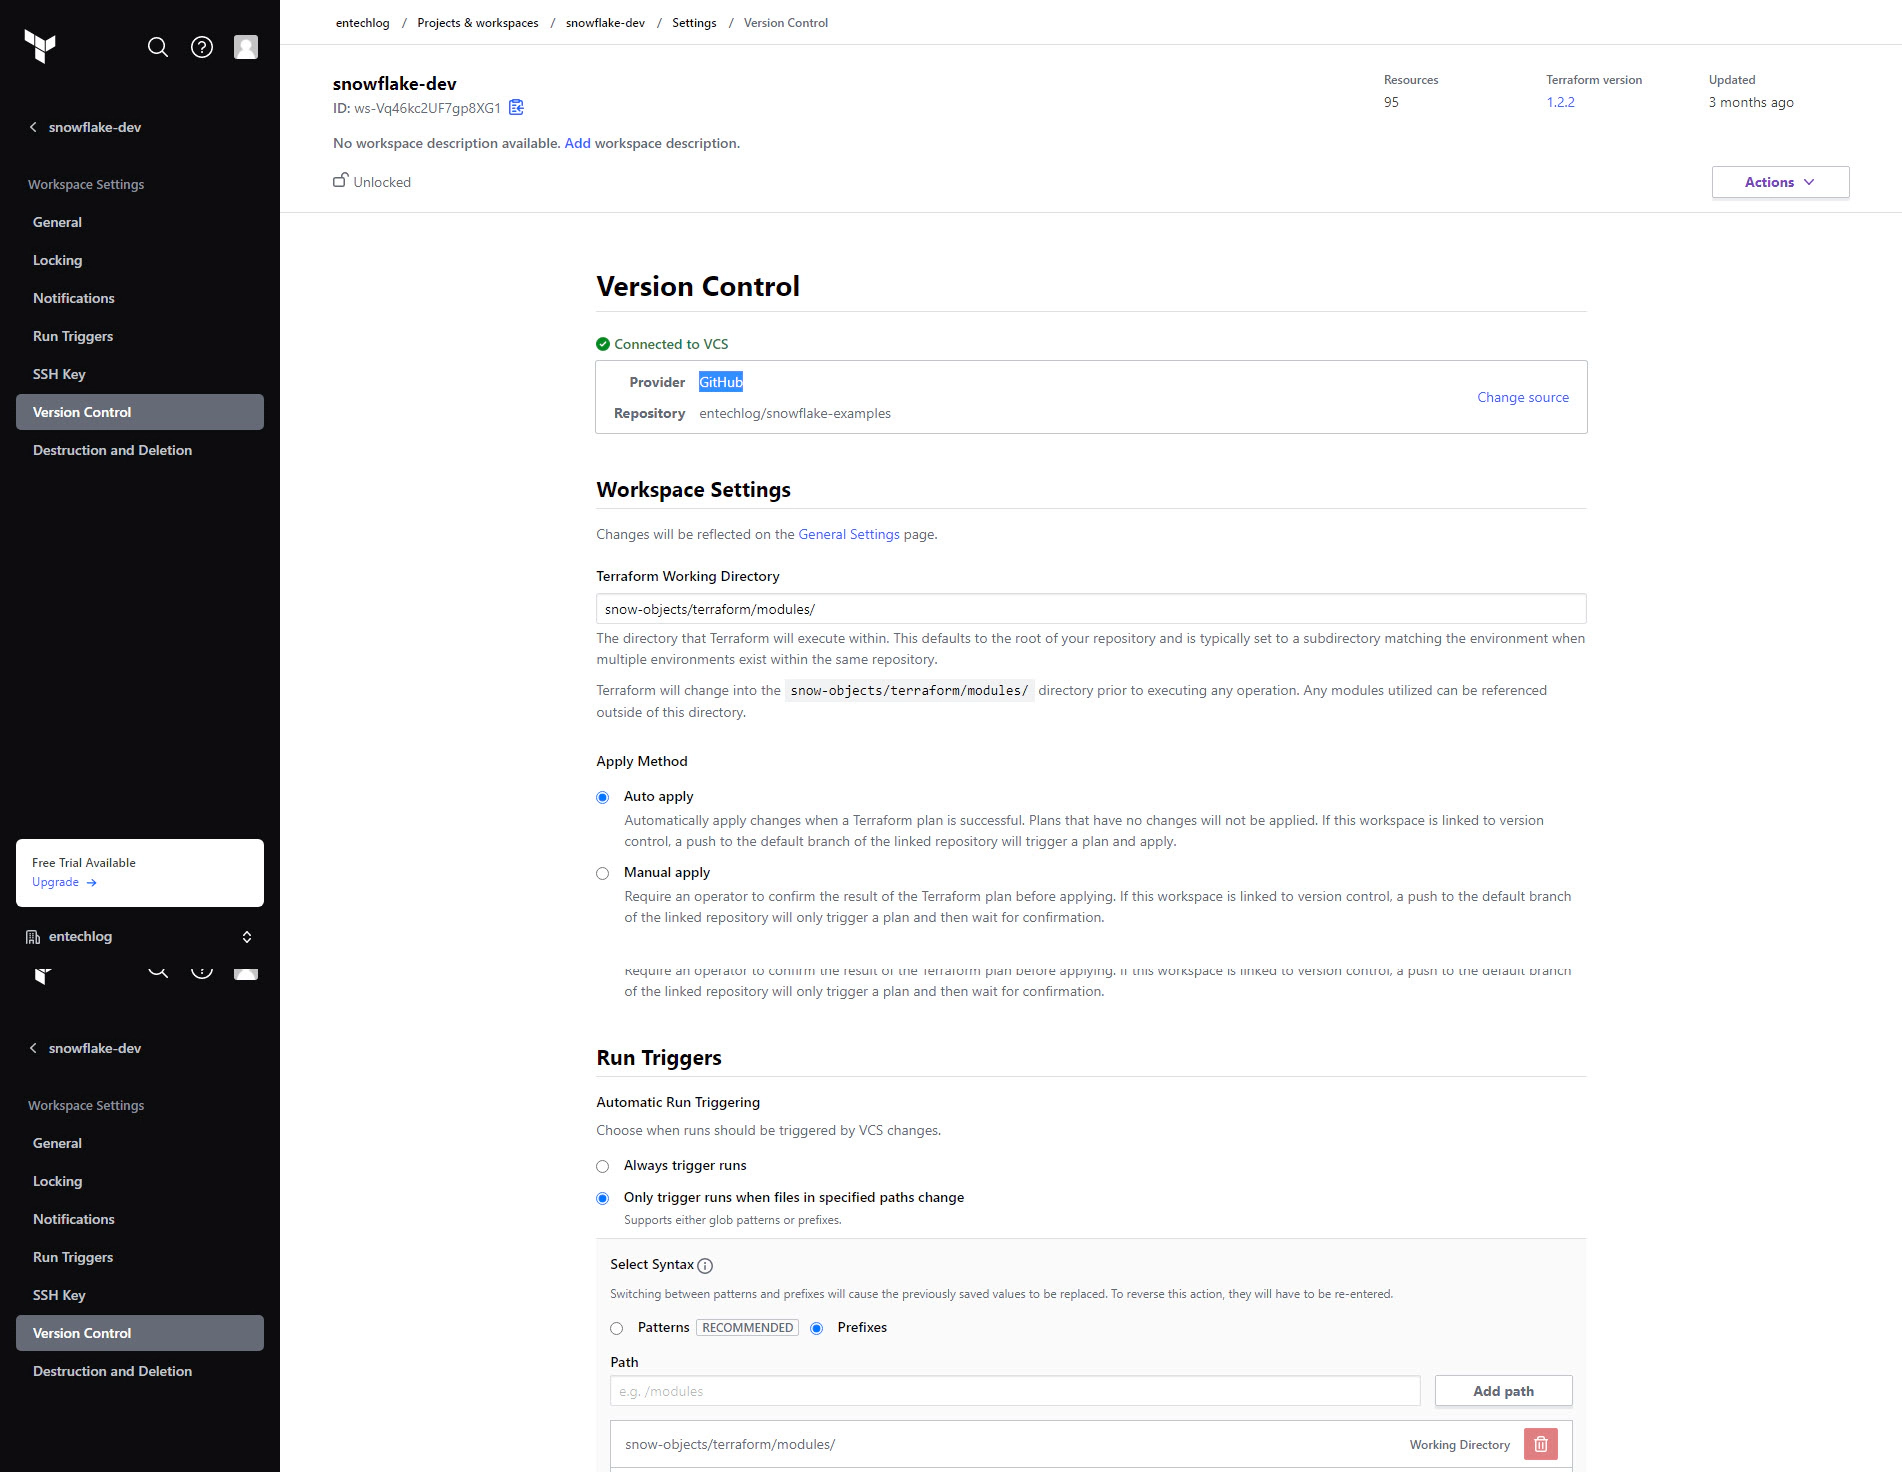
Enable Automatic speculative plans in the version control properties. This setting ensures that Terraform plans are automatically generated for all pull requests (PRs) with changes to the modules directory.
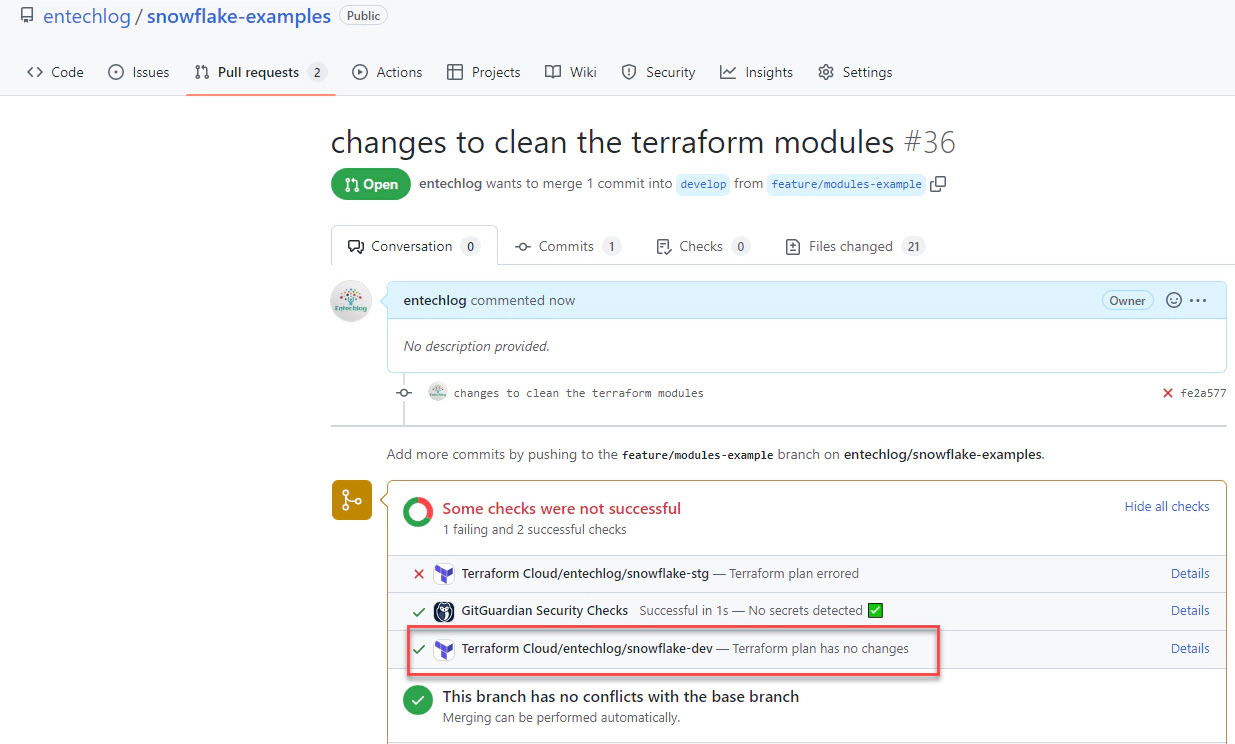
Once the PR is reviewed and approved, the changes will be automatically deployed to Snowflake.

By integrating Terraform Cloud with a version control provider, you can automate the deployment process, making it more efficient and less error-prone. This setup ensures that all changes are reviewed and tested before being applied.
If you have any questions or feedback, feel free to leave a comment below.
Note: This blog represents my own viewpoints and not those of my employer, Snowflake. All product names, logos, and brands are the property of their respective owners.
Federated authentication enables your users to connect to Snowflake using secure SSO (single sign-on). With SSO enabled, …

A Snowflake object naming convention is a framework for naming objects in a way that describes what they contain and how …