
How to pull data from API using AWS Lambda & stream to Snowflake using Snowpipe
In this article, we will see how to get/pull data from an api, store in S3 and then stream the same data from S3 to …
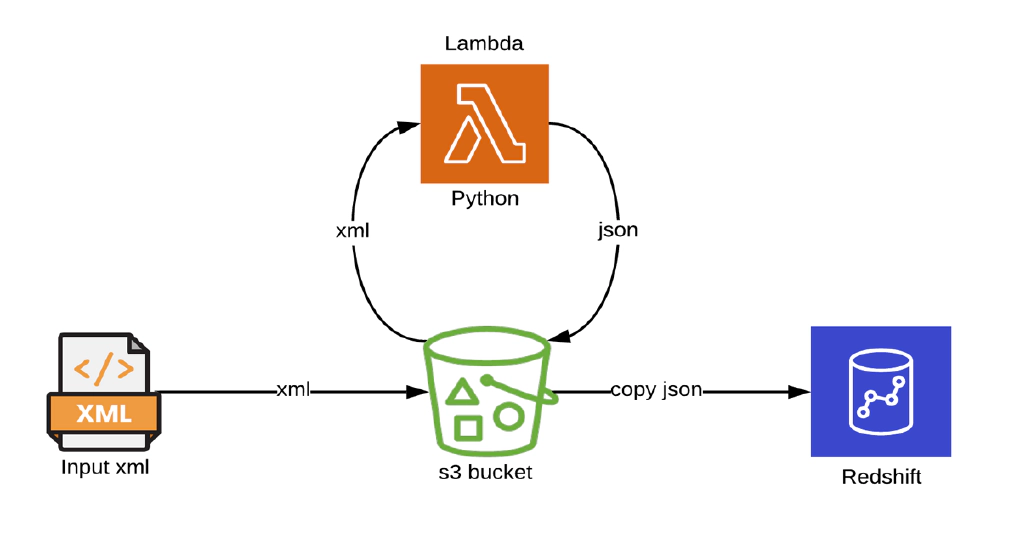

In this article, we will see how to load XML from an s3 bucket into Redshift using AWS Lambda and Redshift copy commands. AWS Lambda code is written in python. Code used in this article can be found here. Clone the git repo to get started.
We will see the steps to set up AWS SAM. Please skip next two sections before Create AWS resources if you have a machine with SAM configured and an IAM user with permissions required for SAM.
Access used for demo is pretty open, please adjust them as per your use case. Deployment should happen from your CICD pipeline and its natural for CICD user to have these elevated access.
Security credentials tab of newly created IAM user and create an access key. The access key will be used by SAM to deploy the resources to AWS.We will use SAM framework and localstack in docker for development and testing the python lambda.
Open a new terminal and cd into aws-tools directory. This directory contains Dockerfile and docker-compose.yml to bring up a docker container with AWS SAM and localstack.
Create a copy of .env.template as .env
Update the .env with the access key from previous step
Start aws-tools container by running
docker-compose up -d
Validate the container by running
docker ps
SSH into the container by running
docker exec -it aws-tools /bin/bash
Validate AWS CLI by running
aws --version
Validate AWS SAM by running
sam --version
Validate your AWS profile by running
aws configure list
You can also override the profile OR create a new profile at any point by running aws configure OR aws configure --profile <profile-name>
Validate localstack by running
curl http://localstack:4566 && echo -e ""
Let’s create following AWS resources required for this demo using AWS SAM.
✅ AWS Lambda to read xml from s3, convert xml to json and write json to s3
✅ S3 bucket and bucket policy
✅ Redshift cluster and Redshift role
SAM helps to create serverless application that you can package and deploy in AWS Cloud. AWS Lambda function to read xml from s3, convert xml to json and write json to s3 is written in python. Click the links below to review the code used
🔗 AWS Lambda(Python Module)
🔗 AWS SAM Template
cd in the SAM project directory sam-lambda-xml2json
cd /C/sam-lambda-xml2json/
cd into the SAM project directory and validate SAM project by running
sam validate
Build the SAM project by running
sam build
Commands in this section are executed from the aws-tools container. Alternatively, you can also SSH into the localstack container and run the CLI command using awslocal. In the next few steps awslocal commands is also captured for reference.
Create s3 bucket in localstack by running
aws --endpoint-url=http://localstack:4566 s3api create-bucket --bucket sam-lambda-xml2json --region us-east-1
localstack container command : awslocal s3 mb s3://sam-lambda-xml2json
Copy sample xml file to s3 bucket by running
aws --endpoint-url=http://localstack:4566 s3api put-object --bucket sam-lambda-xml2json --key xml/breakfast_menu.xml --body sample-xml/breakfast_menu.xml
localstack container command : awslocal s3 cp sample-xml/breakfast_menu.xml s3://sam-lambda-xml2json/xml/breakfast_menu.xml
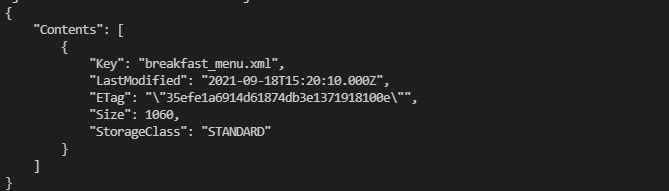
Make sure the s3 bucket in localstack has xml file by running
aws --endpoint-url=http://localstack:4566 s3api list-objects-v2 --bucket sam-lambda-xml2json
localstack container command : awslocal s3 ls s3://sam-lambda-xml2json/ --recursive --human-readable --summarize
Execute the lambda locally by running
sam local invoke --container-host host.docker.internal -e events/events.json
Here events.json is a sample event configured with sam-lambda-xml2json as bucket name and breakfast_menu.xml as key

Validate the generated JSON file by downloading it from localstack s3 bucket to local directory
aws --endpoint-url=http://localstack:4566 s3api get-object --bucket sam-lambda-xml2json --key json/breakfast_menu.json breakfast_menu.json
localstack container command : awslocal s3 cp s3://sam-lambda-xml2json/json/breakfast_menu.json breakfast_menu.json
Execute the lambda locally by passing parameter for environment. Lambda will try to read the s3 bucket in AWS and execution will fail gracefully when an environment other than local is passed. This is expected result
sam local invoke --container-host host.docker.internal -e events/events.json --parameter-overrides ParamEnvironment="dev"

Deploy SAM project by running below command. IAM user for SAM is required for this step
sam deploy --guided --capabilities CAPABILITY_NAMED_IAM
Guided deployment option is best for first deploy. Make sure to keep a note of parameters and the managed S3 bucket name so they can be used in future non guided deployments.
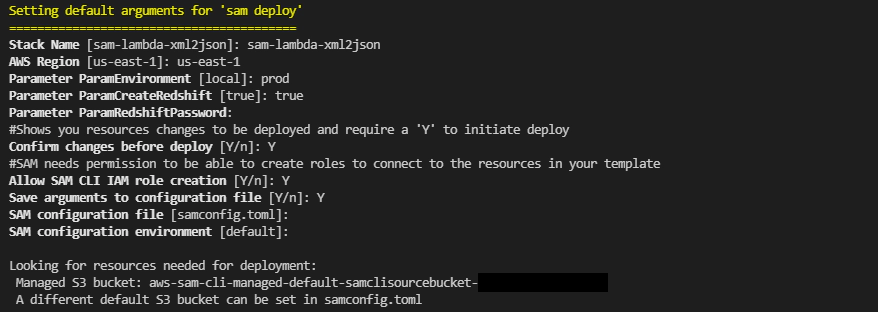
Future deploys can be done using below command
sam deploy --stack-name sam-lambda-xml2json --s3-bucket <sam-bucket-name> --capabilities CAPABILITY_NAMED_IAM --parameter-overrides ParamEnvironment="prod"
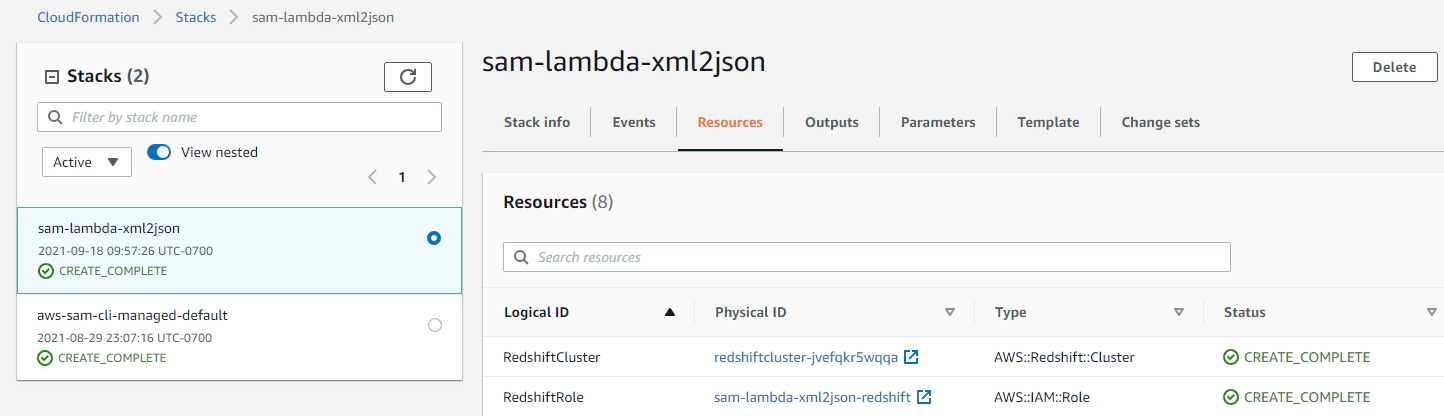
Successful deployment will create the AWS resources. Navigate to Cloudformation in AWS console and confirm the status
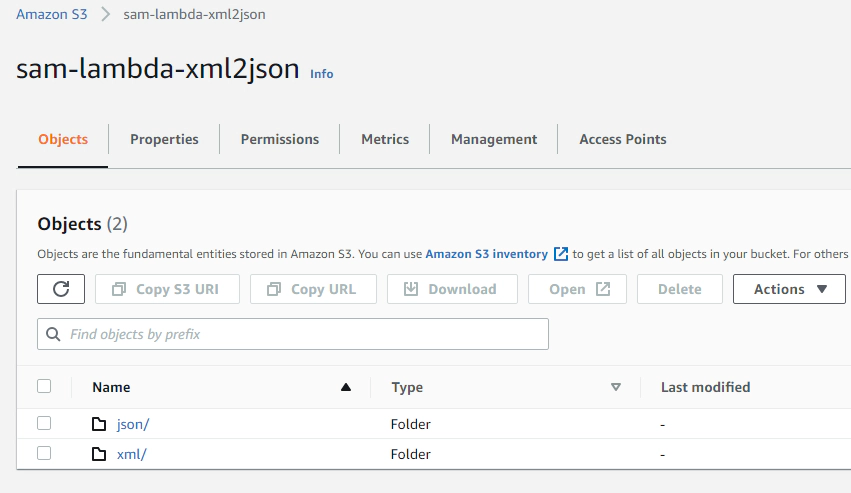
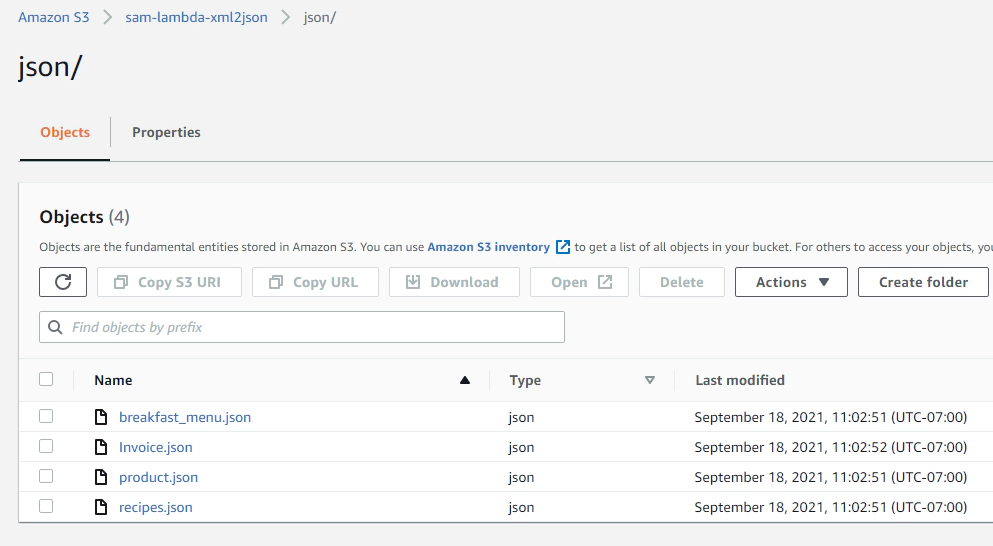
Let’s upload some sample xml to the s3 bucket. The upload should trigger the lambda code to convert xml to JSON
Upload xml to s3 bucket into a directory named xml
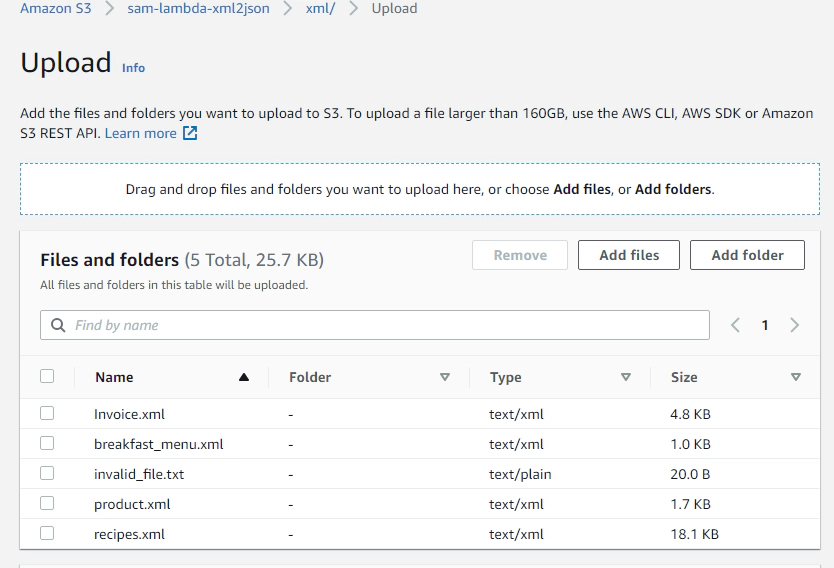
This instantly creates a directory named json with the generated json files in them
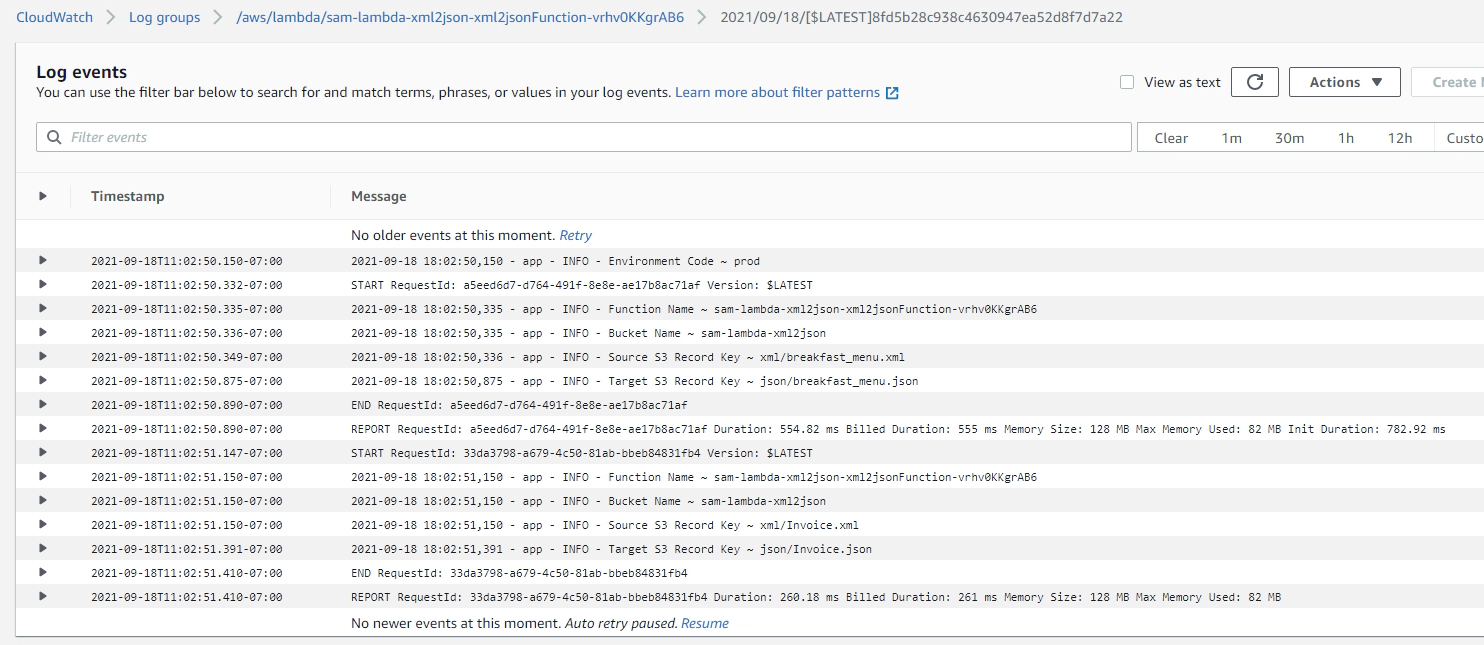
Validate the lambda execution log by navigating to CloudWatch logs
We will see couple of options to the JSON into a Redshift table. One using jsonpath which works well for simple json and the other one using SUPER data type which works well for nested/complex json. Choose the one which fits for your use case
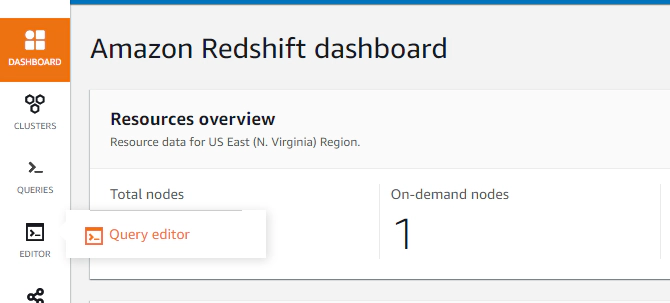
Navigate to Amazon Redshift dashboard –> Query editor to get started
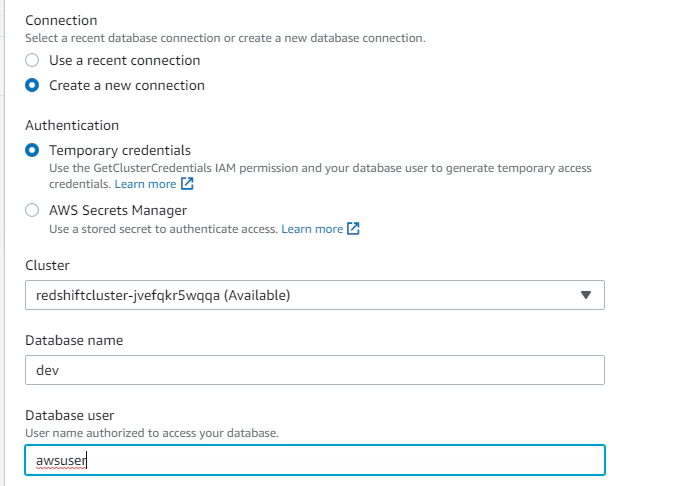
Click connect and run, when running a query for first time you can connect using a temporary credential
Create a table for copying the parsed JSON data
CREATE TABLE breakfast_menu (
  food_name VARCHAR,
  food_price VARCHAR,
  food_description VARCHAR
  );
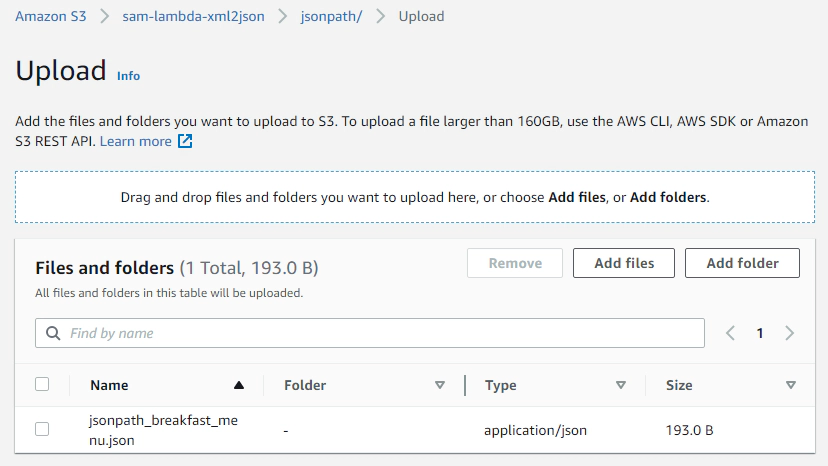
Create a jsonpath for the JSON message and upload the same to jsonpath directory in same s3 bucket.
{
  "jsonpaths": [
      "$['breakfast_menu']['food'][0]['name']",
      "$['breakfast_menu']['food'][0]['price']",
      "$['breakfast_menu']['food'][0]['description']"
  ]
}
Copy JSON from S3 to Redshift table using jsonpath option. With this option, COPY uses the named JSONPaths file to map the data elements in the JSON source data to the columns in the target table.
COPY breakfast_menu
FROM 's3://sam-lambda-xml2json/json/'
CREDENTIALS 'aws_iam_role=<iam-role-for-redshift>'
json 's3://sam-lambda-xml2json/jsonpath/jsonpath_breakfast_menu.json';
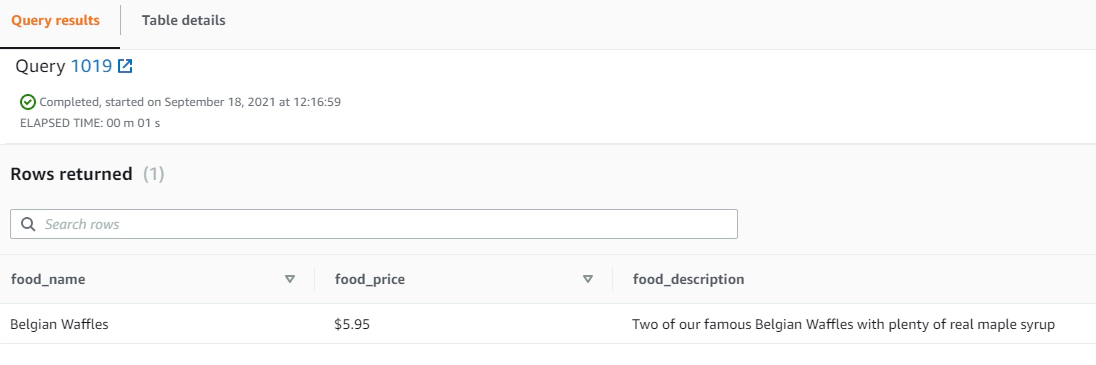
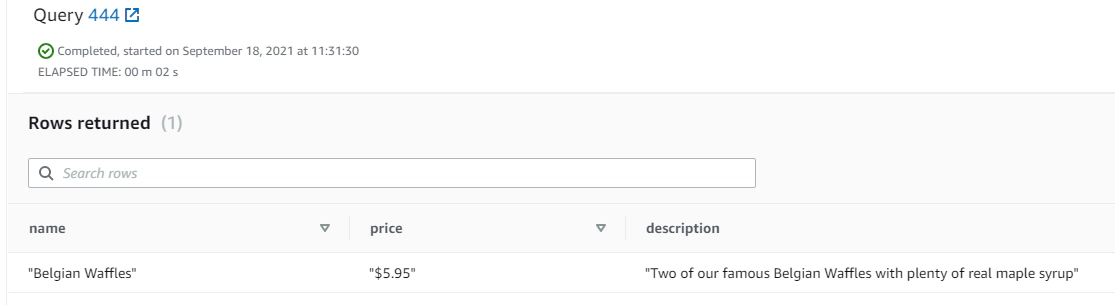
Validate parsed JSON
SELECT *
FROM breakfast_menu
WHERE food_name IS NOT NULL;
As we see here json path requires array index which makes it little complex for nested JSON.
Create table with SUPER type.
CREATE TABLE raw_event (event SUPER);
Copy JSON from S3 to Redshift table using noshred option. Amazon Redshift doesn’t shred the attributes of JSON structures into multiple columns while loading a JSON document
COPY raw_event
FROM 's3://sam-lambda-xml2json/json/breakfast_menu.json'
REGION 'us-east-1'
IAM_ROLE '<iam-role-for-redshift>'
FORMAT JSON 'noshred';
Validate raw event
SELECT re.*
FROM raw_event re;
Parse the JSON using bracket and dot notation. Bracket and dot notation works well for simple JSON just like jsonpath but not great for nested JSON.
SELECT event.breakfast_menu.food [0].name,
  event.breakfast_menu.food [0].price,
  event.breakfast_menu.food [0].description
  FROM raw_event;
Parse the nested JSON using PartiQL
SELECT bmf.name,
  bmf.price,
  bmf.description
  FROM raw_event re,
  	re.event.breakfast_menu.food bmf;

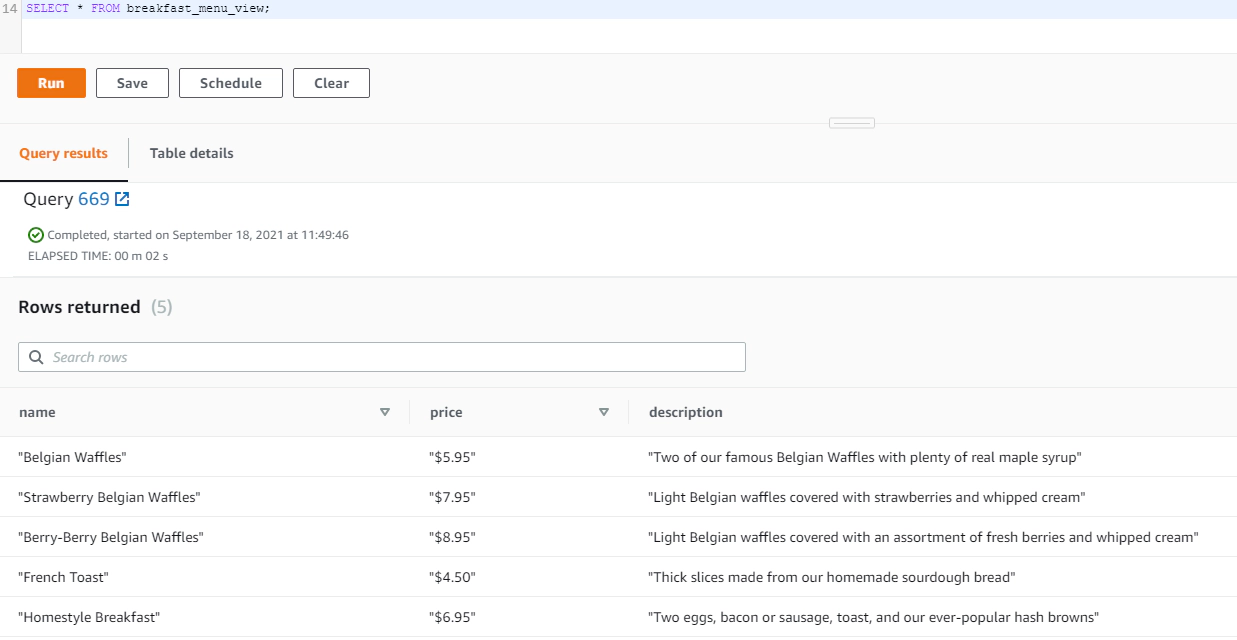
Parse and materialize the JSON into a a view.
CREATE MATERIALIZED VIEW breakfast_menu_view AUTO REFRESH YES AS
SELECT bmf.name,
  bmf.price,
  bmf.description
FROM raw_event re,
  re.event.breakfast_menu.food bmf;

SELECT * FROM breakfast_menu_view;
Empty the S3 bucket
Delete all AWS resources by running
aws cloudformation delete-stack --stack-name sam-lambda-xml2json
We saw how convert an XML into JSON using python Lambda function and load the JSON into redshift table using copy commands. The python code used here can be customized to run in your environment locally with some small changes.
Hope this was helpful. Did I miss something ? Let me know in the comments.
In this article, we will see how to get/pull data from an api, store in S3 and then stream the same data from S3 to …

In this article, we will see how to install AWS SAM in a docker container and to create an AWS Lambda using AWS SAM. …