
How to build Snowflake Cortex Agents using dbt and Cortex Code
Computers have been doing work for humans for decades. The fundamental loop has always been the same: a person has a …


Login into ‘http://pogoplug.com/'
Click setting icon on top right hand corner - > Settings - > Security - > “Enable SSH access for this Pogoplug device”
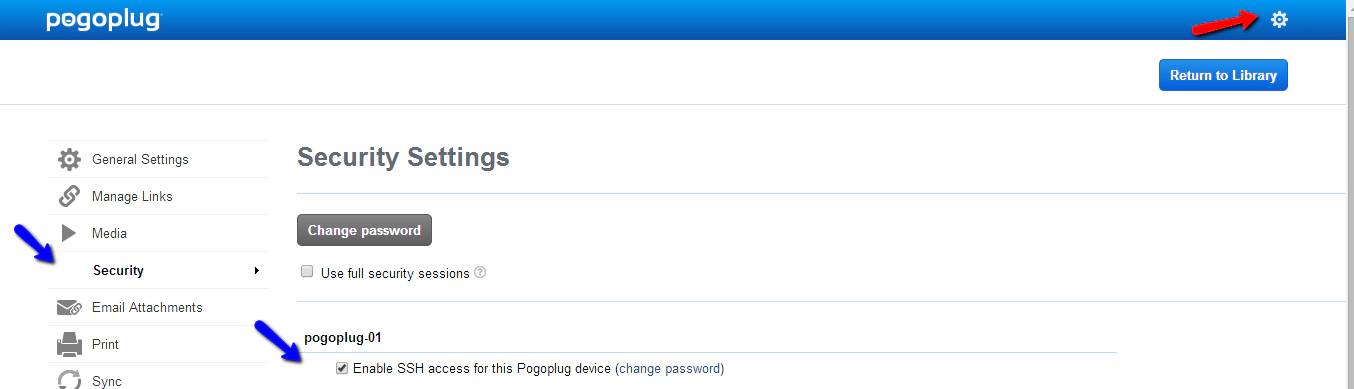
Enable SSH pogoplug.com
Plug in the Pogoplug without any USB drive attached.
SSH into Pogoplug using putty or similar SSH clients, You should also know the IP address of pogoplug to SSH which can be found from your router setting.
Log in as root/ceadmin (The password might be different if you have changed this in pogoplug.com when enabling SSH).

SSH Login using Putty
Stop the Pogoplug Software\Service
killall hbwd
Install UBoot (This step is different for E02 and V4 models, So please select the correct one based on the device you have)
cd /tmp
wget http://jeff.doozan.com/debian/uboot/install_uboot_mtd0.sh
chmod +x install_uboot_mtd0.sh
./install_uboot_mtd0.sh
Would you like to disable the Pogoplug services? [Y/n]
n
Download the install script
cd /tmp
wget http://archlinuxarm.org/os/ppv4/ppv4-install.sh
chmod +x ppv4-install.sh
./ppv4-install.sh
Plug in USB Flash Drive into the back bottom USB port (For E02 Model), Into top USB port (Port near SATA port for V4 Models)
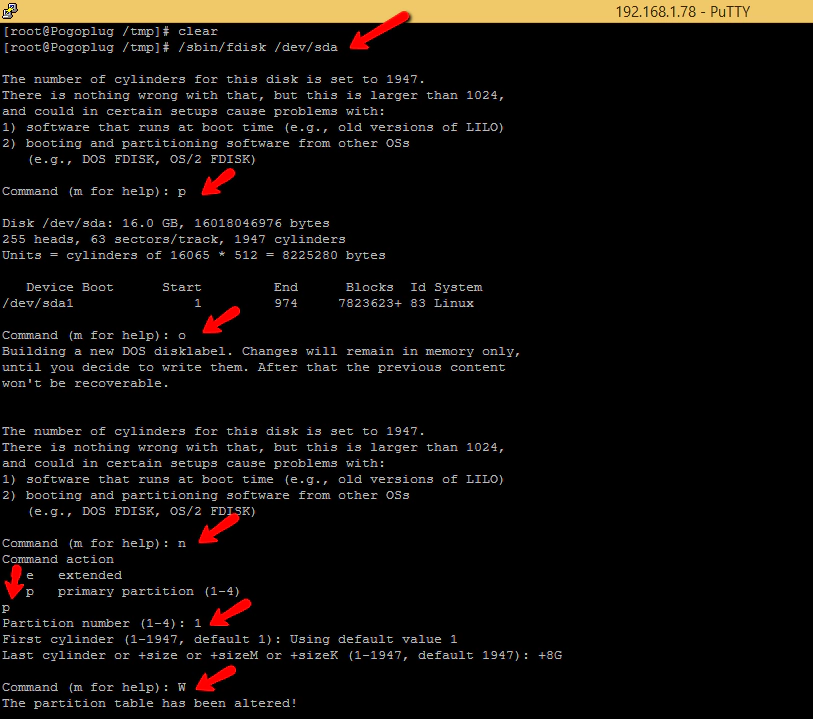
Partition your USB Flash Drive
/sbin/fdisk /dev/sda
p # list current partitions
o # to delete all partitions
n # new partition
p # primary partition
1 (one) # first partition
<enter> # default start block
<enter> # default end block (to use the whole drive, I used +8G as I am using a 16 GB flash drive)
w # write new partition to disk
Format USB Flash Drive
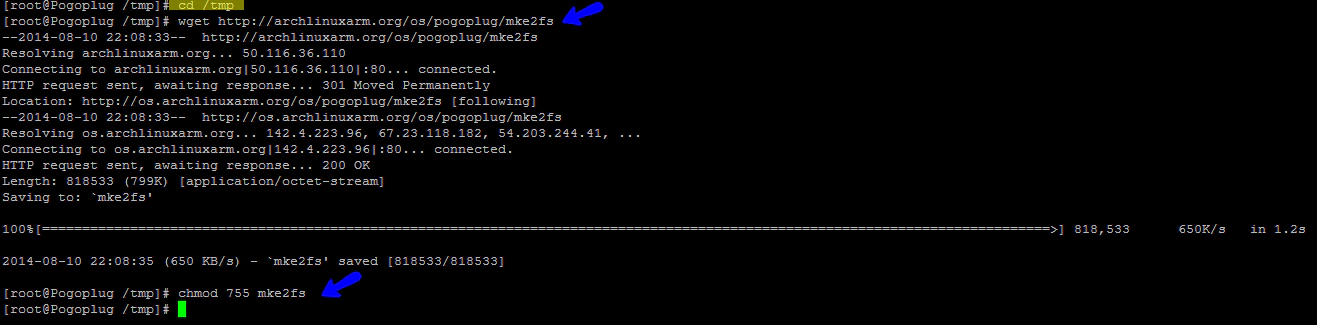
cd /tmp
wget http://archlinuxarm.org/os/pogoplug/mke2fs
chmod 755 mke2fs
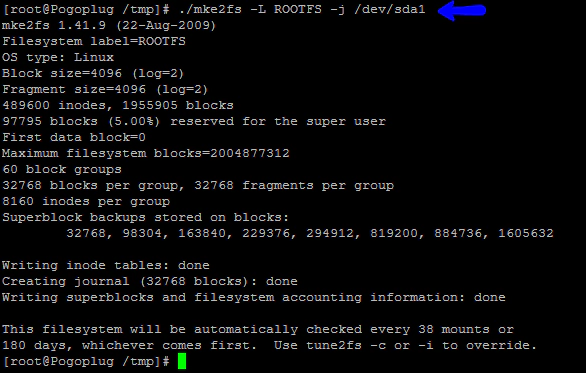
Format and label partition
./mke2fs -L ROOTFS -j /dev/sda1
Mount USB flash drive
mkdir -p /tmp/usb
mount /dev/sda1 /tmp/usb
Download Arch Linux ARM (aka ALARM) and extract to USB Drive
cd /tmp/usb
wget http://archlinuxarm.org/os/ArchLinuxARM-kirkwood-latest.tar.gz
tar -xzvf ArchLinuxARM-kirkwood-*.tar.gz
rm ArchLinuxARM-kirkwood-*.tar.gz
sync  # Takes a while when using a flash drive
cd ..
umount /tmp/usb
Update uboot env varibles, Have uboot mount partition as ext3 (Applicable for E02 only)
/usr/sbin/fw_setenv usb_rootfstype ext3
Correct machid - make LED Green versus Orange (Applicable for E02 only)
/usr/sbin/fw_setenv machid dd6
reboot
After reboot, Give it a minute or two and the SSH back into your Pogoplug and login with the username and password of root/root, If login works that means your Installation is SUCCESS.
Upgrade Kernal and Install some initial packages
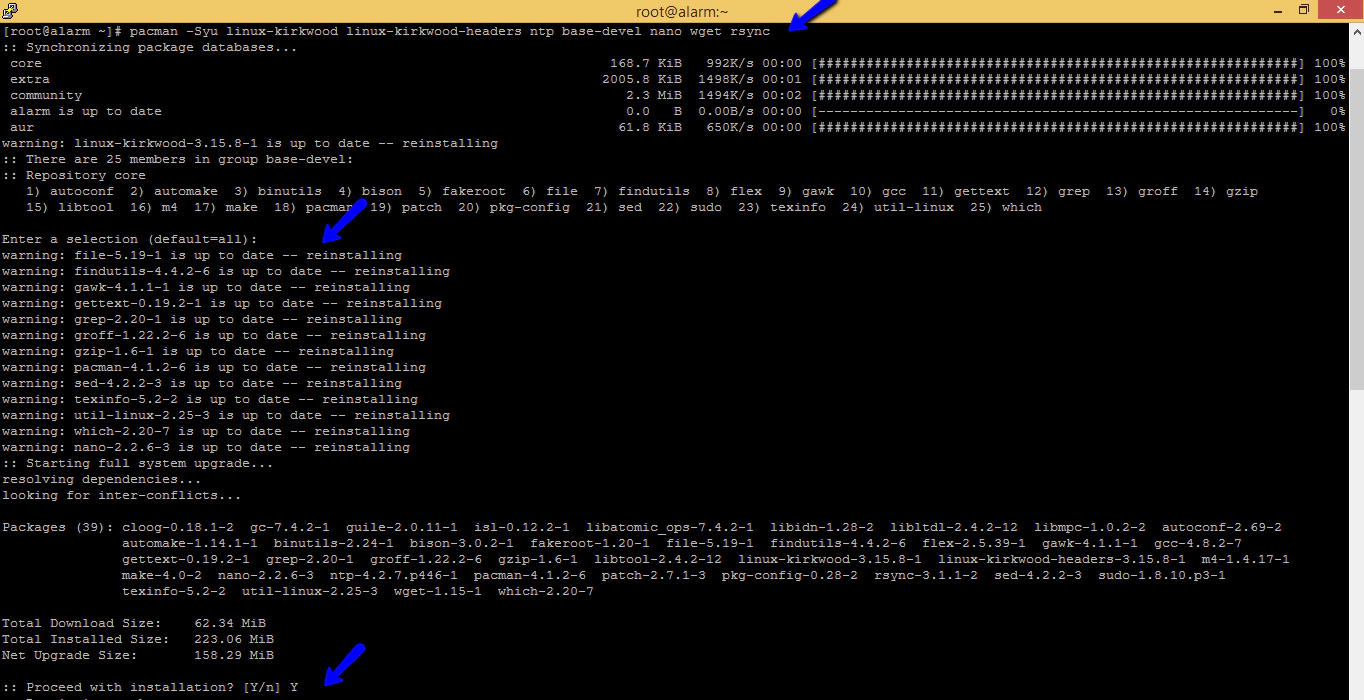
pacman -Syu linux-kirkwood linux-kirkwood-headers ntp base-devel nano wget rsync
Issue below command to keep your packages updated
pacman -Syu
Issue below command to change your host name
hostnamectl set-hostname myhostname
Issue below commands to list all time zone & to change to your time zone
timedatectl list-timezones
timedatectl set-timezone America/Chicago
Autostart NTPD(Network Time Protocol daemon), Pogoplug don’t have hardware clock
systemctl enable ntpd
systemctl start ntpd
Force time update after network starts
echo "ExecUpPost='/usr/bin/ntpdate -u pool.ntp.org'">>/etc/netctl/eth0
Add ROOTFS to fstab so fsck will run when needed
echo "LABEL=ROOTFS / ext3 rw,noatime 0 1" >> /etc/fstab
reboot
Install udevil
pacman -Sy udevil
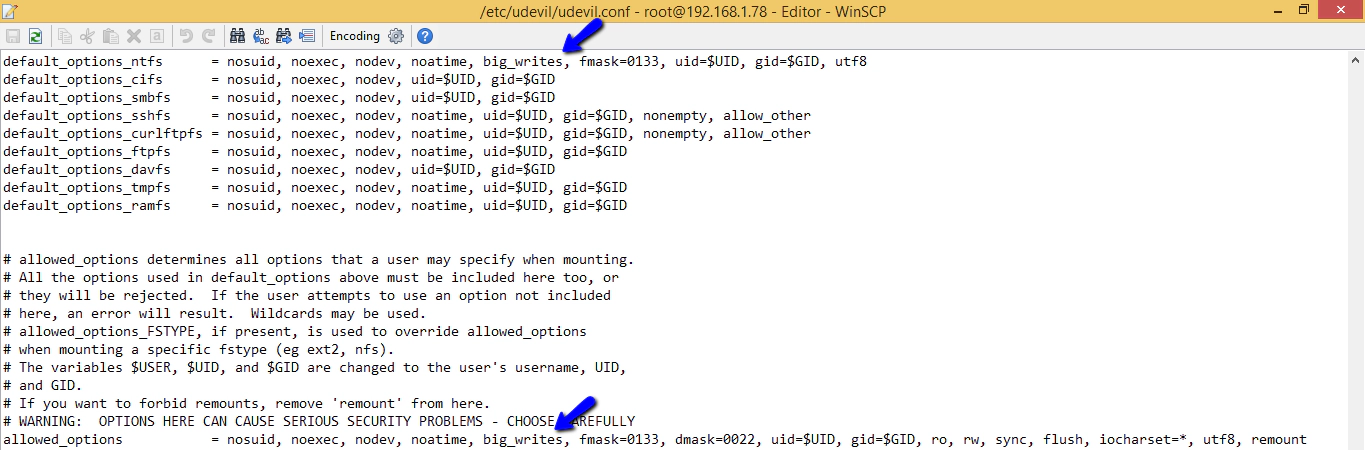
Update udevil.conf for better Speed, Edit /etc/udevil/udevil.conf (I use winscp for editing config files, but you can use VI or Nano editor), We need add “big_writes” in default_options_ntfs= and allowed_options=, Updated lines will look like below screenshot.
Create media dir, add the udevil service to autostart and reboot the device. Any hard disk connected will show inside this media folder.
mkdir /media
systemctl enable devmon@root
reboot

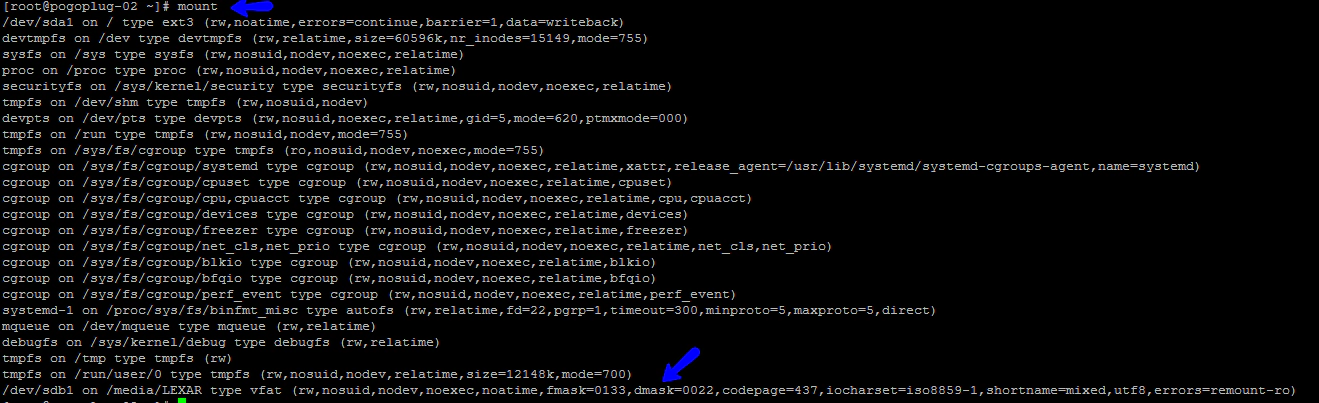
Connect a hard disk now to any of the open USB port and Issue mount command to verify the hard disk is coming up in media folder.
mount
*** The instructions below assumes you have ALARM installed on the first partition of your USB hard drive. Replace “/dev/sda2” (second partition on first hd) with “/dev/sdb1” (first partition second hard drive) if you have ALARM installed on a USB Flash Drive and adding a new USB Hard Drive for SAMBA.
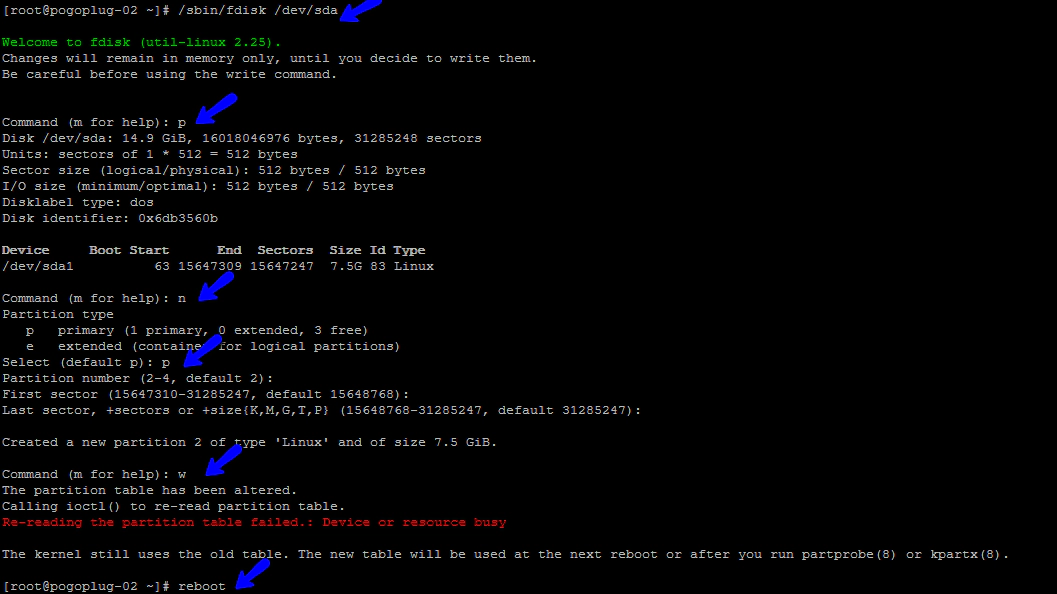
*** Create a 2nd Partition on your USB Drive (Remember we used 16 GB drive and allocated 8 GB for ARM partition, we will now use the remaining space for this setup)
/sbin/fdisk /dev/sda

p       # list current partitions
n       # new partition
p       # primary partition
<enter> # default to second partition
<enter> # default start block
<enter> # default end block #use the whole flash drive

w       # write new partition to disk
reboot
Label new partition as USB
mkfs.ext3 -L USB /dev/sda2
Mount the disk and 2nd partition
mkdir -p /media/usb
mount /dev/sda2 /media/usb
install samba and upgrade everything
pacman -Syu samba
Create folder we’ll be sharing
mkdir -p /media/usb/share
Download sample smb.conf
cd /etc/samba
wget http://dl.dropbox.com/u/42238/pogoplug/v2/smb.conf
Edit smb.conf (optional) to change name and to add additional shares
Start samba
systemctl start smbd nmbd
Mount after reboot
echo "LABEL=USB /media/usb ext3 rw,noatime,nofail 0 0" >> /etc/fstab
Start samba
systemctl start smbd nmbd
Autostart samba on reboot
systemctl enable smbd nmbd
Test Samba now from your computer now
#\\ip_address_of_pogoplug\usb
Reboot and test
reboot
Install webmin
pacman -Sy webmin perl-net-ssleay nano
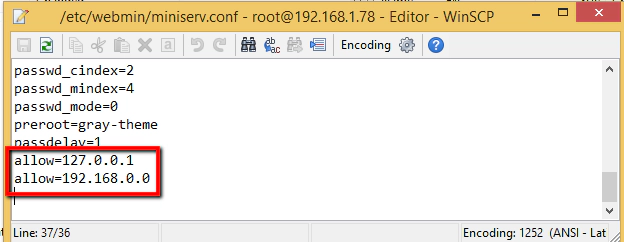
Edit config file to add below two lines which handles access, Config file name is /etc/webmin/miniserv.conf (I am using winscp to edit, you could use VI or Nano)
allow=127.0.0.1 ## Allow local access
allow=192.168.0.0 ## Allows all users from 192.168.0.1 - 192.168.0.255
Start webmin
systemctl start webmin
Auto start after reboot
systemctl enable webmin
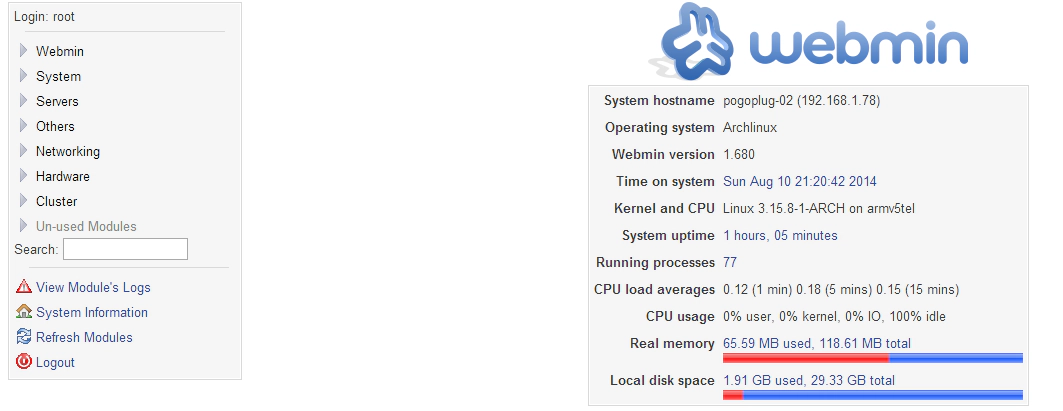
Test Webmin (Login using your root id\password which is root\root)
https://ip_address_of_pogoplug:10000
Install pogoplug software
pacman -U http://dl.dropboxusercontent.com/u/15043728/ArchLinuxArm/my.pogoplug.com/pogoplug-3.3.5-1-arm.pkg.tar.xz
Download sample pogoplug.conf file
cd /etc
wget http://dl.dropbox.com/u/42238/pogoplug/v2/pogoplug.conf
Edit configuration file *** Edit ’etc/pogoplug.conf’, vfsdir0, If needed add more lines to add your hard drive location from media folder *** Add svcid (ID) from the bottom of your PogoPlug (no dashes)
Start pogoplug service
systemctl start pogoplug
Autostart pogoplug service on reboot
systemctl enable pogoplug
Reboot and register at http://my.pogoplug.com
reboot
*** Sample command to restart a application “systemctl restart pogoplug”
Computers have been doing work for humans for decades. The fundamental loop has always been the same: a person has a …

As data platforms grow, one of the most expensive patterns is duplicating raw data across multiple storage engines. If …