
How to build Snowflake Cortex Agents using dbt and Cortex Code
Computers have been doing work for humans for decades. The fundamental loop has always been the same: a person has a …


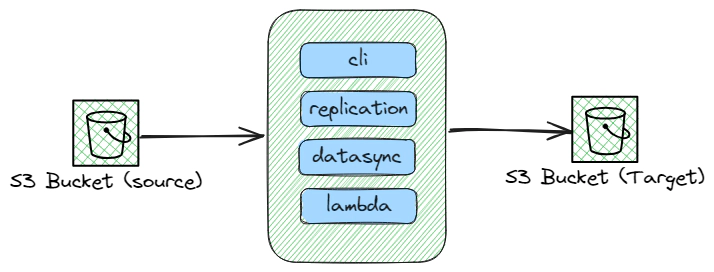
Transferring data between Amazon S3 buckets is a common requirement for many AWS users. This guide will walk you through four different methods to accomplish this task: using AWS CLI, AWS DataSync, S3 bucket replication, and AWS Lambda functions. Each method suits different scenarios based on factors such as data volume, transfer frequency, and automation needs. Additionally, we’ll cover the setup process, including the necessary Terraform code for provisioning AWS resources and Lambda function code for automated transfers. Moreover, this demonstration specifically focuses on copying data between S3 buckets across multiple AWS accounts, showcasing the versatility and power of AWS services in complex cloud architectures.
The code used in this article can be found here.
Before we get started, make sure you have the following setups ready:
Docker: Essential for creating an isolated environment that’s consistent across all platforms. If you haven’t installed Docker yet, please follow the official installation instructions.
AWS Account: You’ll need an AWS account to access cloud services used in this demo. If you don’t have one, you can create it by following these steps to create and activate an AWS account. AWS provides a Free Tier for new users that we’ll leverage for this demo.
Terraform: We will be creating the required AWS resources using Terraform. It’s beneficial to have a basic understanding of Terraform’s concepts and syntax to follow the deployment process effectively.
Ensure these prerequisites are in place to smoothly proceed with the upcoming sections of our guide.
Follow these steps to set up an AWS account for use with Terraform:
Create a New IAM User:
terraform. This user will be utilized by Terraform to provision AWS resources.Set Permissions:
AdministratorAccess policy to the user.Attaching AdministratorAccess provides full access to AWS services and resources, which is recommended only for this demonstration. In production environments, it’s crucial to adhere to the principle of least privilege by assigning only the necessary permissions.
Create Access Keys:
Security credentials tab of the IAM user.This step should be done in both source and target account. Ensure you securely store the access key and secret key generated during this process, as they will be required for configuring the AWS CLI and Terraform.
For the purpose of the demo we will use a docker container called developer-tools which has Terraform and tools required for the demo. If you already have a machine with Terraform, AWS CLI then you can skip this step.
git clone https://github.com/entechlog/developer-tools.git
cd into developer-tools directory and create a copy of .env.template as .env. For the purpose of demo, we don’t have to edit any variables
cd developer-tools
Start the container
docker-compose -f docker-compose-reg.yml up -d --build
Validate the containers by running
docker ps
SSH into the container
docker exec -it developer-tools /bin/bash
Validate terraform version by running below command
terraform --version
Create AWS profile named dev by running the below command
aws configure --profile dev
Update the account details with values from Terraform User Setup in AWS
Test the profile by running the command
aws sts get-caller-identity
This will become the default profile. Repeat this step to also create a profile named prd. You may choose other profile names as well; just ensure the Terraform code is adjusted accordingly. AWS profile can be also configured by setting the environment variables AWS_DEFAULT_REGION, AWS_SECRET_ACCESS_KEY, AWS_ACCESS_KEY_ID with the value from Terraform User Setup in AWS
The AWS Command Line Interface (CLI) offers a straightforward method for copying files between S3 buckets, perfect for ad-hoc data transfer needs.
| Feature | Description |
|---|---|
| Simplicity | With just a single command, you can initiate the transfer. |
| Scripting | Easily integrate into scripts for automation. |
| Control | Offers parameters to control the copy process, such as recursive copying and inclusion/exclusion of specific files. |
| Terraform Code | https://github.com/entechlog/aws-examples/blob/master/aws-datasync/terraform/copy.tf |
This Terraform script automates the setup of a secure environment for copying files between S3 buckets across different AWS accounts. The process involves several key components:
IAM Roles and Policies: The script creates an IAM role (source_cross_account_role) in the source AWS account, designed to be assumed by entities in the destination account. This role is associated with a trust policy (source_cross_account_role_policy) that explicitly allows actions sts:AssumeRole, enabling the destination account to assume this role and perform actions in the source account under specified permissions.
Cross-Account Access: For the destination account to access resources in the source account, an IAM user (destination_cross_account_user) is created in the destination account along with access keys. This user is given a policy (destination_cross_account_assume_role_policy) that allows it to assume the source account’s IAM role, facilitating cross-account resource access.
S3 Bucket Setup: The script provisions two S3 buckets - one in each account (demo-source in the source account and demo-destination-copy in the destination account). It configures a bucket policy on the source bucket to permit the assumed role to perform operations like listing and copying objects.
Data Transfer Permissions: It also outlines specific permissions for copying data, including listing buckets and managing objects (s3:GetObject, s3:PutObject, etc.), ensuring that the destination account can only access and manipulate files as permitted by the source account’s policies.
File Uploads: To demonstrate the transfer capabilities, the script includes steps to upload sample files to the source S3 bucket. These files can then be copied to the destination bucket, showcasing the automated, secure transfer process enabled by the setup.
Create the necessary resources by executing the command terraform apply in your terminal. This will prompt Terraform to provision the resources defined in your configuration files.
Configure the AWS CLI Profile To facilitate cross-account operations, it’s essential to configure the AWS CLI with a profile capable of assuming a designated cross-account role. This setup involves editing the AWS configuration file, typically found at ~/.aws/config on Linux and macOS, or C:\Users\USERNAME.aws\config on Windows.
Example Configuration
[profile cross]
role_arn = arn:aws:iam::<DEV_ACCOUNT_ID>:role/<ROLE_NAME>
source_profile = <BASE_PROFILE>
region = <REGION>

[profile <BASE_PROFILE>]
aws_access_key_id = <YOUR_ACCESS_KEY_ID>
aws_secret_access_key = <YOUR_SECRET_ACCESS_KEY>
region = <REGION>
Testing the Profile To verify the cross-account profile’s setup, execute a test command using the AWS CLI to call an operation that necessitates valid credentials.
aws sts get-caller-identity --profile cross
aws s3 ls s3://<SOURCE_BUCKET_NAME> --profile cross
aws s3 ls s3://<SOURCE_BUCKET_NAME> --recursive --human-readable --summarize --profile cross
aws s3 sync s3://<SOURCE_BUCKET_NAME> s3://<DESTINATION_BUCKET_NAME> --profile cross
This Terraform-based approach streamlines the setup of IAM roles, policies, and S3 buckets, making it easier to manage secure, automated data transfers between AWS accounts. By leveraging AWS’s robust security features and Terraform’s automation capabilities, users can efficiently replicate or back up files across accounts with minimal manual intervention.
AWS DataSync is a data transfer service that simplifies, automates, and accelerates moving data between on-premises storage systems and AWS storage services, as well as between AWS storage services.
| Feature | Description |
|---|---|
| Automatic | Once set up, new and updated objects are automatically replicated. |
| Cross-Region | Supports replication to buckets in different AWS regions. |
| Versioning | Works with versioned objects to replicate all versions. |
| Terraform Code | https://github.com/entechlog/aws-examples/blob/master/aws-datasync/terraform/replication.tf |
This Terraform configuration facilitates the replication of objects between S3 buckets situated in potentially different AWS accounts, ensuring data consistency and availability. The process encompasses several crucial steps:
Establishing Replication Roles: The script initiates by creating an IAM role (source_replication_role) within the source account. This role is imbued with the trust policy to be assumed by the S3 service, specifically granting it the sts:AssumeRole action, thereby authorizing it to perform replication tasks.
Defining Access Permissions: It meticulously crafts an IAM policy (source_replication_policy_document) that delineates the permissions essential for replication. This includes permissions for handling object retention, versioning, and replication specifics such as s3:ReplicateObject and s3:ReplicateDelete, applied to both source and destination buckets. This policy ensures that the replication role has the necessary access to read from the source bucket and write to the destination bucket.
Policy Association: The defined IAM policy is then attached to the replication role, linking the role with its operational permissions.
Configuring Destination Bucket: A new S3 bucket is provisioned in the destination account (destination_s3_bucket_replication), intended to receive the replicated objects. This bucket is secured with a policy (destination_replication_bucket_policy) that permits the source account’s replication role to perform replication actions, ensuring a secure cross-account data transfer.
Activating Replication: Finally, the script configures the replication settings on the source bucket through the aws_s3_bucket_replication_configuration. This configuration specifies the rules for what objects are replicated (e.g., objects with a certain prefix), the destination bucket, and other options like storage class and replication of delete markers.
Create the necessary resources by executing the command terraform apply in your terminal. This will prompt Terraform to provision the resources defined in your configuration files.
To confirm that the replication setup is functioning correctly, simply observe that data is automatically duplicated between buckets. This process requires no further action once the initial configuration is complete.
By automating the replication setup, this Terraform script not only simplifies the process of duplicating S3 objects across accounts but also ensures a robust, secure, and efficient data redundancy strategy. It leverages AWS’s native replication features to guarantee that your data is consistently available where and when you need it, with minimal manual intervention.
S3 replication is an automatic mechanism to replicate data from one bucket to another. It’s ideal for data backup and redundancy across geographical locations.
| Feature | Description |
|---|---|
| Speed | Utilizes a multi-threaded architecture to achieve high-speed transfers. |
| Automation | Offers scheduling capabilities for recurring data transfer tasks. |
| Data Verification | Ensures data integrity with automatic checks both during and after the transfer. |
| Terraform Code | https://github.com/entechlog/aws-examples/blob/master/aws-datasync/terraform/datasync.tf |
This Terraform configuration automates the setup for seamless data transfers between S3 buckets using AWS DataSync, ensuring a structured and secure approach. The process involves several key components:
IAM Role Creation: Initiates by crafting an IAM role (source_datasync_role) in the source account, equipped with a policy that grants DataSync services the sts:AssumeRole permission. This role is pivotal for DataSync to access source S3 bucket data.
DataSync Read Access Policy: Establishes a policy (source_datasync_read_policy) defining read permissions on the source S3 bucket. This policy is essential for DataSync to fetch data from the source bucket, outlining actions like s3:GetObject and s3:ListBucket, ensuring DataSync can read the necessary data for transfer.
Policy Attachment: The read policy is then associated with the DataSync IAM role, aligning the role with its operational permissions for accessing source bucket data.
S3 Locations for DataSync: Specifies S3 locations for both source and destination, marking where data will be read from and written to. These locations are linked to their respective buckets and configured to use the previously created IAM role, enabling DataSync to interact with both buckets under the defined permissions.
DataSync Task Configuration: Configures a DataSync task (s3_datasync_task) that defines the actual data transfer process between the specified source and destination locations. This task includes transfer options like bandwidth limits and data validation settings, tailored to optimize the transfer according to specific requirements.
Logging and Monitoring: Optionally sets up CloudWatch logging for the DataSync task, enabling monitoring and logging of the data transfer process. This is facilitated through an additional IAM policy (datasync_logs_policy) that grants the DataSync role permission to log events to CloudWatch, offering visibility into the transfer operations.
Create the necessary resources by executing the command terraform apply in your terminal. This will prompt Terraform to provision the resources defined in your configuration files.
Start the DataSync task from the AWS Management Console and then verify the files in the target location to confirm successful data transfer.
By leveraging this Terraform script, users can efficiently set up a robust, secure, and automated data transfer pipeline between S3 buckets, capitalizing on AWS DataSync’s capabilities to handle large-scale data movements with ease. This setup not only simplifies the process of syncing data across AWS environments but also ensures that the transfer is performed under strict security and compliance standards, making it an ideal solution for businesses looking to automate their cloud data workflows.
AWS Lambda allows you to run code in response to triggers without provisioning or managing servers. A Lambda function can be triggered by S3 events (like object creation) to copy data from one bucket to another.
| Feature | Description |
|---|---|
| Event-Driven | Automatically responds to data changes in your S3 bucket. |
| Custom Logic | Allows for the implementation of custom logic during the copy process, such as file transformation. |
| Scalability | Automatically scales with the number of events. |
| Terraform Code | https://github.com/entechlog/aws-examples/blob/master/aws-datasync/terraform/lambda.tf |
This Terraform setup facilitates an automated process for copying data between S3 buckets using AWS Lambda, ensuring a responsive and efficient data handling mechanism. The configuration involves several pivotal steps:
Destination S3 Bucket Setup: Initiates by provisioning a destination S3 bucket (demo-destination-lambda) where the copied data will be stored. This setup underscores the target location for the data transfer operation.
Lambda Execution Role Creation: Establishes an IAM role (lambda_execution_role) that the Lambda function will assume. This role is endowed with an assume role policy that specifically grants the Lambda service (lambda.amazonaws.com) the sts:AssumeRole permission, thus authorizing it to perform operations on behalf of the user.
S3 Access and Logging Policies: Constructs IAM policies (s3_access and lambda_logging) that grant the Lambda function permissions to access S3 buckets and write logs to CloudWatch, respectively. These policies are essential for the Lambda function to interact with S3 for data retrieval and storage, as well as to log its operations for monitoring and debugging purposes.
Lambda Function Deployment: Deploys an AWS Lambda function (s3_copy_lambda) with the specified handler and runtime settings. The function is configured to access the source and destination S3 buckets, as outlined in its environment variables. This function is the core component that triggers the copying of data based on specified events (e.g., object creation in the source bucket).
S3 Bucket Notification Configuration: Sets up a notification configuration on the source S3 bucket to trigger the Lambda function whenever new objects are created. This event-driven approach ensures that data is copied in real-time, maintaining up-to-date synchronization between the source and destination buckets.
Lambda Execution Permissions: Grants explicit permission for the Lambda function to be invoked by S3 events, solidifying the link between the S3 event notification and the Lambda function’s execution.
Create the necessary resources by executing the command terraform apply in your terminal. This will prompt Terraform to provision the resources defined in your configuration files.
Upload a file with the specified suffix to the source S3 bucket to automatically trigger the Lambda function, then verify the target S3 bucket to confirm the data has been successfully copied.
By leveraging this Terraform script, users can automate the data copying process between S3 buckets with minimal manual intervention. This setup not only enhances data management efficiency but also capitalizes on the scalability and event-driven nature of AWS services, making it an optimal solution for dynamic data handling needs.
As we’ve explored the various methods to transfer data between S3 buckets, it’s clear that AWS provides a powerful toolkit for addressing a wide range of data management needs. Whether you’re looking for a quick ad-hoc solution with AWS CLI, an automated and recurring transfer with DataSync, a seamless replication strategy, or a custom event-driven approach using AWS Lambda, the right tool is at your disposal.
The key to optimizing your data transfer strategy lies in understanding the unique requirements of your data operations and the nuances of each method. By carefully considering factors such as data volume, transfer frequency, security requirements, and the need for automation, you can select and implement the most efficient and cost-effective approach.
Moreover, by leveraging Terraform to automate the setup and management of your data transfer tasks, you can achieve greater scalability, consistency, and reliability in your AWS environment. Automation not only saves time but also reduces the potential for human error, ensuring that your data operations run smoothly.
In conclusion, as you refine your data transfer strategies, remember to stay informed about the latest AWS features and best practices. The cloud landscape is ever-evolving, and staying ahead of the curve will empower you to make the most of your AWS investments. We hope this blog has provided you with valuable insights and the confidence to enhance your data transfer processes. Happy data moving !
Hope this was helpful. Did I miss something ? Let me know in the comments.
This blog represents my own viewpoints and not those of my employer. All product names, logos, and brands are the property of their respective owners.
Computers have been doing work for humans for decades. The fundamental loop has always been the same: a person has a …

As data platforms grow, one of the most expensive patterns is duplicating raw data across multiple storage engines. If …