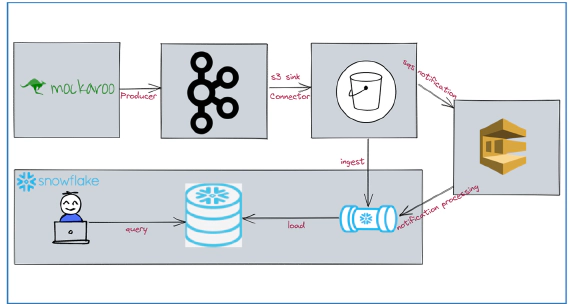
How To Stream Data From Kafka To Snowflake Using S3 and Snowpipe
In this article, we will see how to stream data from kafka to snowflake using S3 and Snowpipe. Code used in this article …

In this article, we will see how to use dbt with Snowflake. dbt (data build tool) does the T in ELT (Extract, Load, Transform) processes. It doesn’t extract or load data, but it is extremely good at transforming data that’s already loaded into your warehouse. Code used in this article can be found here. Download the directories dbt-docker and dbt-snowflake to get started.
dbt seed to load raw and reference tables just for demo purposes.dbt seed to load your raw layer, though it can be used to load simple reference tables. All other data ingestion to your RAW layer will happen outside dbt.Started this exploration by installing dbt manually on a Linux machine. The install had a few issues along the way due to the python version and other modules installed in the machine. Due to which I ended up using docker for consistency. I am listing the steps for both Linux and Docker, however I would recommend using docker if possible.
Install Python 3.8, As of this post dbt does not work with Python 3.9
sudo apt-get install python3.8 python3.8-dev python3.8-distutils python3.8-venv
If you have multiple versions of python, then you can run below commands to set the priority of each version and to select a version.
# Set Priority
sudo update-alternatives --install /usr/bin/python python /usr/bin/python3.8 1
sudo update-alternatives --install /usr/bin/python python /usr/bin/python2.7 2

# Select Python version
sudo update-alternatives --config python
Install pip
sudo apt-get install python3-pip
Validate python version
python --version
Install dbt
sudo pip install dbt
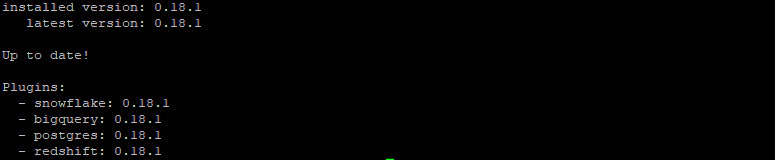
Validate dbt
dbt --version
To use dbt in docker, clone the dbt-examples repo and navigate into “dbt-docker” directory
git clone https://github.com/entechlog/dbt-examples.git
cd dbt-examples/dbt-docker
docker-compose.yml expects c drive to bind to docker, If you have different drive adjust the volume name
  volumes:
    - type: bind
      source: /C
      target: /c
docker-compose.yml will allow us to start and stop the containers using docker-compose up and docker-compose down commands. Start the services by running
docker-compose up --remove-orphans -d --build
Validate the status of docker containers
docker-compose ps
ssh into the container
docker exec -it dbt /bin/bash
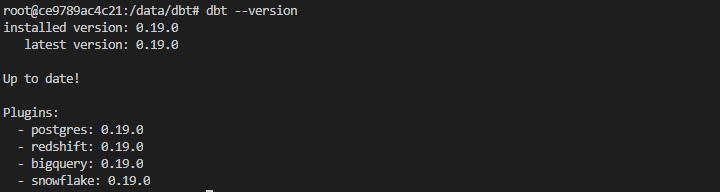
Validate dbt inside container
dbt --version
Login into Snowflake account and do the following steps to setup dbt user, roles and grants.
Create warehouse
USE ROLE SYSADMIN;

CREATE OR REPLACE WAREHOUSE DBT_WH
WITH
WAREHOUSE_SIZE = 'XSMALL'
WAREHOUSE_TYPE = 'STANDARD'
AUTO_SUSPEND = 60
AUTO_RESUME = TRUE
MIN_CLUSTER_COUNT = 1
MAX_CLUSTER_COUNT = 2
SCALING_POLICY = 'ECONOMY'
COMMENT = 'Warehouse for DBT';
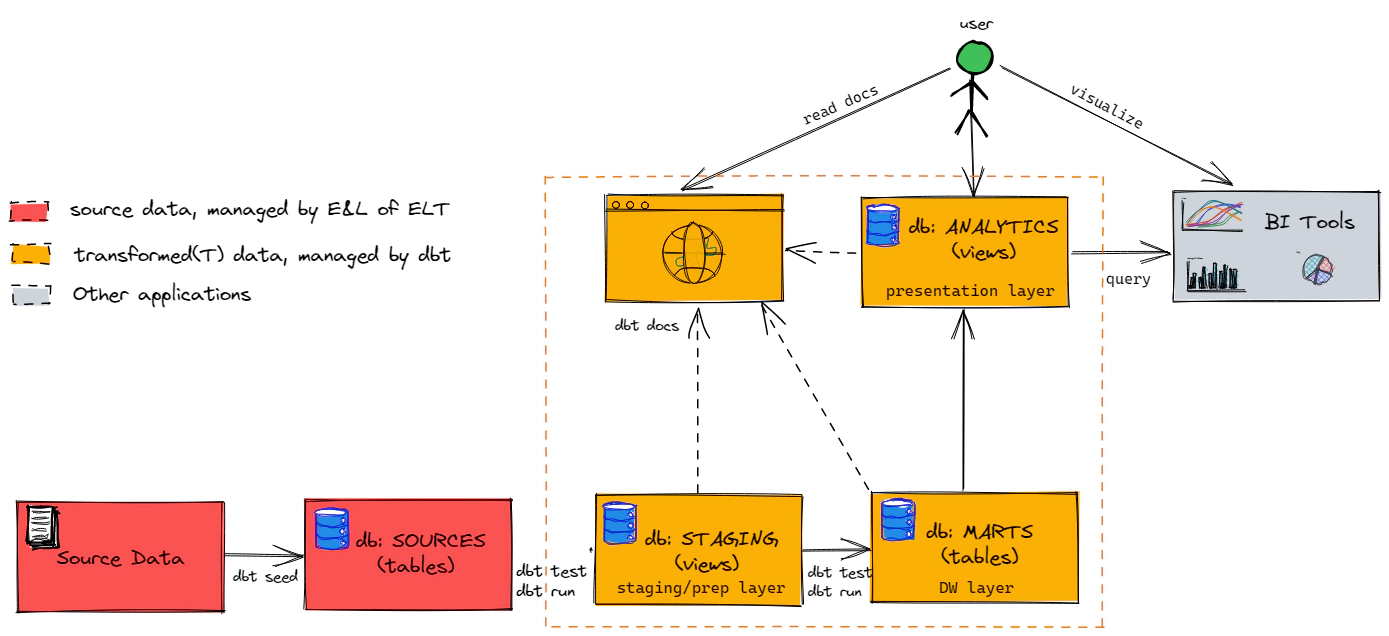
Create database for each layer/model. These layers can be schema OR databases based on STANDARDS which you follow. Click here for more details about the dbt structure best practices
Replace will delete the old database with the same name and create a new database. So be careful when running create database command with replace option
USE ROLE SYSADMIN;

CREATE OR REPLACE DATABASE DBT_DEMO_SOURCES;
CREATE OR REPLACE DATABASE DBT_DEMO_STAGING;
CREATE OR REPLACE DATABASE DBT_DEMO_MARTS;
✅ SOURCES———–> Database for raw incoming data from external sources
✅ STAGING———–> Database for heavy lift data processing. Aka prep area
✅ MARTS————-> Database for analytics layer to host dimensions and facts for a specific business area
Create required schema. Here we will create one schema for each sources in SOURCE and STAGING DB and one SCHEMA for each business area for the marts.
✅ SAKILA————> Schema for raw incoming data from Sakila Sample Database
✅ SAKILA————> Schema for cleansed data from Sakila Sample Database
✅ CORE————–> Schema to host all core dimensions and facts
USE ROLE SYSADMIN;

CREATE SCHEMA "DBT_DEMO_SOURCES"."SAKILA";
CREATE SCHEMA "DBT_DEMO_STAGING"."SAKILA";
CREATE SCHEMA "DBT_DEMO_MARTS"."CORE";
Create Role
USE ROLE USERADMIN;

CREATE OR REPLACE ROLE "DBT_ROLE";
Create User, Make sure to change the password to a complex one as per your needs
CREATE OR REPLACE USER DBT_USER PASSWORD = 'dbtuser'
  MUST_CHANGE_PASSWORD = FALSE
  DEFAULT_WAREHOUSE = DBT_WH
  DEFAULT_ROLE = DBT_ROLE;
Grant role to the user
GRANT ROLE "DBT_ROLE" TO ROLE "SYSADMIN";
GRANT ROLE "DBT_ROLE" TO USER "DBT_USER";
Grant warehouse usage access to role
USE ROLE SECURITYADMIN;

GRANT USAGE ON WAREHOUSE DBT_WH TO ROLE DBT_ROLE;

GRANT CREATE SCHEMA ON DATABASE "DBT_DEMO_SOURCES" TO DBT_ROLE;
GRANT CREATE SCHEMA ON DATABASE "DBT_DEMO_STAGING" TO DBT_ROLE;
GRANT CREATE SCHEMA ON DATABASE "DBT_DEMO_MARTS" TO DBT_ROLE;

GRANT ALL ON SCHEMA "DBT_DEMO_SOURCES"."SAKILA" TO DBT_ROLE;
GRANT ALL ON SCHEMA "DBT_DEMO_STAGING"."SAKILA" TO DBT_ROLE;
GRANT ALL ON SCHEMA "DBT_DEMO_MARTS"."CORE" TO DBT_ROLE;

GRANT USAGE ON ALL SCHEMAS IN DATABASE "DBT_DEMO_SOURCES" TO DBT_ROLE;
GRANT USAGE ON FUTURE SCHEMAS IN DATABASE "DBT_DEMO_SOURCES" TO DBT_ROLE;
GRANT USAGE ON ALL SCHEMAS IN DATABASE "DBT_DEMO_STAGING" TO DBT_ROLE;
GRANT USAGE ON FUTURE SCHEMAS IN DATABASE "DBT_DEMO_STAGING" TO DBT_ROLE;
GRANT USAGE ON ALL SCHEMAS IN DATABASE "DBT_DEMO_MARTS" TO DBT_ROLE;
GRANT USAGE ON FUTURE SCHEMAS IN DATABASE "DBT_DEMO_MARTS" TO DBT_ROLE;

GRANT SELECT ON ALL TABLES IN DATABASE "DBT_DEMO_SOURCES" TO DBT_ROLE;
GRANT SELECT ON FUTURE TABLES IN DATABASE "DBT_DEMO_SOURCES" TO DBT_ROLE;
GRANT SELECT ON ALL TABLES IN DATABASE "DBT_DEMO_STAGING" TO DBT_ROLE;
GRANT SELECT ON FUTURE TABLES IN DATABASE "DBT_DEMO_STAGING" TO DBT_ROLE;
GRANT SELECT ON ALL TABLES IN DATABASE "DBT_DEMO_MARTS" TO DBT_ROLE;
GRANT SELECT ON FUTURE TABLES IN DATABASE "DBT_DEMO_MARTS" TO DBT_ROLE;

GRANT SELECT ON ALL VIEWS IN DATABASE "DBT_DEMO_SOURCES" TO DBT_ROLE;
GRANT SELECT ON FUTURE VIEWS IN DATABASE "DBT_DEMO_SOURCES" TO DBT_ROLE;
GRANT SELECT ON ALL VIEWS IN DATABASE "DBT_DEMO_STAGING" TO DBT_ROLE;
GRANT SELECT ON FUTURE VIEWS IN DATABASE "DBT_DEMO_STAGING" TO DBT_ROLE;
GRANT SELECT ON ALL VIEWS IN DATABASE "DBT_DEMO_MARTS" TO DBT_ROLE;
GRANT SELECT ON FUTURE VIEWS IN DATABASE "DBT_DEMO_MARTS" TO DBT_ROLE;

GRANT MANAGE GRANTS ON ACCOUNT TO ROLE DBT_ROLE;
Review the grants
SHOW GRANTS ON SCHEMA "DBT_DEMO_SOURCES"."SAKILA";
SHOW GRANTS ON SCHEMA "DBT_DEMO_STAGING"."SAKILA";
SHOW GRANTS ON SCHEMA "DBT_DEMO_MARTS"."CORE";
SHOW GRANTS TO USER DBT_USER;
In this step we will connect dbt with Snowflake database.
If you have installed dbt locally on a Linux machine, create a new dbt project by running the command.
dbt init dbt-snowflake
dbt-snowflake after init is the name of the project, So it can be anything which is meaningfuldbt-snowflake folder and copy the content from this repoIf you are running dbt in docker, then navigate to the directory with dbt-snowflake
root@ce9789ac4c21:/data/dbt# cd /C/Users/nadesansiva/Downloads/dbt-examples-main/dbt-snowflake
root@ce9789ac4c21:/data/dbt# ls
README.md  analysis  assets  data  dbt_project.yml  docs  macros  models  packages.yml  profiles.yml.template  snapshots  snowflake  tests demo-artifacts
Make sure the macros, models and snapshots directories are empty to start with. We will copy the required content from demo-artifacts directory as needed during each section of this demo.
Find the path of dbt config profiles.yml by running
dbt debug --config-dir
To keep it simple, we will create the profiles.yml in same directory as the project
Create a copy of profiles.yml.template as profiles.yml
Edit the config and add Snowflake details. See here for more details. Here is the config for this demo, be sure to update the account id for your account
dbt-snowflake:
target: dev
outputs:
  dev:
    type: snowflake
    account: <your-snowflake-account>

    # User/password auth
    user: DBT_USER
    password: dbtuser

    role: DBT_ROLE
    database: DBT_DEMO_SOURCES
    warehouse: DBT_WH
    schema: DBT
    threads: 1
    client_session_keep_alive: False
dbt-set-profile from the project directory to let dbt know about this new profiles.yml location.dbt-set-profile is an alias for the command unset DBT_PROFILES_DIR && export DBT_PROFILES_DIR=$PWD.
Edit the dbt_project.yml to connect to the profile which we just created. The value for profile should exactly match with the name in profiles.yml
name: 'dbt_snowflake'
version: '0.1'
profile: 'dbt-snowflake'
source-paths: ["models"]
analysis-paths: ["analysis"]
test-paths: ["tests"]
data-paths: ["data"]
macro-paths: ["macros"]
snapshot-paths: ["snapshots"]

target-path: "target"
clean-targets:
    - "target"
    - "dbt_modules"
    - "logs"

models:
  dbt_snowflake:
      materialized: table
      staging:
        database: DBT_DEMO_STAGING
        schema: SAKILA
        materialized: view
      marts:
        database: DBT_DEMO_MARTS
        schema: CORE
        materialized: table
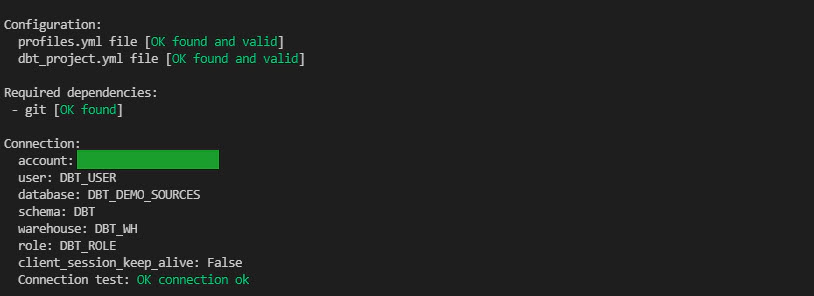
Validate the dbt profile and connection by running debug command from the dbt project directory.
dbt debug
We will use the mysql sakila db schema as source. See here for the source data model details.
Exported the tables as csv files and placed them in dbt/data folder. We will use the dbt seed command to load the data into Snowflake.
Before we start the seed lets update the dbt_project.yml route the data to raw schema. It will by default load to the schema specified in profiles.yml
seeds:
sakila_db:
  database: DBT_DEMO_SOURCE
  schema: raw # all seeds in this project will use the mapping schema by default
  sources:
    schema: sakila # seeds in the `data/sakila/ subdirectory will use the sakila schema
  lookups:
    schema: lookups # seeds in the `data/lookups/ subdirectory will use the lookups schema
Load raw tables
dbt seed
Load went fine, though data got loaded into DBT_SAKILA rather than SAKILA schema.

Even after specifying schema for seeds, dbt adds the default schema in profiles.yml as prefix. To change this behaviour we will override the code for dbt macro generate_schema_name with a custom macro of same name. Create a macro named generate_schema_name.sql and copy the below code. Read more about this here
You can copy the code from “dbt-snowflake\demo-artifacts\macros\utils” to “dbt-snowflake\macros\utils”
{% macro generate_schema_name(custom_schema_name, node) -%}
  {%- set default_schema = target.schema -%}
  {%- if custom_schema_name is none -%}
      {{ default_schema }}
  {%- else -%}
      {{ custom_schema_name | trim }}
  {%- endif -%}
{%- endmacro %}
Seeding the data again will load them to the right schema.

It’s safe to test the data in sources before loading data into staging and marts. We will create a file named src_<source>.yml (say src_sakila.yml) with the source definition, testing and documentation for source area.
You can copy the code from “dbt-snowflake\demo-artifacts\models\sources" to “dbt-snowflake\models\sources"
Here is an example for test specification in src_sakila.yml
version: 2

sources:
  - name: sakila
    tables:
      - name: actor
        columns:
          - name: ACTOR_ID
            tests:
              - dbt_expectations.expect_column_values_to_be_unique
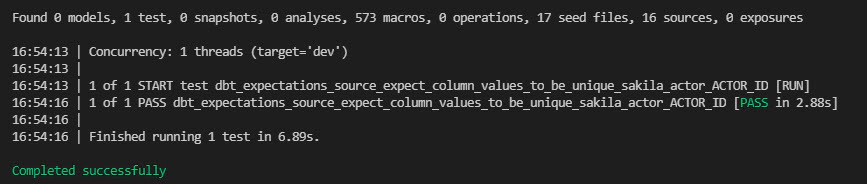
After we are ready with our source test, we can execute them by running
# Install packages
dbt deps
# Test all sources
dbt test --models source:*
# Test specific source model
dbt test --models source:sakila
dbt test --models source:lookups
Our goal is to create rental fact and related dimension as shown below. Here we will load staging, aka PREP area to prepare data for dim and facts. In dbt world transformation is done using model. Model is data transformation, expressed in a single SELECT statement. Read more about dbt models here
Models are in .sql files in models directory of dbt project, subdirectories are supported with in models directory.
Since most of the RAW tables are loaded by Extract and Load tools outside dbt, you need to define them as sources before using them. We have already defined the sources as part of source testing in src_sakila.yml and src_lookups.yml
Here is an example model .sql file for a prep object. We could either use ref or source function as we seeded the data, but to stay close to a real use case, we will use source function.
You can copy the code from “dbt-snowflake\demo-artifacts\models\staging" to “dbt-snowflake\models\staging"
with source as (
    -- select * from {{ ref('actor') }}
    select * from {{ source('raw', 'actor') }}
),

renamed as (
    select *
    from source
)

select * from renamed
After we are ready with our models, we can execute them by running
# Run all models
dbt run
# Run specific models by model name
dbt run --models stg_customer
# Run specific models by directory name
dbt run --models staging.*
Best practice is to create sub directories if we want to group certain runs together
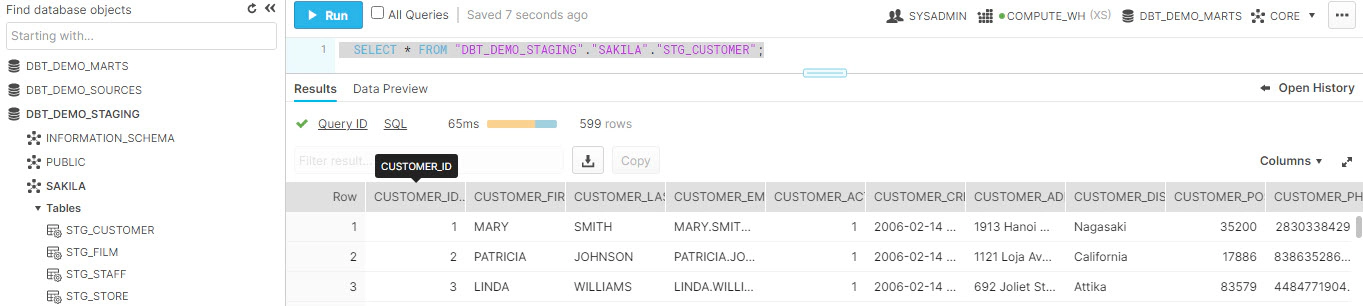
Validate the data in staging objects
SELECT * FROM "DBT_DEMO_STAGING"."SAKILA"."STG_CUSTOMER";
SELECT * FROM "DBT_DEMO_STAGING"."SAKILA"."STG_FILM";
SELECT * FROM "DBT_DEMO_STAGING"."SAKILA"."STG_STAFF";
SELECT * FROM "DBT_DEMO_STAGING"."SAKILA"."STG_STORE";
The next step is to load the marts and here we will see few options to load the marts. Just for the ease of understanding we will create the customer dimension in several ways(with different names).
Creating the model as tables is the simplest option, Here we will have to specify the materialized property of config as table. When using table materialization, models are rebuilt on each run, via create table as statement(CTAS).
{{ config(materialized='table') }}

SELECT *
FROM {{ ref('stg_customer') }} scus
You can copy the code from “dbt-snowflake\demo-artifacts\models\marts” to “dbt-snowflake\models\marts”
Create the model by running
dbt run -m dim_customer_table
Validate the definition in snowflake
select get_ddl('table', 'DBT_DEMO_MARTS.CORE.DIM_CUSTOMER_TABLE');
Validate the data in Snowflake
-- We should see 599 records
SELECT COUNT(*) as no_of_rec FROM "DBT_DEMO_MARTS"."CORE"."DIM_CUSTOMER_TABLE";
SELECT * FROM "DBT_DEMO_MARTS"."CORE"."DIM_CUSTOMER_TABLE";
Incremental model limits the amount of data thus reducing the runtime of transformations.
Specify the materialized property of config as incremental and these models are built as tables
{{
    config(
        materialized='incremental',
        incremental_strategy='delete+insert',
        unique_key='customer_id'
    )
}}

SELECT *
FROM {{ ref('stg_customer') }} scus

{% if is_incremental() %}
	HAVING scus.last_update > (select max(last_update) from {{ this }})
{% endif %}
Create the model by running (-d is to run in debug mode to see the full execution logs in CLI)
dbt -d run -m dim_customer_incremental
You should see following steps in the dbt run log
🚧 Create TEMPORARY table with HAVING clause to filter records based incremental condition
🚧 Delete from the TARGET table, since we have incremental_strategy as delete+insert
🚧 Insert into the TARGET table by selecting from the TEMPORARY table
Validate the definition in snowflake, output will be a create table statement
select get_ddl('table', 'DBT_DEMO_MARTS.CORE.DIM_CUSTOMER_INCREMENTAL');
Validate the data in Snowflake
-- We should see 599 records
SELECT COUNT(*) as no_of_rec FROM "DBT_DEMO_MARTS"."CORE"."DIM_CUSTOMER_INCREMENTAL";
SELECT * FROM "DBT_DEMO_MARTS"."CORE"."DIM_CUSTOMER_INCREMENTAL";

 -- Check the current max record in staging area and marts
select 'stg_customer' as table_name, max(last_update) as last_update from DBT_DEMO_STAGING.SAKILA.stg_customer
union
select 'DIM_CUSTOMER_TABLE' as table_name, max(last_update) as last_update from DBT_DEMO_MARTS.CORE.DIM_CUSTOMER_TABLE
union
select 'dim_customer_incremental' as table_name, max(last_update) as last_update from DBT_DEMO_MARTS.CORE.dim_customer_incremental

-- Check the record before update
SELECT * FROM DBT_DEMO_STAGING.SAKILA.stg_customer where CUSTOMER_ID = 1;
SELECT * FROM DBT_DEMO_MARTS.CORE.DIM_CUSTOMER_TABLE where CUSTOMER_ID = 1;
SELECT * FROM DBT_DEMO_MARTS.CORE.dim_customer_incremental where CUSTOMER_ID = 1;
Make some change in source table
-- Update the source table
 UPDATE DBT_DEMO_SOURCES.SAKILA.CUSTOMER
 SET EMAIL = 'dbt-demo@example.com', LAST_UPDATE = current_timestamp(2)
 WHERE CUSTOMER_ID = 1

-- Check the record after update, the staging area/view should have the updated information
SELECT * FROM DBT_DEMO_SOURCES.SAKILA.CUSTOMER where CUSTOMER_ID = 1;
SELECT * FROM DBT_DEMO_STAGING.SAKILA.stg_customer where CUSTOMER_ID = 1;
SELECT * FROM DBT_DEMO_MARTS.CORE.DIM_CUSTOMER_TABLE where CUSTOMER_ID = 1;
SELECT * FROM DBT_DEMO_MARTS.CORE.dim_customer_incremental where CUSTOMER_ID = 1;
Re-run the model and this time only the record which we changed will be picked up for processing
dbt -d run -m dim_customer_incremental
Validate the data
-- Check the record after update, the stage area/view and incremental table should have the updated information. The table should still have old email since we did not rerun the model yet
SELECT * FROM DBT_DEMO_SOURCES.SAKILA.CUSTOMER where CUSTOMER_ID = 1;
SELECT * FROM DBT_DEMO_STAGING.SAKILA.stg_customer where CUSTOMER_ID = 1;
SELECT * FROM DBT_DEMO_MARTS.CORE.DIM_CUSTOMER_TABLE where CUSTOMER_ID = 1;
SELECT * FROM DBT_DEMO_MARTS.CORE.dim_customer_incremental where CUSTOMER_ID = 1;
So this is an type-1(overwrite) Slowly Changing Dimension implementation
Snapshots are used to record changes to a mutable table over time. Snapshots are type-2(add new row) Slowly Changing Dimension
Code for snapshots should be placed inside snapshots directory in the dbt project
snapshots needs target_database and target_schema which can be specified in the configuration block of sql OR inside dbt_project.yml. In this example, updated dbt_project.yml with below block.
snapshots:
  sakila_db:
      marts:
        target_database: DBT_DEMO_MARTS
        target_schema: CORE
Snapshot sql(say snap_customer.sql) files are select statement inside snapshot block, config block for snapshots requires the following
⏩ unique_key
⏩ strategy can be timestamp OR check. updated_at is required for timestamp strategy and check_cols is required for check strategy
{% snapshot snap_customer %}

{{
    config(
      unique_key='customer_id',
      strategy='timestamp',
      updated_at='last_update',
      invalidate_hard_deletes=True,
    )
}}

select * from {{ ref('DIM_CUSTOMER_TABLE') }}

{% endsnapshot %}
You can copy the code from “dbt-snowflake\demo-artifacts\snapshots” to “dbt-snowflake\snapshots”
Create the snapshot by running
dbt snapshot -s snap_customer
Validate the definition in snowflake, output will be a create TRANSIENT table statement. In addition to the data attributes, the table definition will also have following dbt audit attributes
| Attribute Name | Description |
|---|---|
| DBT_SCD_ID | A unique key generated for each snapshotted record |
| DBT_UPDATED_AT | The updated_at timestamp of the source record when this snapshot row was inserted |
| DBT_VALID_FROM | The timestamp when this snapshot row was first inserted |
| DBT_VALID_TO | The timestamp when this row row became invalidated |
select get_ddl('table', 'DBT_DEMO_MARTS.CORE.SNAP_CUSTOMER');
Validate the data in Snowflake
-- We should see 599 records
SELECT COUNT(*) as no_of_rec FROM "DBT_DEMO_MARTS"."CORE"."SNAP_CUSTOMER";
SELECT * FROM "DBT_DEMO_MARTS"."CORE"."SNAP_CUSTOMER";

 -- Check the current max record in staging area and marts
select 'stg_customer' as table_name, max(last_update) as last_update from DBT_DEMO_STAGING.SAKILA.stg_customer
union
select 'DIM_CUSTOMER_TABLE' as table_name, max(last_update) as last_update from DBT_DEMO_MARTS.CORE.DIM_CUSTOMER_TABLE
union
select 'snap_customer' as table_name, max(last_update) as last_update from DBT_DEMO_MARTS.CORE.snap_customer

-- Check the record before update
SELECT * FROM DBT_DEMO_STAGING.SAKILA.stg_customer where CUSTOMER_ID = 1;
SELECT * FROM DBT_DEMO_MARTS.CORE.DIM_CUSTOMER_TABLE where CUSTOMER_ID = 1;
SELECT * FROM DBT_DEMO_MARTS.CORE.snap_customer where CUSTOMER_ID = 1;
Make some change in stage
-- Update the source table
 UPDATE DBT_DEMO_SOURCES.SAKILA.CUSTOMER
 SET EMAIL = 'dbt-demo@example.com', LAST_UPDATE = current_timestamp(2)
 WHERE CUSTOMER_ID = 1

-- Check the record after update, the view should have the updated information
SELECT * FROM DBT_DEMO_STAGING.SAKILA.stg_customer where CUSTOMER_ID = 1;
SELECT * FROM DBT_DEMO_MARTS.CORE.DIM_CUSTOMER_TABLE where CUSTOMER_ID = 1;
SELECT * FROM DBT_DEMO_MARTS.CORE.snap_customer where CUSTOMER_ID = 1;
Re-run the source table and snapshot
dbt run -m dim_customer_table
dbt snapshot -s snap_customer
Validate the data, we should see two records for the record which we updated
-- Stage, view and snapshot table should have the updated information now
SELECT * FROM DBT_DEMO_STAGING.SAKILA.stg_customer where CUSTOMER_ID = 1;
SELECT * FROM DBT_DEMO_MARTS.CORE.DIM_CUSTOMER_TABLE where CUSTOMER_ID = 1;
SELECT * FROM DBT_DEMO_MARTS.CORE.snap_customer where CUSTOMER_ID = 1;

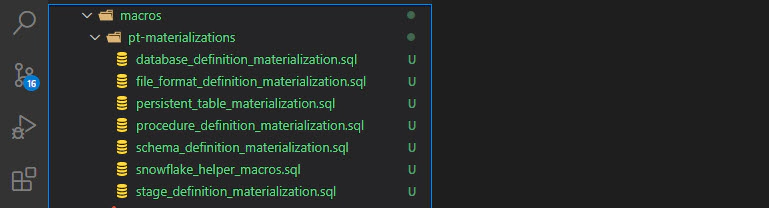
Materializations are responsible for taking a dbt model sql statement and turning it into a transformed dataset in a database. dbt does not support data description language (DDL), but can be made possible with custom materializations. Lets see one such custom materializations, Persistent Tables materialization. This materialization supports DDL, non destructive column add (CREATE OR REPLACE will drop the existing table, so Persistent Tables materialization works by creating a copy table and then copying the data back over after the changes)
Custom macros’s should be placed inside macros directory, its good to place them inside a sub folder for specific function
You can copy the code from “dbt-snowflake\demo-artifacts\macros\materializations-pt” to “dbt-snowflake\macros\materializations-pt”
Create sql file with DDL
{{
    config(materialized='persistent_table'
        ,retain_previous_version_flg=false
        ,migrate_data_over_flg=true
    )
}}

CREATE OR REPLACE TABLE "{{ database }}"."{{ schema }}"."dim_customer_materialization" (
    CUSTOMER_ID NUMBER(38,0),
	CUSTOMER_FIRST_NAME VARCHAR(100),
	CUSTOMER_LAST_NAME VARCHAR(100),
	CUSTOMER_EMAIL VARCHAR(100)
)
Create model by running
dbt -d run -m dim_customer_materialization --full-refresh
Validate the definition in snowflake, The definition should match the DDL statements in the model file
select get_ddl('table', 'DBT_DEMO_MARTS.CORE.DIM_CUSTOMER_MATERIALIZATION');
This enables us to use DDL with dbt, though this is an anti-pattern in dbt world
If we want to add a new column OR drop a column from an existing table, it’s not possible with incremental materialization unless we do a full refresh (This is changing soon with PR 3387). Not all tables can afford a full refresh for several reasons
⏩ Cost associated with full refresh based backfill
⏩ Source tables no longer has all the historical data required to do a full refresh based backfill
To solve this problem we will use vault_insert_by_period materialization. I have customized a bit further to add support for target database parameter and few other cosmetic logic changes. Click here for the original code
Since all of the source records which we have used in this demo has the same last updated date, to have some data for backfills scenario we will run below sql
UPDATE DBT_DEMO_SOURCES.SAKILA.CUSTOMER
SET EMAIL = 'dbt-demo@example.com', LAST_UPDATE = current_timestamp(2)
WHERE CUSTOMER_ID = 1
Create a new model sql file, say dim_customer_insert_by_period.sql with below code, This materialization requires
| period | granularity of the load (hour, day, month, year) |
|---|---|
| timestamp_field | column name for time stamp field which should be used for filtering data |
| start_date | dates to control the load range |
| stop_date | dates to control the load range |
{{
 config(
   materialized = "vault_insert_by_period",
   period = "year",
   timestamp_field = "last_update",
   start_date = "2006-01-01",
   stop_date = "2021-01-01",
 )
}}

WITH stage
AS (
 SELECT CUSTOMER_ID,
 	CUSTOMER_FIRST_NAME,
 	CUSTOMER_LAST_NAME,
 	CUSTOMER_EMAIL,
 	LAST_UPDATE
 FROM {{ ref('stg_customer') }}
 WHERE __PERIOD_FILTER__
 )

SELECT *
FROM stage
Run the model
dbt -d run -m dim_customer_insert_by_period
Now, lets add a new column to the model by running below sql. Idea here is to manage the DDL’s outside dbt in a DCM(Database Change Management) tool like sqitch/schemachange
ALTER TABLE "DBT_DEMO_MARTS"."CORE"."DIM_CUSTOMER_INSERT_BY_PERIOD"
ADD COLUMN CUSTOMER_DISTRICT VARCHAR DEFAULT NULL;
Validate the data in snowflake
Update the start_date and stop_date in dim_customer_insert_by_period.sql and add the new column CUSTOMER_DISTRICT in the source query
   {{
     config(
       materialized = "vault_insert_by_period",
       period = "year",
       timestamp_field = "last_update",
       start_date = "2021-01-01",
       stop_date = "2021-07-01",
     )
   }}

   WITH stage
   AS (
   	SELECT CUSTOMER_ID,
   		CUSTOMER_FIRST_NAME,
   		CUSTOMER_LAST_NAME,
   		CUSTOMER_EMAIL,
   		LAST_UPDATE,
   		CUSTOMER_DISTRICT
   	FROM {{ ref('stg_customer') }}
   	WHERE __PERIOD_FILTER__
   	)

   SELECT *
   FROM stage
stop_date should be greater than or equal to current date
Run the model
dbt -d run -m dim_customer_insert_by_period
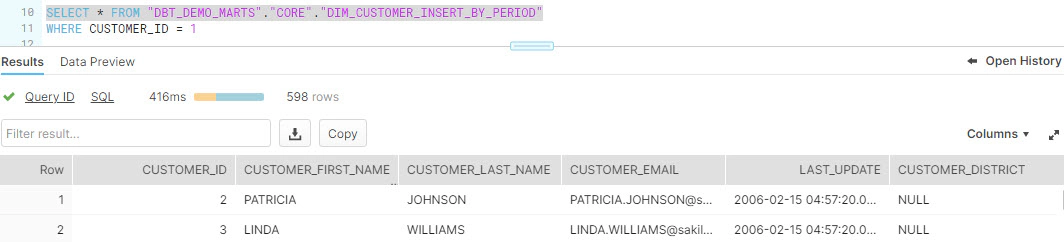
Validate the data in snowflake, As you could see this run just loaded the one record which for the period mentioned in start and stop date.
SELECT * FROM "DBT_DEMO_MARTS"."CORE"."DIM_CUSTOMER_INSERT_BY_PERIOD"
WHERE CUSTOMER_ID = 1
Next step is to integrate the start and end date as a parameter from airflow and to add delete logic always before the load to have better handle on loads for a specific period.
A good process of software reuse leads to enhance the reliability, productivity, quality and the reduction of time and cost. In dbt, reusability comes in the form of packages. You can find all dbt packages in dbt hub
Create packages.yml at the same level as dbt_project.yml and update it with the required package details. The one I am more interested about during this exploration is dbt_expectations, this allows dbt users to deploy Great Expectations like data testing without needing additional integration with Great Expectations.
packages:
  - package: fishtown-analytics/dbt_utils
    version: 0.6.4
  - package: calogica/dbt_expectations
    version: 0.2.2
  - package: fishtown-analytics/codegen
    version: 0.3.1
  - package: yu-iskw/dbt_airflow_macros
    version: 0.2.2
  - package: Datavault-UK/dbtvault
    version: 0.7.3
To install packages, run dbt deps
dbt has two type of tests, schema tests and data tests
Schema tests are configured as YAML inside the schema.yml file. Schema test returns 0 when successful.
Data test is a select statement inside tests directory. Data test returns 0 records when successful.
Here is a sample configuration file say stg_sakila.yml for doing schema test using the default dbt tests unique, not_null and dbt_expectations test expect_column_values_to_be_unique
 models:
   - name: customer
     columns:
       - name: customer_id
         tests:
           - unique
           - not_null
           - dbt_expectations.expect_column_values_to_be_unique
To execute tests, run dbt test
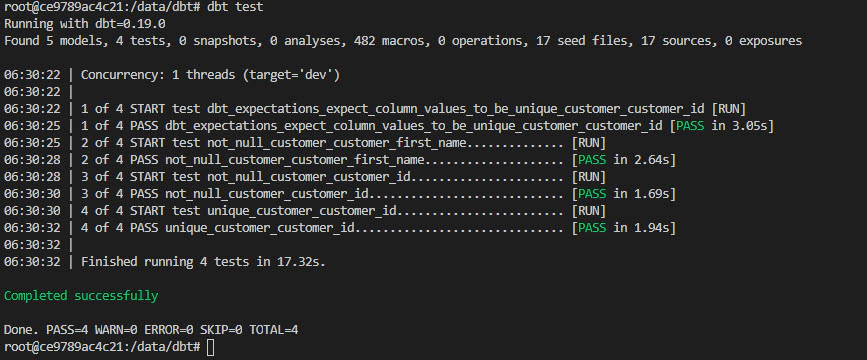
Currently the test runs after model creation and persisting the changes, there is a ticket open to do test after model creation but persist changes only if test passes. See more details about this here
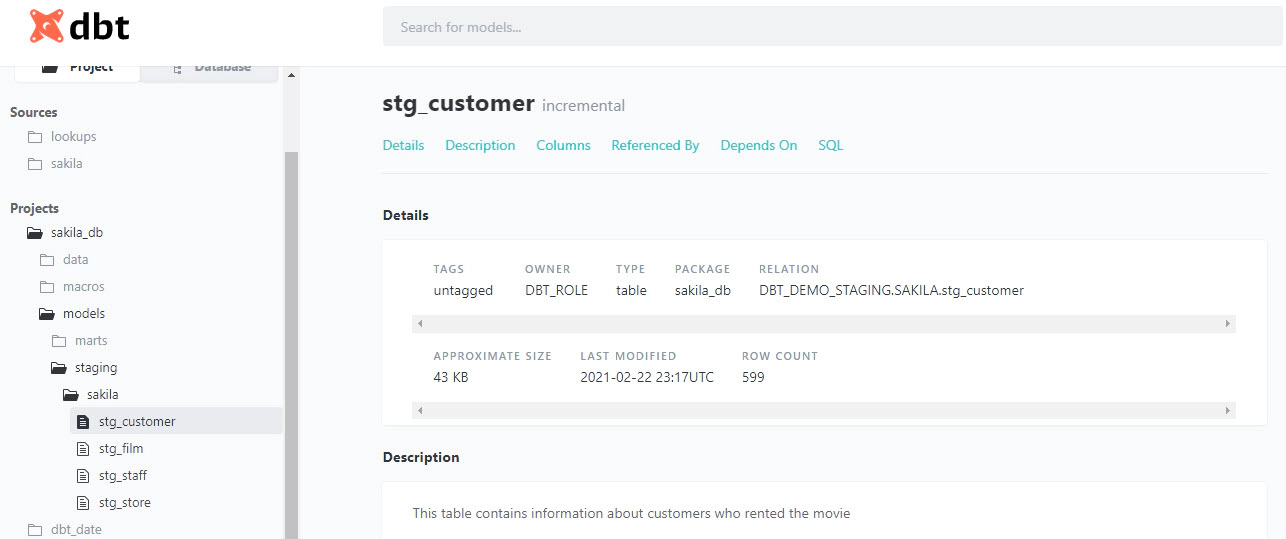
dbt provides way to generate documentation and to publish them as a website.
You can add descriptions to models, columns, sources in the schema.yml. Here is an example
models:
- name: customer
  description: This table contains information about customers who rented the movie
  columns:
    - name: customer_id
      description: This is a unique identifier for customer
dbt also supports docs block using the jinja docs tag, to add docs block
⏩ Update dbt_project.yml to add the following
docs-paths: ["docs"]
asset-paths: ["assets"]
⏩ Create .md file with required information inside docs directory and place the supporting images in assets directory. Example would be overview.md file with __overview__ block which overrides the default overview and creates custom overview page
{% docs __overview__ %}
# Exploring Dbt With Snowflake
In this article, we will see how to use dbt with Snowflake.

{% enddocs %}
⏩ Another example would be to film.md and update it with details about films table
{% docs film_overview %}

This table contains information about films.

{% enddocs %}
⏩ Update schema.yml to add the doc() function to reference the docs name, which is film_overview in this example
- name: film
  description: '{{ doc("film_overview") }}'
You can generate documents by running dbt docs generate.
Generated documents can be published by running dbt docs serve --port 8085. This will publish the documents locally.
Its advisable to run dbt run before generating documents. Read more about order of execution here. So the order of execution would be
dbt deps
dbt seed
dbt run
dbt test
dbt docs generate
dbt docs serve
It’s not mandatory to add entry for each column in schema.yml, but the documentation would be good as details in your schema.yml. So it’s recommended to add detailed information and to follow some standards for schema.yml.
Documents can be also hosted on s3 as a static site. Click here for documents generated from this demo. Here are the high level steps to host dbt docs in s3
⏩ Create s3 bucket
⏩ Update s3 bucket policy to allow read access
{
    "Version": "2012-10-17",
    "Statement": [
        {
            "Sid": "PublicReadGetObject",
            "Effect": "Allow",
            "Principal": "*",
            "Action": "s3:GetObject",
            "Resource": "arn:aws:s3:::dbt.entechlog.com/*"
        }
    ]
}
⏩ Enable Static website hosting
⏩ Upload the contents from target/ directory of dbt project to the s3 bucket.
Hope this was helpful. Did I miss something? Let me know in the comments and I’ll add it in!
docker container ls -adocker-compose downdocker-compose down --volumesdocker rm $(docker ps -q -f status=exited)dbt clean
In this article, we will see how to stream data from kafka to snowflake using S3 and Snowpipe. Code used in this article …
In this article, we will see how to integrate Kafka connect with Amazon Managed Streaming for Apache Kafka (MSK). Code …