
How To Connect Google Domain to Route 53
In this article, we will see the steps to connect your custom google domain with AWS Route 53. This article was written …


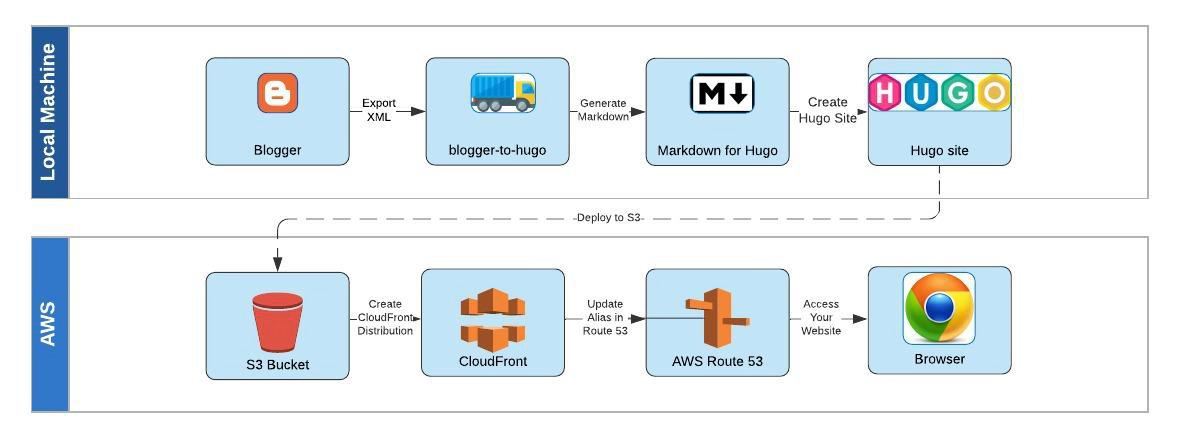
I have been hosting my blog in Google Blogger for a long time. It is still one of the easy ways to host blogs without having to spend on monthly fees (apart from the domain fees, if you need a custom domain). Working in AWS tools and technology gave me this idea of migrating my blog from Blogger to AWS. In this article, we will see the steps to migrate blogs from Google Blogger to Hugo and host in AWS using S3, CloudFront, Certificate Manager and Route 53.
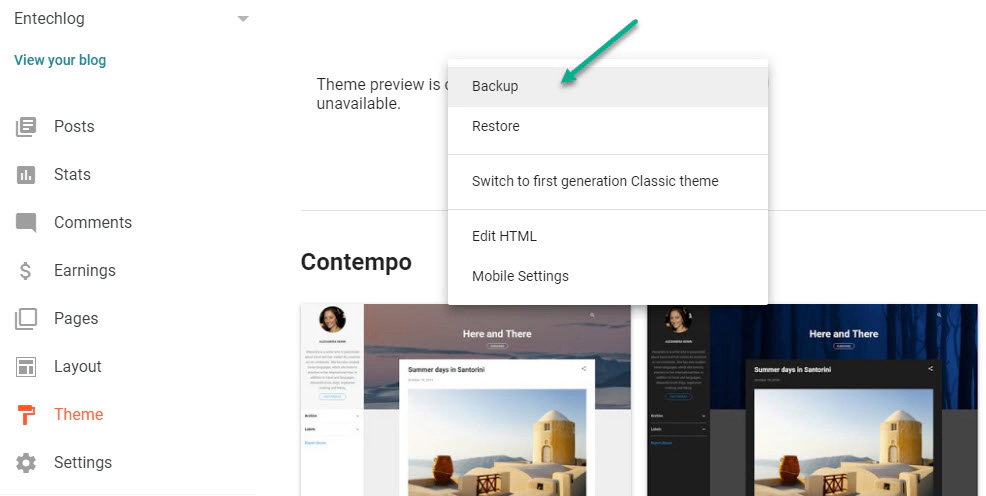
Login into blogger at www.blogger.com
Click Theme –> ... in My Theme —> Backup –> Download
Use a Blogger Migration tool like blogger-to-hugo to generate .md files required for Hugo. I used blogger-to-hugo for my migration. Download blogger-to-hugo
Install blogger-to-hugo
cd C:\Users\admin\Downloads\petraszd-blogger-to-hugo-5ee6b9cea64b\petraszd-blogger-to-hugo-5ee6b9cea64b
python setup.py install
Run blogger-to-hugo, This needs path for input xml file and output folder
blogger-to-hugo C:\Users\admin\Downloads\blog-05-09-2020.xml C:\Users\admin\Downloads\blog-05-09-2020
Target folder will have the required .md file. Review them carefully for any errors. I had to go over each .md file to clear errors. Review can wait until we install Hugo and test them, since at this point we may not know if we have any errors
Install Hugo for your platform, See https://gohugo.io/getting-started/installing/ for more details. Here are the steps to install Hugo in windows
Open PowerShell and issue command
choco install hugo -confirm
Install hugo-extended version
choco install hugo-extended -confirm
Test the installation
hugo version
Create a new directory (say HugoProject) for all Hugo projects in a location you prefer
mkdir HugoProject
Navigate to HugoProject
cd C:\Users\admin\HugoProject
Create a new site using below command. This will create a directory structure with all required folders for the new site
hugo new site www.example.com-hugo-theme-console
Successful creation will give below message
Congratulations! Your new Hugo site is created in C:\Users\admin\HugoProject\www.example.com-hugo-theme-console.

Just a few more steps and you're ready to go:

1. Download a theme into the same-named folder.
   Choose a theme from https://themes.gohugo.io/ or
   create your own with the "hugo new theme <THEMENAME>" command.
2. Perhaps you want to add some content. You can add single files
   with "hugo new <SECTIONNAME>\<FILENAME>.<FORMAT>".
3. Start the built-in live server via "hugo server".

Visit https://gohugo.io/ for quickstart guide and full documentation.
PS C:\Users\admin\HugoProject>
Navigate to the directory of new hugo site
cd www.example.com-hugo-theme-console
Initialize git
git init
Download and install theme from https://themes.gohugo.io/. You can select the theme which you like
mkdir themes

cd themes

git submodule add https://github.com/mrmierzejewski/hugo-theme-console.git hugo-theme-console
Set theme parameter in your config file
theme = "hugo-theme-console"
Copy the contents from themes\<theme-name>\exampleSite to hugo site folder www.example.com-hugo-theme-console
Make changes to .md files in \content as per your requirements. You can also create new posts using command
hugo new posts/my-first-post.md
Copy the output from blogger-to-hugo to \content\posts folder.
Start Hugo server and validate your site locally
hugo server --disableFastRender --buildDrafts
Login into your AWS Management Console and go to AWS S3. Create an S3 bucket with the name same your full domain name, say www.example.com. Remember to replace example.com with your domain name. This is applicable for all the steps in this article.
Create Hugo Deployment target in config.toml for S3
[[deployment.targets]]
# Name for this target.
name = "www.example.com-S3"
URL = "S3://www.example.com/?region=us-east-1"
Build hugo using below command. This will create public folder with all static files
hugo
Deploy files to S3 using below command. Make sure your machine has AWS CLI access before running this command. See Quickly configuring the AWS CLI for more details on how to configure AWS CLI
hugo deploy
In Amazon S3 –> Select the bucket www.example.com –> Permissions –> Block public access and turn off Block all public access
In Amazon S3 –> Select the bucket www.example.com –> Permissions –> Bucket Policy –> Add below policy
{
    "Version": "2012-10-17",
    "Statement": [
        {
            "Sid": "PublicReadGetObject",
            "Effect": "Allow",
            "Principal": "*",
            "Action": "S3:GetObject",
            "Resource": "arn:aws:S3:::www.example.com/*"
        }
    ]
}
Login into your AWS Management Console and go to AWS S3
In Amazon S3 –> Select the bucket www.example.com –> Properties –> Static website hosting –> Use this bucket to host a website
Make sure to update the “Index document” name. In most cases it will be index.html
Login into your AWS Management Console and go to Route 53
In Route 53 –> Click Hosted zones – > Click Create Hosted Zone
Fill in naked domain name (without www, so it will be example.com) and select Type as Public Hosted Zone and click on create
Login into your AWS Management Console and go to Certificate Manager
In Certificate Manager –> Click Request certificate –> Request a public certificate –> Here add 3 entries, one for full domain name www.example.com, one for naked domain name example.com and one for wild card domain name *.example.com –> Click DNS validation –> Review –> Confirm and request
In Certificate Manager –> Click the certificate for www.example.com –> Expand the Domain table –> Click on Create record in Route 53 on all 3 entries (full domain, naked domain and wild card domain)
This should add a CNAME (Canonical Name record is a type of resource record in the Domain Name System which maps one domain name to another) record in the Hosted Zone.
We should wait for “Pending validation” status in Certificate Manager to change to “Success” before proceeding to next steps. This could take 24-48 hours, please see https://aws.amazon.com/premiumsupport/knowledge-center/acm-certificate-pending-validation/ for more details
Copy the endpoint from static webhosting and use it to create a new CloudFront distribution. Remember here “Origin Domain Name” should the endpoint from static webhosting of S3 and not the S3 bucket itself.
Select Redirect HTTP to HTTPS in Viewer Protocol Policy
Select Yes in Compress Objects Automatically
Fill Alternate Domain Names (CNAMEs) with full domain name www.example.com
Select Custom SSL Certificate (example.com): in SSL Certificate and select the certificate which was created in “Step 5: Create public certificate for your domain”
Fill Comment with full domain name www.example.com
Click on Create Distribution
After CloudFront distribution creation is complete, Copy the Domain Name from CloudFront distribution

Go to Route 53 –> Click on Hosted zones –> Click on the Hosted zone which we created
Add a record set for the full domain name www.example.com
| Name | www |
|---|---|
| Type | A |
| Alias | Yes |
| Alias Target | Domain name from CloudFront distribution |
| Routing Policy | Simple |
| Evaluate Target Health | No |
You domain www.example.com should be live in about 30 minutes. Please read How To redirect naked domain to full domain in AWS to setup naked domain for your blog.
In this article, we will see the steps to connect your custom google domain with AWS Route 53. This article was written …
This article explains the steps required to make AWS CLI call from local machine using federated login. Steps described …